2 Stück
CT-IN-18 Doppelpunkt-Röhren
(Trennzeichen)
incl. Befestigungs-Gummi und blauer Bodenbeleuchtung
Bitte
vergessen Sie nicht den Nocrotec Shop zu besuchen für andere Versionen dieser
Röhren!/
Please don't forget to visit the Nocrotec Shop for other
versions of these tubes!
For English text:
Please see below!
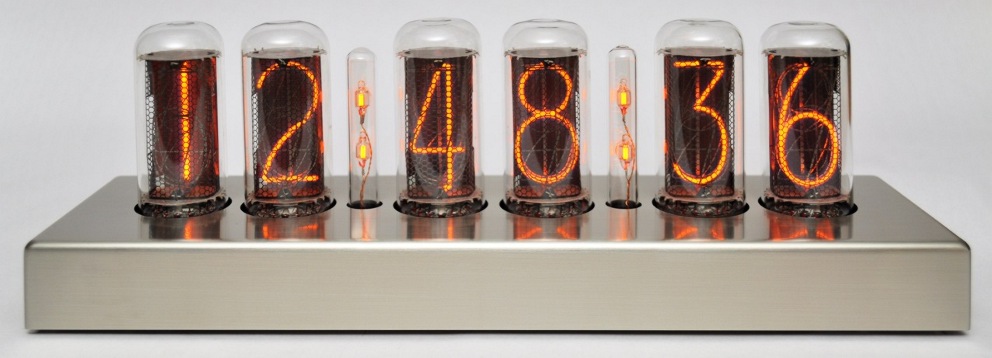
Anwendungsbeispiel!
Hinweis: Das Uhren-Gehäuse und die IN-18 Nixie
Röhren sind nicht Bestandteil dieses Angebots!
(IN-18 Nixie Röhren und Fassungen finden sie
in meinen anderen Auktionen!)
Dieses
Angebot enthält 2
wunderschöne, neue, CT-IN-18 Doppelpunkt-Röhren,
2 Befestigungs-Gummi und
2 blaue LEDs (Farbe gleich wie in meinen
IN-18 Auktionen)
für die Bodenbeleuchtung als Set wie hier gezeigt:
|
2× |
= |

|


|
Lieferumfang: |
|
Dieses Set passt optimal zu den IN-18 Nixie Röhren
in meinen anderen Auktionen!
Aber auch für andere ähnliche Röhren (mit Ziffernhöhe 30-50 mm) sind diese
Doppelpunkt-Röhren hervorragend geeignet.
Z.B.:
7031, 7032, 7037, B566M, B-7031, B-7032, B-7037, CD94, CD94/GR-211, CV8090,
F9090, F9090A, GA12, GR10G, GR10J, GR10J/F, GR-211, LC-631, NL-7037, NL-7038,
NL-934, Z5220M, Z522M, Z5660M, Z566M, Z5680M, Z568M, ZM1040, ZM1040T, ZM1042,
ZM1042/01, ZM1220, ZM1222.
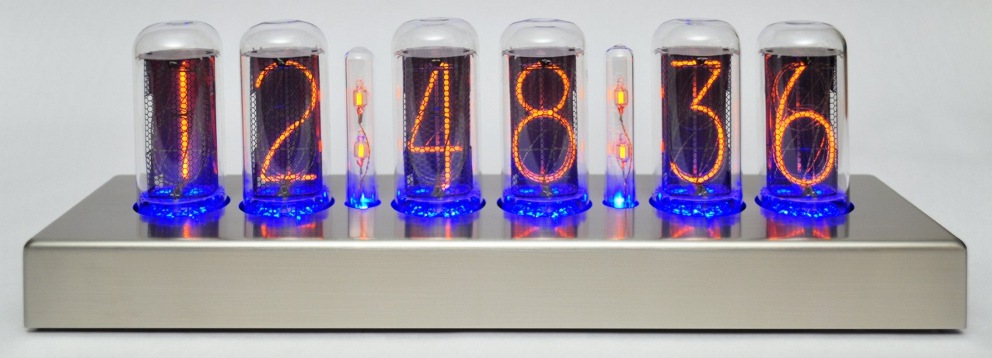
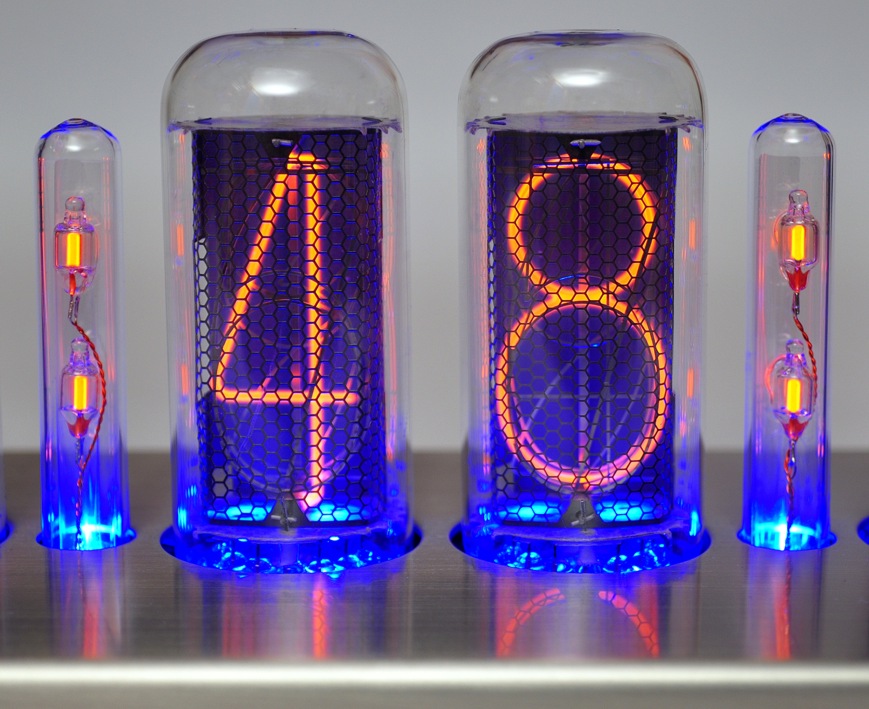
Die Doppelpunkt-Röhren bieten die Möglichkeit die mitgelieferten LEDs an der Röhre anzubringen um den sehr beeindruckenden Bodenbeleuchtungs-Effekt zu erzeugen.
 ohne Bodenbeleuchtung |
|
|
|
|
Sie können
anstatt den mitgelieferten blauen LEDs natürlich auch andere LEDs verwenden.
Sie finden hier die technischen
Daten und Montagehinweise der Röhren als PDF-File (6 MB).
|
Hier sehen sie die Zeichnung der Doppelpunkt-Röhren CT-IN-18: |
|
Hinweise:
|

Technische Daten der
Doppelpunktröhre CT-IN-18:

|
Röhrentyp |
|
CT-IN-18 |
|
Abmessungen |
|
siehe Zeichnung |
|
Brennspannung |
Udrop |
59 V |
|
Empfohlender Vorwiderstand bei 170 V |
RV |
180 kΩ |
|
Betriebsstrom nominal |
I |
0,6 mA |
|
|
|
|
|
Anschlussbelegung |
|
Anschluss |
|
blauer Draht |
|
hintere obere Elektrode (+) |
|
roter Draht |
|
hintere untere Elektrode (+) |
|
schwarzer Draht |
|
vordere obere Elektrode (-) |
|
grüner Draht |
|
vordere untere Elektrode (-) |
Montagehinweise und Bodenbeleuchtung der Doppelpunkt-Röhre CT-IN-18
Für die Montage der Doppelpunkt-Röhre verwenden Sie
den beiliegenden Montagegummi. Sie können den Gummi in eine Bohrung in eine
Platine einbauen oder in eine Montageplatte.
Hier ein Beispiel (Platine):


Nach der Montage des Gummis schieben Sie die Doppelpunkt-Röhre von unten in den
Gummi. Beachten Sie dazu die Zeichnung oben "Zeichnung der Doppelpunkt-Röhre
CT-IN-18". Anschließend nehmen Sie den Anschluss vor:


Wenn Sie für die Doppelpunkt-Röhren eine
Bodenbeleuchtung mit LEDs verwenden wollen, bringen Sie eine LED vorne (an der
Sichtseite) am Glas an. Beleuchten Sie die
Doppelpunkt-Röhren NICHT von hinten! Hier empfiehlt es sich die LEDs
direkt auf die Platine zu Löten. Falls sie keine Platine sondern eine
Montageplatte verwenden, können sie die LEDs darauf festkleben oder sich eine
entsprechende Halterung bauen.
Hier sehen Sie ein Beispiel für die Bodenbeleuchtung der Doppelpunktröhren:

Die Punkte können natürlich einzeln geschalten werden, sodass nicht nur ein
Doppelpunkt sondern auch die Punkte einzeln (z.B. für das Datum) dargestellt
werden können:
2 Punkte an:


1 Punkt an:


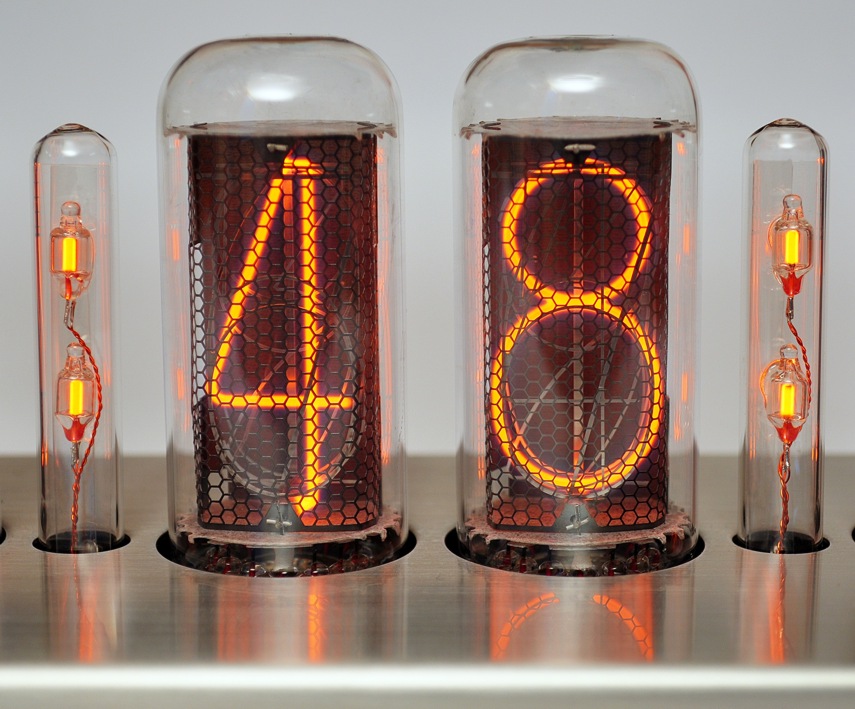
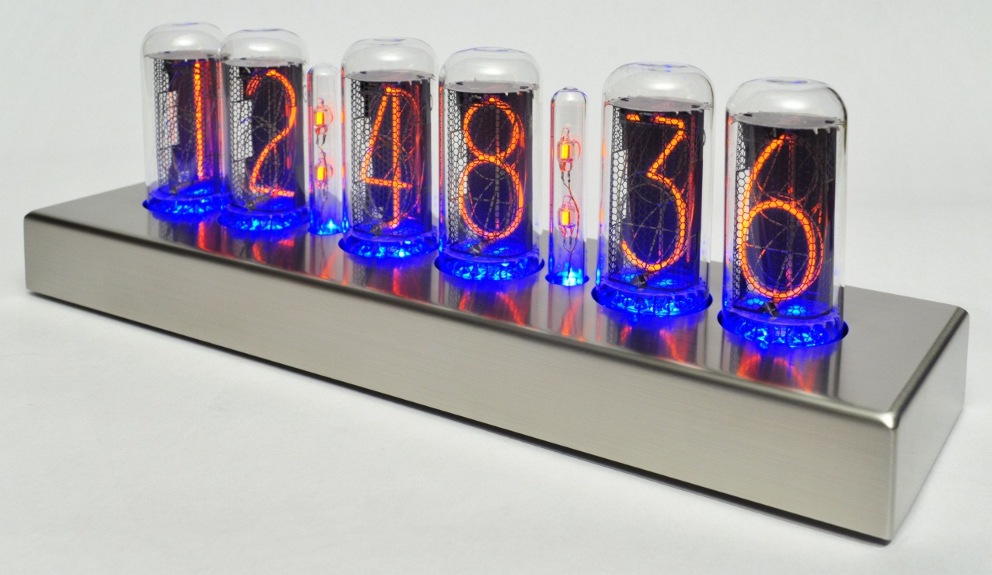
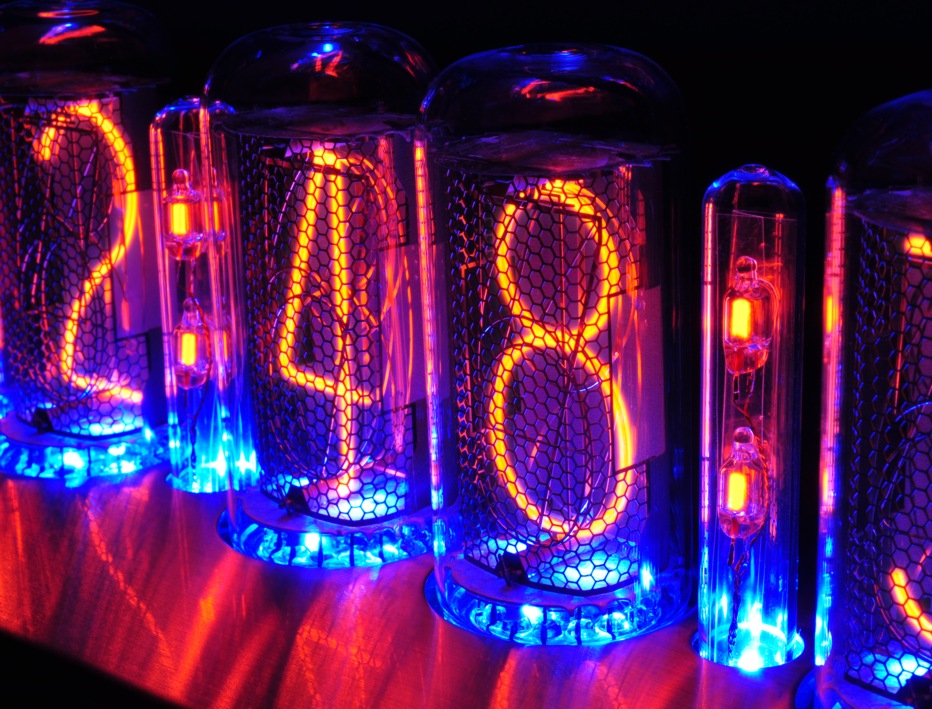
Anwendungsbeispiel: Die IN-18 Blue Dream Nixie Clock -
Als Bausatz hier zu finden!
Auf den nächsten Bildern sehen Sie als Beispiel die IN-18 Blue Dream
Nixie Uhr in ein wunderschönes Edelstahlgehäuse eingebaut.
Der Fantasie für das Gehäuse sind natürlich keine Grenzen gesetzt. Viel Spaß
beim Bauen!
Hinweis: Das in den
folgenden Bildern abgebildete Uhren-Gehäuse und die Nixie-Röhren sind nicht
Bestandteil dieses Angebots!


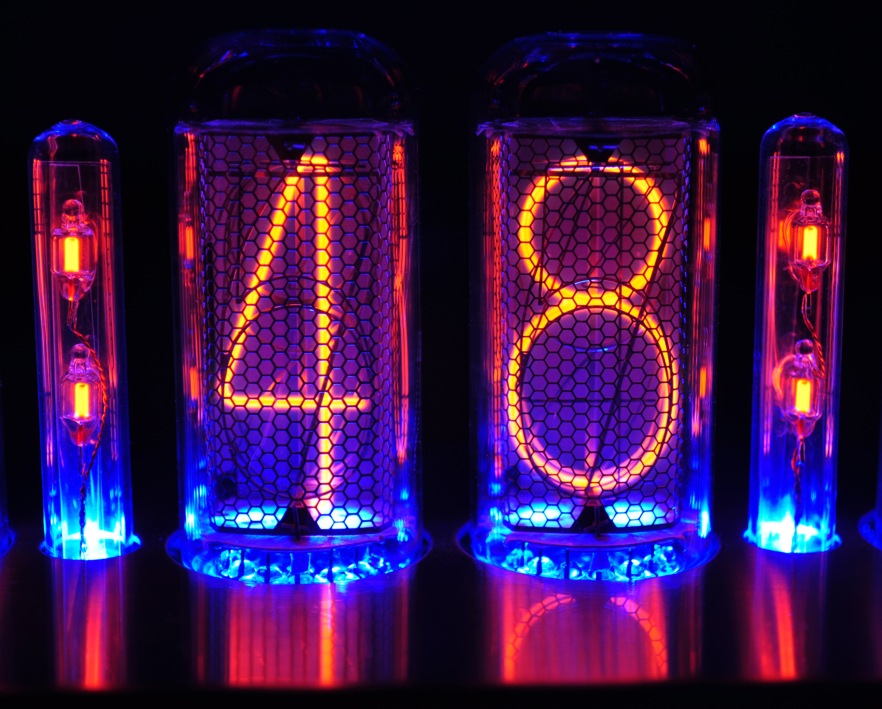
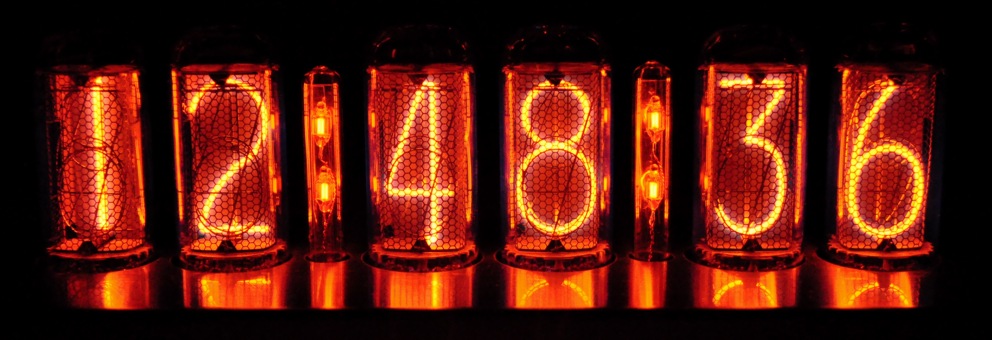
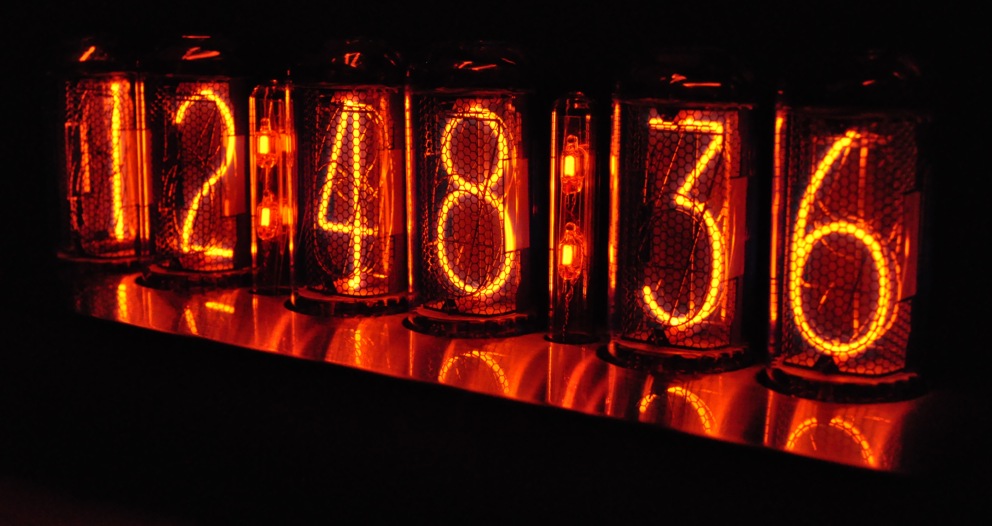
Die Uhr mit blauer Bodenbeleuchtung eingeschaltet:

Die Uhr bei
Nacht:


Hinweis: Das in den vorausgehenden Bildern
abgebildete Uhren-Gehäuse und die Nixie-Röhren sind nicht Bestandteil dieses
Angebots!
Viel Spaß beim
Bieten!
ENGLISH TEXT:
Please don't
forget to visit the Nocrotec Shop for other versions of these tubes!
2
pcs. CT-IN-18 Colon Tubes
(Separators)
incl. mounting rubber and blue floor lighting
Example of
use! Remark: The Nixie clock case and IN-18 Nixie
tubes are not part of this offer!
(You will find Nixie tubes at
my other listings!)
This offer includes 2 wonderful, new,
CT-IN-18 colon tubes,
2 mounting rubbers and 2 blue
LEDs for the floor lighting as shown here:
|
2× |
= |
|
|
Scope of delivery: |
|
This set fits perfect to the
IN-18 tubes
at my other listings!
but also for similar tubes (with digit heigth 30-50 mm).
For example:
7031, 7032, 7037,
B566M, B-7031, B-7032, B-7037, CD94, CD94/GR-211, CV8090, F9090, F9090A, GA12,
GR10G, GR10J, GR10J/F, GR-211, LC-631, NL-7037, NL-7038, NL-934, Z5220M, Z522M,
Z5660M, Z566M, Z5680M, Z568M, ZM1040, ZM1040T, ZM1042, ZM1042/01, ZM1220,
ZM1222.
These colon tubes
provide the opportunity to apply the included LEDs at the tube to generate the
very impressive floor lighting effect.
|
without floor lighting |
|
|
|
|
You can use other LEDs instead of
the included blue ones, of course.
You'll find the complete assembly
instructions and the technical data of the tubes as pdf file here (6 MB).
|
Here you see the drawing of the CT-IN-18
colon tube: |
|
Remarks:
|
Technical data of colon tube
CT-IN-18:
|
Tube type |
|
CT-IN-18 |
|
dimensions |
|
see drawing |
|
voltage drop |
Udrop |
59 V |
|
recommended Resistor at 170 V |
RV |
180 kΩ |
|
nominal current |
I |
0.6 mA |
|
|
|
|
|
Terminal assignment |
|
Connection |
|
blue wire |
|
rear upper electrode (+) |
|
red wire |
|
rear lower electrode (+) |
|
black wire |
|
front upper electrode (-) |
|
green wire |
|
front lower electrode (-) |
Mounting notes and floor lighting of colon
tube CT-IN-18
Fasten the colon tube by using the included mounting rubber. You can mount the
rubber in a hole in a PCB board or in a hole in an assemby board.
Here an example (PCB):
After mounting the rubber, insert the colon tube from the bottom side into the
rubber. Note the drawing "Drawing of colon tube CT-IN-18" above for that. After
this, connect the colon tube:
If you want to use the floor lighting with LEDs at the colon tubes attach one
LED at the front side (face side) of each colon tube.
Do NOT illuminate the colon tube from the back side! I recommend to
solder the LED directly to the PCB board. If you use an assembly board instead
of a PCB board, you can glue the LEDs to it or build an appropriate holder for
the LEDs.
Here you see an example for the illumination of the colon tubes:
The dots can be switched seperately of course, so that not only a colon is shown
but the singel dots (e.g. for the date).
2 dots switched on:
1 dot switched on:
Example of use: The IN-18 Blue Dream Nixie Clock -
Available as a kit here!
At the following pictures you see the IN-18 Blue Dream Nixie Clock
mounted in a gorgeous stainless steel case as example.
There’s no limit for your fantasy for the case, of course. Have fun building it!
Remark: The shown clock case and Nixie tubes are not part
of this offer!
The clock with blue floor lighting switched on:
At
night:
Remark: The
shown clock case and the Nixie tubes are not part of this offer!
Happy bidding!!!!