OUTEX CLEAR TUBELESS KIT
It feels better without tube! The total number of sales has reached 10,000 sets!
This product is Front & Rear Set for WR250X / DID / BEHR / etc.
Rim Size: Front 17×3.00MT and Rear 17×4.00MT or 4.25MT.
Tape Width: Front 34mm and Rear 51mm.
Part Number: FR304D.
English Instruction Manual.
"Features of the OUTEX clear tubeless kit"
1. Greatly reduced risk of blowouts
2. Improved handling, less unsprung weight
3. Race proven and popular with many factory riders in Japan
4. Easy application and durable construction
5. Tyre changes made quick and easy
6. Specialised, clear, triple layer construction
7. Easily repairable in the event of a snapped spoke
"Customers' Comment"
The tubeless kit is very easy to install and high quality. Has not leaked what so ever. Highly recommend Outex tubeless kits!
Check out the video on YouTube;
①Pre-cut nipple tapes ②Double sided sealing tape ③Protective sheet ④Air valves ⑤White cotton gloves ⑥OUT☆EX sticker and hologram sticker ⑦Instruction manual,
The materials selected for this kit have been proven to be highly durable with regards heat resistance (up to 140 degrees Celsius), weather resistance and adhesion.
Tape left over after initial installation can be used for repairs such as spoke replacement.
Installation of the tubeless kit requires some basic mechanical skills and knowledge.
Other things needed for the installation process:
degreaser/brake/parts cleaner, alkaline detergent, clean cloth/rag, scissors, tapered cutter knife, sand paper(#100-200), hair dryer.
All product is made for use as directed, but Outex and SuperBikers2 is not responsible for product failure due to incorrect application and/or damage during application, tire changes and the like.
FAQ of the tubeless kit
Q1 How difficult is the installation process?
A1 You don't need to have a special skills or talent, just read the enclosed instruction in advance and follow carefully.
Q2 Should I be worried about the potential of air leaks/deflation after installation?
A2 Please read and understand the contents of the installation sheet before attempting to install.
When you install it correctly, it will surely not have any leaks. In the rare event there was some installation issue or damage causing an air leak we have included repairing tape.
Q3 How can I remove the bumps of the welded rim?
A3 Even if there are bumps, usually that it does not cause any leaks. However it is recommended to remove the bumps.
Q4 Is there any way to check success of the installation prior to using the wheel?
A4 Immediately after installation, the adhesion of the tape is not at full strength, so take care when fitting tire on the rim. After the tire has been fitted, put the air pressure in 2.5 kilo, Then put it in the water tank for you to see and check if there is any air leak , Before riding, be sure to adjust tire pressure as recommended by the tire manufacturer.
Q5 what kind of durability/life can I expect from my Outex tubeless kit?
A5 The durability/life of the main tape used in our kit is subject to many variables, however as a guide in outdoors usage it is about 5-10 years provided it is not exposed to UV for extended periods of time, Because of its intended application area on the internal of a wheel rim and therefore removed from any UV exposure the expected durability (assuming no damage from user) is excellent and towards the upper end of the time frame previously mentioned.
Q6 How can I repair or replace damaged spokes?
A6 By rotating the nipple you can remove the spokes, if you can't remove some parts of it. Please cut the protection seal and the double sided tape around the nipple in question, then after removal and replacement of the spokes be sure to put a seal and double sided tape again for the new spokes repair area.
Q7 If there is rain or if I would have a car wash is there any possibility for the water to get in to the tire.
A7 There is almost zero possibility for the water to get in because of the adhesive tape strength and the air pressure,
Q8 After installing my tubeless kit is it better to use tubeless tires?
A8 Basically we recommend you to use the tubeless tires, but some users are also using the tube type tire, and there is no report such as air leak. But the usage of the tube tire doesn't have any guarantee.
But our company and our professional riders (many ex-factory racers) did extensive testing in extreme conditions and there was no air leaks at all. However after simulating an air leak if there with a tubed tire we could resolve with use of bead sealer.
Q9 Is it better to remove the notches of the bead?
A9 We do not recommend to remove the notches.
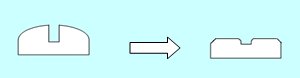
Q10 If the spoke nipples are big and protruding will it be a problem?
A10 When nipples are big we recommend you to scrape the head of the nipples as in the below image, it will make for easier kit installation.
After having scraped them, please remove the burr or edges.
http://img02.shop-pro.jp/PA01010/217/etc/clip_0117.jpg?202404144306
Also available for the following.
Contact us for any other size requirements, or just specify the parts number before buying.
OUTEX CLEAR TUBELESS KIT LIST
HONDA
Part Number Model/Rim Maker Rim Size Price
FR304D XR400 MOTOAD /DID Front & Rear Set / Front 17~18×3.00 MT & Rear 17~18×4.00~4.25 MT US$120.00
YAMAHA
Part Number Model/Rim Maker Rim Size Price
FR304D WR250X/DID Front & Rear Set / Front 17~18×3.00 MT & Rear 17~18×4.00~4.25 MT US$120.00
DID
Part Number Rim Size Price
FR304D Front& Rear Set / Front 17~18×3.00 MT & Rear 17~18×4.00~4.25 MT US$120.00