

Ghostbusters ECTO LED Lights and Siren. Modify your own model or R/C car!
Evan Designs
There is NO CAR included in this listing.
Looking for just the ECTO Siren with no LEDs?
https://www.ebay.com/itm/115244336126

Get the kit to make a car like this now!
This is a do-it-yourself kit NO CAR INCLUDEDIn this kit we have included:
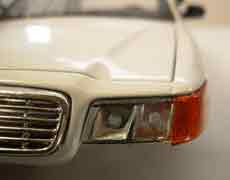
Headlights and Lightbar Lights (lights with 14 inch wire) |
Back of car (lights with 8" wire) |
Plus: |
 |
| (4) Solid 3mm warm white headlights | (2) Solid 3mm red tail lights | ECTO Siren! | |
| (8) Normal flash (1.5Hz) 3mm blue lights for the light bars and the front grill (or anywhere else) |
|||
| (1) Normal flash (1.5Hz) 3mm red light for the beacon signal on the roof | |||
A total of 15 LEDs plus a siren. And they all run on a single 9 volt battery that can be fit inside the trunk or passenger compartment depending on the model.
There is no top light bar included.
Same sound as the Ecto-1 siren in the movie!

Ecto Siren - YouTube
Video will open in a new window
Using the eBay App? Paste link into a browser window:
Installation instructions: (These instructions are for a 1:18 police car, but they follow a similar process.)
Installation is not too
hard, but it will be time consuming.
"What else is needed beside the car?"
- Unscrew the 7 screws on the underside of the car and pull the chassis out of the body. Now you have your hollow police car ready to work on.


- Remove the lenses from the inside. You can use a soldering iron and heat up the plastic stub holding the lens in place and then gently slip it out of the hole.
- Drill holes for the head lights and tail lights. We like to use a cordless drill to drill holes and get a good quality cobalt drill bit to get through diecast metal.
- Our lights come wired with resistors. Note: They are not pre-connected to the battery strap, we find it easier to install them when they are not part of a net of lights.
- When you get your lights glued in place with silicone or superglue, use small strips of duct tape inside the body of the car to keep the lights and wires solidly in place.
- Warning: Do NOT use hot glue as the heat can damage the diodes inside the LEDs.
- Now bring all the black wires to the black wire on battery strap and twist them together. For extra security use solder or a wire nut.
- Repeat the same process with all the red LED wires to one of the red wires on the battery strap.
- The siren will be connected to the same negative as everything else, and the other red wire on the battery strap. This way the siren and lights can be controlled independently.
- Drill holes for the on/off switches in a convenient location on the undercarriage of the car.
- Connect your fresh 9 volt battery to the battery snap and put it in the trunk. You may need to remove the spare tire to fit the battery depending on the car.
- Small Phillips screwdriver to unscrew the bottom of the car.
- A variable speed cordless drill with a cobalt drill bit for drilling into the diecast.
- We use a 7/64th drill bit when we want just the tip of the LED to poke out the hole, like behind the headlight and tail light lens. When we want the whole LED to show like on the back ledge, we use a 1/8th drill bit.
- Glue for the lights, some people use Model Airplane canopy glue, it is used for windows on models and dries perfectly clear. You can also use silicone-based glue or superglue.
- Epoxy to hold the 2 switches in place underneath the car.
- Duct tape to hold wires out of the way.
- A fresh 9 volt battery to put in the trunk.
- Optional: Solder gun and solder to make solid connections where wires meet.
Shipping: International shipping has to go through customs which may take anywhere from 3 to 20 EXTRA business days. Average delivery time for international packages is 10-14 days from the date of purchase.
Our Return Policy: If you feel that you have not received an order as described or pictured, please let us know so that we may remedy the situation. We offer hassle-free returns with the help of eBay's return process. Please contact us before leaving a feedback/rating so that we may do our best to make sure you walk away pleased with your experience.