SmartStairway SS281x-Wi-Fi
Controller for automatic RGB stair lighting with addressable LED strips
- The controller is designed to work with addressable RGB LED strips WS281 * (WS2811, WS2812, etc.) with 1 control channel.
- The controller allows you to create both static lighting in any color of your choice, as well as animated effects. The system has a light sensor that allows you to turn off the light in the daytime and activate it at night.
- Using the ambient light sensor also allows you to use adaptive brightness control within the range you specify. It will protect your eyes in the dark and will not cause glare at night. The controller will automatically dim in the dark and increase in a bright room.
- The system allows you to adjust the number of steps in the range from 1 to 32 and adjust the number of pixels (LEDs) for each of the steps. This can be useful if your steps have different widths.
- The maximum number of pixels for one step cannot be more than 255. The maximum number of address pixels for the entire staircase cannot be more than 1500, but it is better to choose lower values, not more than 800. You can read more about the calculation and selection of LED strips in the user manual. The link to the file in PDF format can be found below. Also, for your convenience, we have made a video instruction on how to connect and configure the system.
Download:
- User manual ENGLISH (PDF, 12.6MB): shop.xopc.net.ua/files/ws281x_manual_eng.pdf
- YouTube video tutorial: youtu.be/Z69udDHmtiM
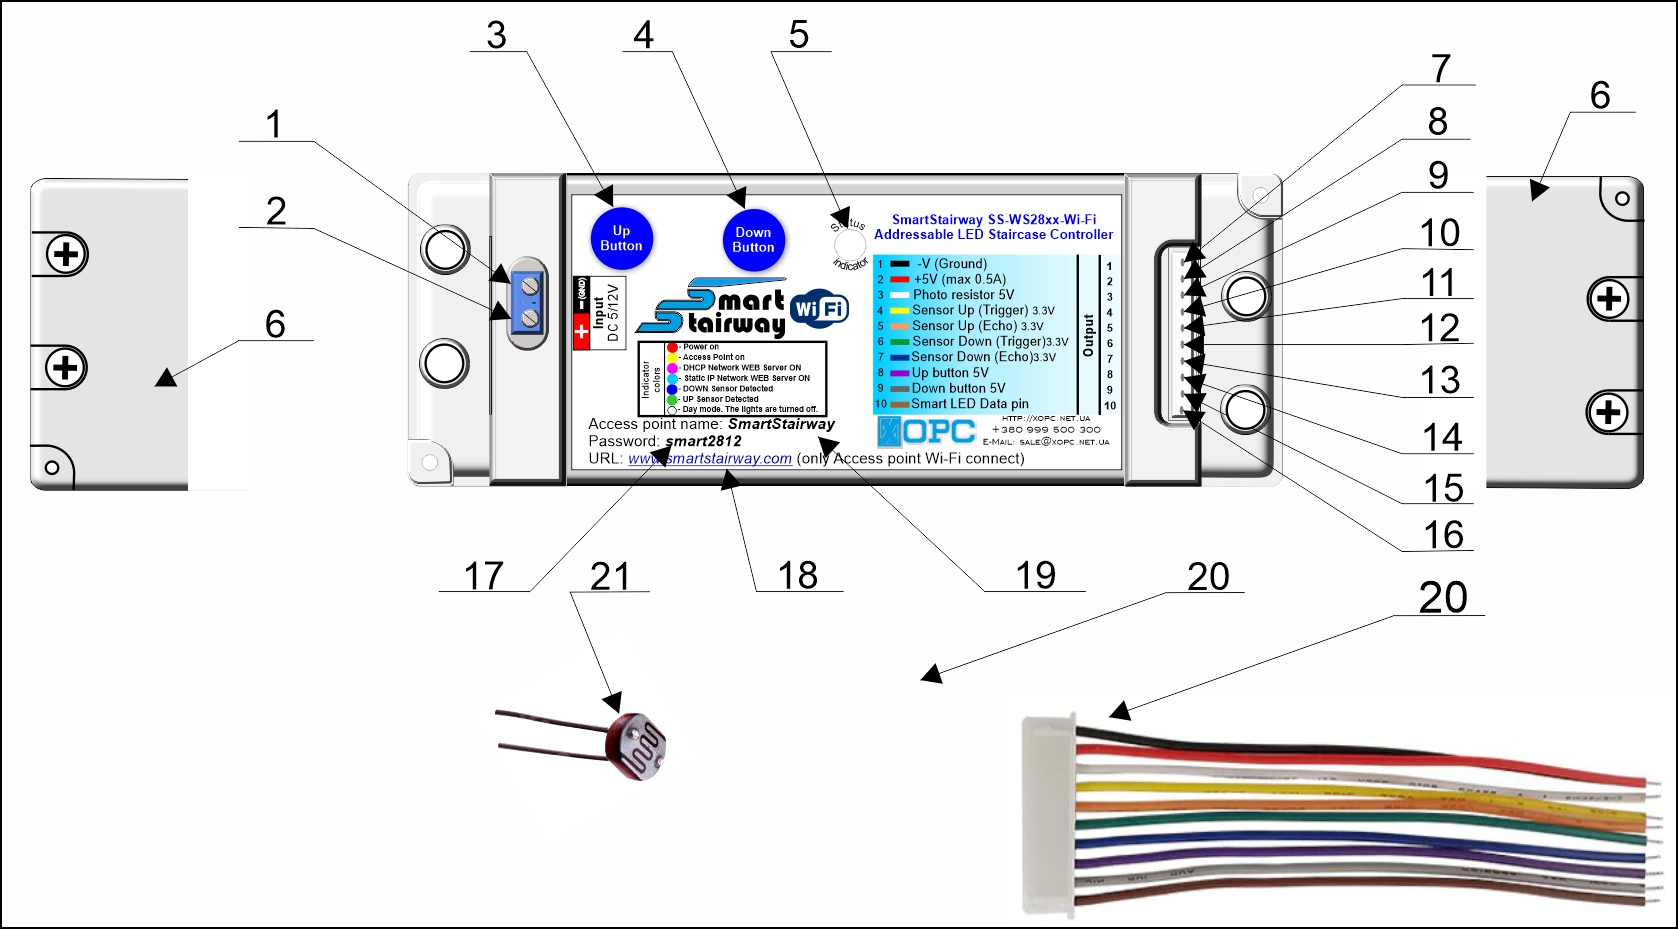
The main elements
1- Terminal for connection "-" from the power supply of a direct current of 5/12V stabilized on tension (GROUND)
2- Terminal for connection "+" from the power supply of a direct current of 5/12V stabilized on tension
3- Touch button "Top»
4- Touch button "Down»
5 - LED system status indicator (see status colors in the table)
6 - Decorative cover of terminal compartments.
Pins for connecting the output connector:
7 - PIN1 -V (GROUND)
8 - PIN2 + 5V output is voltage stabilized with 0.5A overload protection
9 - PIN3 analog input for connecting a light sensor photoresistor (max. 5V)
10 - PIN4 for connection of the top sensor. PIR Sensor - Data, Ultrasonic sensor - Triger
11 - PIN5 for ECHO connection when using the upper ultrasonic sensor. If a PIR sensor is used, this PIN is not used.
12 - PIN6 for connection of the lower sensor. PIR Sensor - Data, Ultrasonic sensor - Triger
13 - PIN7 for ECHO connection when using the lower ultrasonic sensor. If a PIR sensor is used, this PIN is not used.
14 - PIN8 for connection of the top button without fixing for compulsory switching on of light (+ 5B).
15 - PIN9 for connection of the lower button without fixing for compulsory switching on of light (+ 5B).
16 - PIN10 for connection of the signal cable of the address LED strip Data IN.
Other items:
17 - Password to connect to the controller in Wi-Fi access point mode
18 - Wi-Fi access point name
19 - URL of the web server page in case of connection to the controller in the access point mode.
20 - Wire connector for connecting peripheral equipment.
21 - Photoresistor.
Specifications.
|
Supply voltage: |
DC 5/12V |
|
Power consumption in standby mode: |
no more than 3W. |
|
Maximum power consumption with Wi-Fi connection: |
no more than 12W. |
|
Average consumption in the operating mode of the backlight on: |
no more than 7 W. |
|
Built-in power stabilizer voltage and power: |
DC5V, 0.5A (protected by self-healing fuse) |
|
Compatible sensors: |
Pyroelectric HC-SR501, HC-SR505, Ultrasonic HC-SR04, microwave rcwl-0516 and others similar in terms of power and level TTL signal. |
|
Compatible LED strips: |
DC 5/12V: WS2812, WS2811 and their analogues. |
|
Number of steps: |
from 1 to 32 pcs. |
|
Number of LED pixels per step: |
from 1 to 255 pcs. |
|
Maximum total number of pixels: |
no more than 1500 pcs. Depending on the number of pixels, the frequency decreases FPS. The more pixels, the less frame rate. It is recommended not to exceed quantity 1000 pcs. Optimal work is possible when quantity less than 650 pixels.If necessary to provide a large number of LEDs, it is better to choose a tape WS2811 DC12V, it will increase speed, and reduce the current |
Pyroelectric sensor.
The controller can work with pyroelectric sensors or ultrasonic rangefinders in any combination. Pyroelectric sensors are easy to install and connect, do not require additional settings. They determine the movement of objects, the temperature of which is 10 degrees or more higher than the temperature of the surrounding objects. They can detect movement up to 5 meters away. The angle of view of the sensors is approximately 45-50 degrees (for more details, see the diagram in the user manual). The sensors are not demanding on the choice of installation location and can be installed near the floor or steps. This type of sensor is preferred if your staircase allows it.
Ultrasonic sensor.
An ultrasonic sensor is a rangefinder that measures the distance to an obstacle. Its principle of operation is based on the emission of an ultrasonic signal, which, after being reflected from an obstacle, returns to the sensor. The controller calculates the distance to the obstacle based on the speed of sound and the signal return time. Compares it with the value that you have written into memory and if the measured distance is less - turns on the light. The maximum distance for detecting obstacles is 1.2m (47 "). The principle of operation of ultrasonic sensors has some technological disadvantages:
- - the sound is not reflected from the sound-absorbing surfaces. The sensor will not see soft sound-absorbing objects
- - the speed of sound depends on temperature and atmospheric pressure, therefore, when this parameter is changed, the distance value may slightly change.
- - The angle of propagation of the sound wave is approximately 45-60 degrees (see the diagram in the user manual for more details). Therefore, it is important to choose the right location for the sensor. It should not be located close to the floor or a step, as if it is close to the side surface, the sensor will measure the distance to this surface, and not to an obstacle on the stairs. Therefore, it is recommended to install the sensor at least 50 cm from the floor or step.
- - Ultrasonic rangefinders are high-frequency devices operating at a frequency of more than 400 kHz. Therefore, use shielded wires no longer than 10m (32 feet) to connect them.
Shielded wires must be used for all types of sensors. In this case, the shield of the wire should be connected to "GND" of the power supply. This will protect the system from electromagnetic interference and inductive pickup. Since any wire is an antenna, it collects inductive interference from other electrical devices in your home. Failure to comply with this rule can lead to erroneous switching on of the system due to inductive currents in the wires.
The controller is in standby mode. At this time, a standby effect may appear on the stairs. It can be:
- - completely off LEDs.
- - Only the first and last rungs are enabled in low brightness or animated modes.
- - The outermost LEDs on each step on the left and right side are on.
- - Running light on the left and right on the extreme LEDs with a certain interval of time. To indicate the location of the stairs in the dark.
If a turn-on signal is received from one of the two sensors, the controller will start sequentially turning on the LEDs of the steps from the triggered sensor to the opposite side. You can also select any static color and many turn-on effects in runtime. You can also choose dynamic turn-on effects: rainbow effect, flame effect.
After all steps have been turned on, the system will go into standby mode before shutting down. You can set the waiting time yourself. If during this time one of the sensors is triggered, the wait timer will restart. The light will be turned off when the waiting time has elapsed since the last triggering of the sensor. Then the light will turn off in the same direction.
You can activate the use of the light sensor and set the threshold and sensitivity for turning off the system when a certain level of illumination is exceeded. If the room becomes lighter than you indicated, the light will be turned off. However, you can still forcibly turn on the light using the touch buttons on the controller or switches if you are using them. But the sensors will not turn on the light. If the illumination level becomes lower, the controller will turn on standby mode again and start polling the sensors.
Also, when the light sensor is activated, you can adjust the sensitivity of the sensor in order to exclude its reaction to short-term changes in lighting caused, for example, by the headlights of cars passing on the street, and the like.
You can also activate the adaptive brightness mode. In this mode, you set the percentage to decrease the brightness from the one you set in complete darkness. This way the controller will calculate and dim the LEDs as the overall lighting level changes. For example, you set the threshold for turning off the light to 150lm, the brightness for the standby mode is 30, and the brightness for the on mode is 100 points. And they asked to reduce the brightness in the dark by 70%.
Then, in complete darkness, the brightness of the steps will be 9 points in the standby mode, and 30 points in the operating mode. This will keep your eyes in the dark and prevent the light from blinding you. Moreover, as the illumination decreases, the brightness will proportionally change as the illumination in the room decreases. This ensures comfortable observation of the lighting.
The system is configured using the built-in WEB-server through the WEB interface. You can connect to the controller's Wi-Fi hotspot from your mobile device, or configure the system to work on your home network using a router. Then you can connect to the controller from any device on your home network. Having connected to the controller's WEB interface, you can set:
- - Type of LED strip used
- - The number of steps and the number of address pixels for each step.
- - Select the type of sensors used and set the switching distance for ultrasonic sensors.
- - Configure Wi-Fi connection and home network settings
- - Select an effect in standby mode (or disable it)
- - Select the switch-on effect in operation.
- - Adjust color and brightness for standby
- - Adjust the color and brightness for the working mode of inclusion.
- - Set the speed of the effects to turn on and the time to wait before turning off
- - Customize dynamic animated effects, frame rate, number of colors and so on. Depending on the selected effect.
- - Configure the mode of using the light sensor, shutdown threshold, sensitivity and adaptive brightness parameters if you want.
Read in detail in the user manual and watch the video tutorial on connection and setup.
Contact us
We can be contacted at any time through e-Mail messages if you have any questions, comments or product requests. We will respond to you within 24 hours and do our best to help you out! We encourage our customers to contact us with any questions or concerns! We'd like to be sure you are completely satisfied with your purchase.
| Shipping |
The dispatch of the goods is carried out within 1-5 days by a small registered package by airmail with tracking. The parcel may not be tracked in Ireland, the United Kingdom and Germany. This is due to the fact that the abovementioned countries do not track small registered packets. You can get information about the location of the parcel in these countries by submitting a request to the local postal service
Delivery time takes from 14 to 45 working days, depending on the country. Most countries in Europe, the United States delivery an average of 14 to 35 days. The countries of Asia, Middle East, Africa, Central and South America averaged from 21 to 45 days. International economy shipping is carried out by small registered airmail package "Registered Mail® International". In many countries around the world, this type of delivery requires hand-to-hand delivery and may require a signature. Please consider this when purchasing. Parcels can be stored from 14 days to 2 months at the local post office, after which they can be disposed of or sent back. Parcel retention time after unsuccessful delivery depends on the regulations of the postal service of your country. Check with your local post office for details. The recipient can usually extend the shelf life of the parcel, request re-delivery or readdressing. To do this, contact your local postal service. |
|---|---|
| Return and warranty conditions |
Return of goods is accepted within 30 calendar days. Items must be returned in original condition with tags if applicable within 30 days of purchase. Return shipping at the same time pays the buyer.In case of product failure during the warranty period, free repair of the product is possible. The cost of delivery is paid by the buyer. Damage caused by incorrect operation, connection or violation of technical requirements are not warranty cases. Such repairs are carried out on a paid basis. Return of goods damaged as a result of violations of the rules of connection and operation is not accepted.
|
.