Usa-auto-plus
Your best choice


|
|
||||||

|

|

|

|
|||

|

|

|

|
|||


Front Mount Hydraulic Steering Cylinder Seal Kit is Great for Use in Marine Applications!
Used to repair leaking or weeping cylinder seals. Rebuild the outboard front mount hydraulic cylinders, preventing the leaking of fluid and optimizing efficient performance
It is critical for you to check the cylinder rod to see whether it has scratches, nicks or damages in anyway. Any damages found, the complete cylinder must be replaced. Failure to replace a damaged steering cylinder will result in seal failure and possible loss of steering. Do not remove shaft from steering cylinder. Bleeding the system to remove any air, compatible with Seastar Hydraulic Oil HA5340 only. Check for smooth operations and full travel of the cylinder. Check for no leaking.
Compatibility
Fits front mount cylinder parts HC5340, HC5341, HC5342, HC5343, HC5344, HC5345, HC5346, HC5347, HC5348, HC5358, HC5365, HC5375, HC5394, HC5445, HC6750, HC6751, HC6752, HC6753, HC6754, HC6755
Model Reference
-HC5345, HC5340 and HC5342 (threaded end gland)
-HC5347 (Pivot Cylinder, Honda 115-130 specific),
-HC5348 (Pivot Cylinder, OMC 77-90 specific),
-HC5365 (Compact Cylinder (threaded end gland)),
-HC5394 (SeaRay Compact Cylinder (obsolete) (threaded gland)).
Note
The smallest imperfection on the shiny steering rod will cause a new seal to fail real quick. Remove the internal steering rod and then take some 1500 then 2000 grit wet sand paper and go over the full length of the steering rod (take your time!!). Clean rod up, lube it with hydro fluid and carefully reassemble the steering system.


Using Instruction
1. Loosening the Seal Gland. Turn the outboard hard to port; place the pin wrench in the holes of a gland. And use a 5⁄8-inch box wrench on the nut on the port end of the piston rod. (NOTE:Turn counterclockwise on the pin wrench with opposite pressure on the box wrench to loosen the seal gland)
2.Removing the Support Bracket. Use a 3/4-inch socket wrench to remove the nut and washer securing the support bracket to the support rod. (Do the same to the piston rod nut and washer. ) Use wrenches on the opposite ends to keep the rods from turning. With hardware gone, pull off the support bracket.
3. Use the pin wrench to remove the Old Seal Gland.
4.Install the New Seal Gland. Place the tapered guide tool from the kit on the end of the piston rod and lubricate it and the piston rod well with oil or grease. Carefully slide the new seal gland over the guide and onto the piston rod until it reaches the cylinder. Screw the seal gland into the cylinder, but don't tighten it yet. Remove the guide tool; it is not part of the final assembly, but you will need it for the other side.
5. Reinstall the Support Bracket. Reconnect the support bracket to the support rod and piston rod and replace the washers and nuts, tightening the nuts against the washers. You may need to use wrenches on the opposite nuts to tighten sufficiently.
6. Tightening the New Seal Gland. Use the pin wrench to tighten the new seal gland while using a 5⁄8-inch box wrench on the starboard end of the piston rod for counter torque.


COMPATIBILITY
Fit for Seastar hydraulic steering systems, this bleed kit is used for refilling your boat's steering system fluid. Bleed Kit is necessary to fill your hydraulic steering system! When you are 100 miles offshore and your steering goes out, you will be glad to have this to refill your hydraulic system.
MATERIAL
High quality brass fitting and PVC tube ensure excellent mechanical and physical properties. This product shows its good anti-oxidation, corrosion resistance and durability
INSTALLATION
Easy to attach and use, our bridge tube comes with hose clamps for a perfect fit. One person can easily control the bleed process from end to end
FEATURES
Quick-connect brass fitting and ABS screw cap, Leak free connection(Kit includes hose with screw cap and a Bridge Tube that connects to Bleed fittings)
INSTRUCTIONS
1. Attach bottle to helm reservoir (do not pierce bottle)(do not let bottle run empty)
2. Connect bridge tube to bleed fittings on steering cylinder and loosen fittings
3. Use helm to pump fluid through system by turning the wheel in one direction. Air bubbles will be pushed to the reservoir at the helm
4. Manually swing the outboard through full articulation to relieve trapped air and confirm good bleed
5. Note: Orientating bleed fittings up while pumping fluid with helm will allow air to escape cylinder
6. Repeat 3-4 as necessary until no air is visible in bridge tube
| Item Specifics | |
|---|---|
| Garantie | 1 Year |
| Type | Seal Kit and Bleed Kit |
| EAN | Non applicable |
| Marque | UAP-Auto |
| Numéro de pièce fabricant | HS5157 |
1. Payment methods accepted: Payonner.Allows to pay by credit card, debit card and your paypal balance.
2. Payment must be received immediately.
3. We ship items to Your Ebay address.Please make sure your Ebay address is correct before you pay,cause it cannot be changed once the order shipped out.
1. Item will be shipped within 1 business day after your payment cleared.
2. Item will be shipped by SpeedPak or other shipping method .
3. Delivery time depends on destination and other factors,please feel free to contact us by email if you cannot get your order in time.
Please read the shipment and payment detail carefully before you place the order.
1. Return to us within 60 days from the delivery date for exchange or refund. Refund will be given as Money back or item exchange (buyer's choice).
2. Return shipping fee is the responsibility of buyer unless the return is a result of our mistake.
3. If you need return, please contact our customer service representative, let us know the detailed problem and send us some pictures for confirmation.
Please contact us via ebay using"Contact member". We will respond within 1 business day or less.Thank you for your understanding.
Our office hours is as below :
- 9:00 a.m. to 1:00 p.m. (GMT +8) of Saturday
And our office is closed on Sunday and public holidays (Hong Kong)
We apologize for the late reply during the holidays.Please contact us via ebay using"Contact member". We will respond within 1 business day or less. Please include your ebay item numberor order number in all communications.
Usa-auto-plus
Your best choice
Shop Category Hot Item
Hot Sale!
New List Item
Help & Info Payment Policy Shipping Policy Return Policy FAQ About Us |
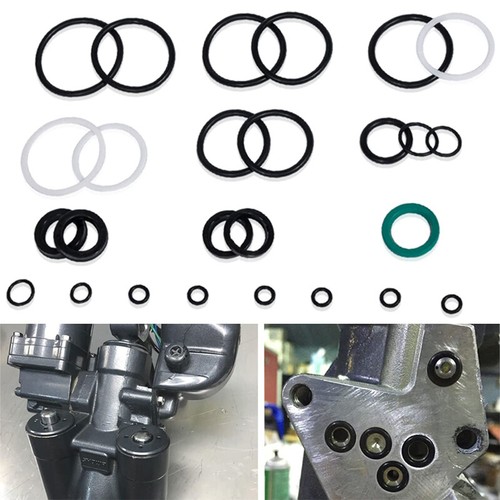
For Seastar HS5157 Front Mount Hydraulic Steering Cylinder Seal Kit + Bleed Kit
Front Mount Hydraulic Steering Cylinder Seal Kit is Great for Use in Marine Applications!
Used to repair leaking or weeping cylinder seals. Rebuild the outboard front mount hydraulic cylinders, preventing the leaking of fluid and optimizing efficient performance It is critical for you to check the cylinder rod to see whether it has scratches, nicks or damages in anyway. Any damages found, the complete cylinder must be replaced. Failure to replace a damaged steering cylinder will result in seal failure and possible loss of steering. Do not remove shaft from steering cylinder. Bleeding the system to remove any air, compatible with Seastar Hydraulic Oil HA5340 only. Check for smooth operations and full travel of the cylinder. Check for no leaking.
Compatibility
Fits front mount cylinder parts HC5340, HC5341, HC5342, HC5343, HC5344, HC5345, HC5346, HC5347, HC5348, HC5358, HC5365, HC5375, HC5394, HC5445, HC6750, HC6751, HC6752, HC6753, HC6754, HC6755
Model Reference
-HC5345, HC5340 and HC5342 (threaded end gland) -HC5347 (Pivot Cylinder, Honda 115-130 specific), -HC5348 (Pivot Cylinder, OMC 77-90 specific), -HC5365 (Compact Cylinder (threaded end gland)), -HC5394 (SeaRay Compact Cylinder (obsolete) (threaded gland)).
Note
The smallest imperfection on the shiny steering rod will cause a new seal to fail real quick. Remove the internal steering rod and then take some 1500 then 2000 grit wet sand paper and go over the full length of the steering rod (take your time!!). Clean rod up, lube it with hydro fluid and carefully reassemble the steering system.
Using Instruction
1. Loosening the Seal Gland. Turn the outboard hard to port; place the pin wrench in the holes of a gland. And use a 5⁄8-inch box wrench on the nut on the port end of the piston rod. (NOTE:Turn counterclockwise on the pin wrench with opposite pressure on the box wrench to loosen the seal gland) 2.Removing the Support Bracket. Use a 3/4-inch socket wrench to remove the nut and washer securing the support bracket to the support rod. (Do the same to the piston rod nut and washer. ) Use wrenches on the opposite ends to keep the rods from turning. With hardware gone, pull off the support bracket. 3. Use the pin wrench to remove the Old Seal Gland. 4.Install the New Seal Gland. Place the tapered guide tool from the kit on the end of the piston rod and lubricate it and the piston rod well with oil or grease. Carefully slide the new seal gland over the guide and onto the piston rod until it reaches the cylinder. Screw the seal gland into the cylinder, but don't tighten it yet. Remove the guide tool; it is not part of the final assembly, but you will need it for the other side. 5. Reinstall the Support Bracket. Reconnect the support bracket to the support rod and piston rod and replace the washers and nuts, tightening the nuts against the washers. You may need to use wrenches on the opposite nuts to tighten sufficiently. 6. Tightening the New Seal Gland. Use the pin wrench to tighten the new seal gland while using a 5⁄8-inch box wrench on the starboard end of the piston rod for counter torque.
COMPATIBILITY
Fit for Seastar hydraulic steering systems, this bleed kit is used for refilling your boat's steering system fluid. Bleed Kit is necessary to fill your hydraulic steering system! When you are 100 miles offshore and your steering goes out, you will be glad to have this to refill your hydraulic system.
MATERIAL
High quality brass fitting and PVC tube ensure excellent mechanical and physical properties. This product shows its good anti-oxidation, corrosion resistance and durability
INSTALLATION
Easy to attach and use, our bridge tube comes with hose clamps for a perfect fit. One person can easily control the bleed process from end to end
FEATURES
Quick-connect brass fitting and ABS screw cap, Leak free connection(Kit includes hose with screw cap and a Bridge Tube that connects to Bleed fittings)
INSTRUCTIONS
1. Attach bottle to helm reservoir (do not pierce bottle)(do not let bottle run empty)
2. Connect bridge tube to bleed fittings on steering cylinder and loosen fittings
3. Use helm to pump fluid through system by turning the wheel in one direction. Air bubbles will be pushed to the reservoir at the helm
4. Manually swing the outboard through full articulation to relieve trapped air and confirm good bleed
5. Note: Orientating bleed fittings up while pumping fluid with helm will allow air to escape cylinder
6. Repeat 3-4 as necessary until no air is visible in bridge tube Payment
1. Payment methods accepted: Payonner.Allows to pay by credit card, debit card and your paypal balance.
Shipping
1. Item will be shipped within 1 business day after your payment cleared.
Please read the shipment and payment detail carefully before you place the order. Returns
1. Return to us within 60 days from the delivery date for exchange or refund. Refund will be given as Money back or item exchange (buyer's choice). Contact Us
Please contact us via ebay using"Contact member". We will respond within 1 business day or less.Thank you for your understanding. - 9:00 a.m. to 6:00 p.m. (GMT +8) of Monday to Friday
- 9:00 a.m. to 1:00 p.m. (GMT +8) of Saturday And our office is closed on Sunday and public holidays (Hong Kong) We apologize for the late reply during the holidays.Please contact us via ebay using"Contact member". We will respond within 1 business day or less. Please include your ebay item numberor order number in all communications. All rights reserved. |