2-Pack HD Tempered Glass Screen Protector for iPad 10.2, 10.9, 9.7, Air, Pro 11 & 12.9
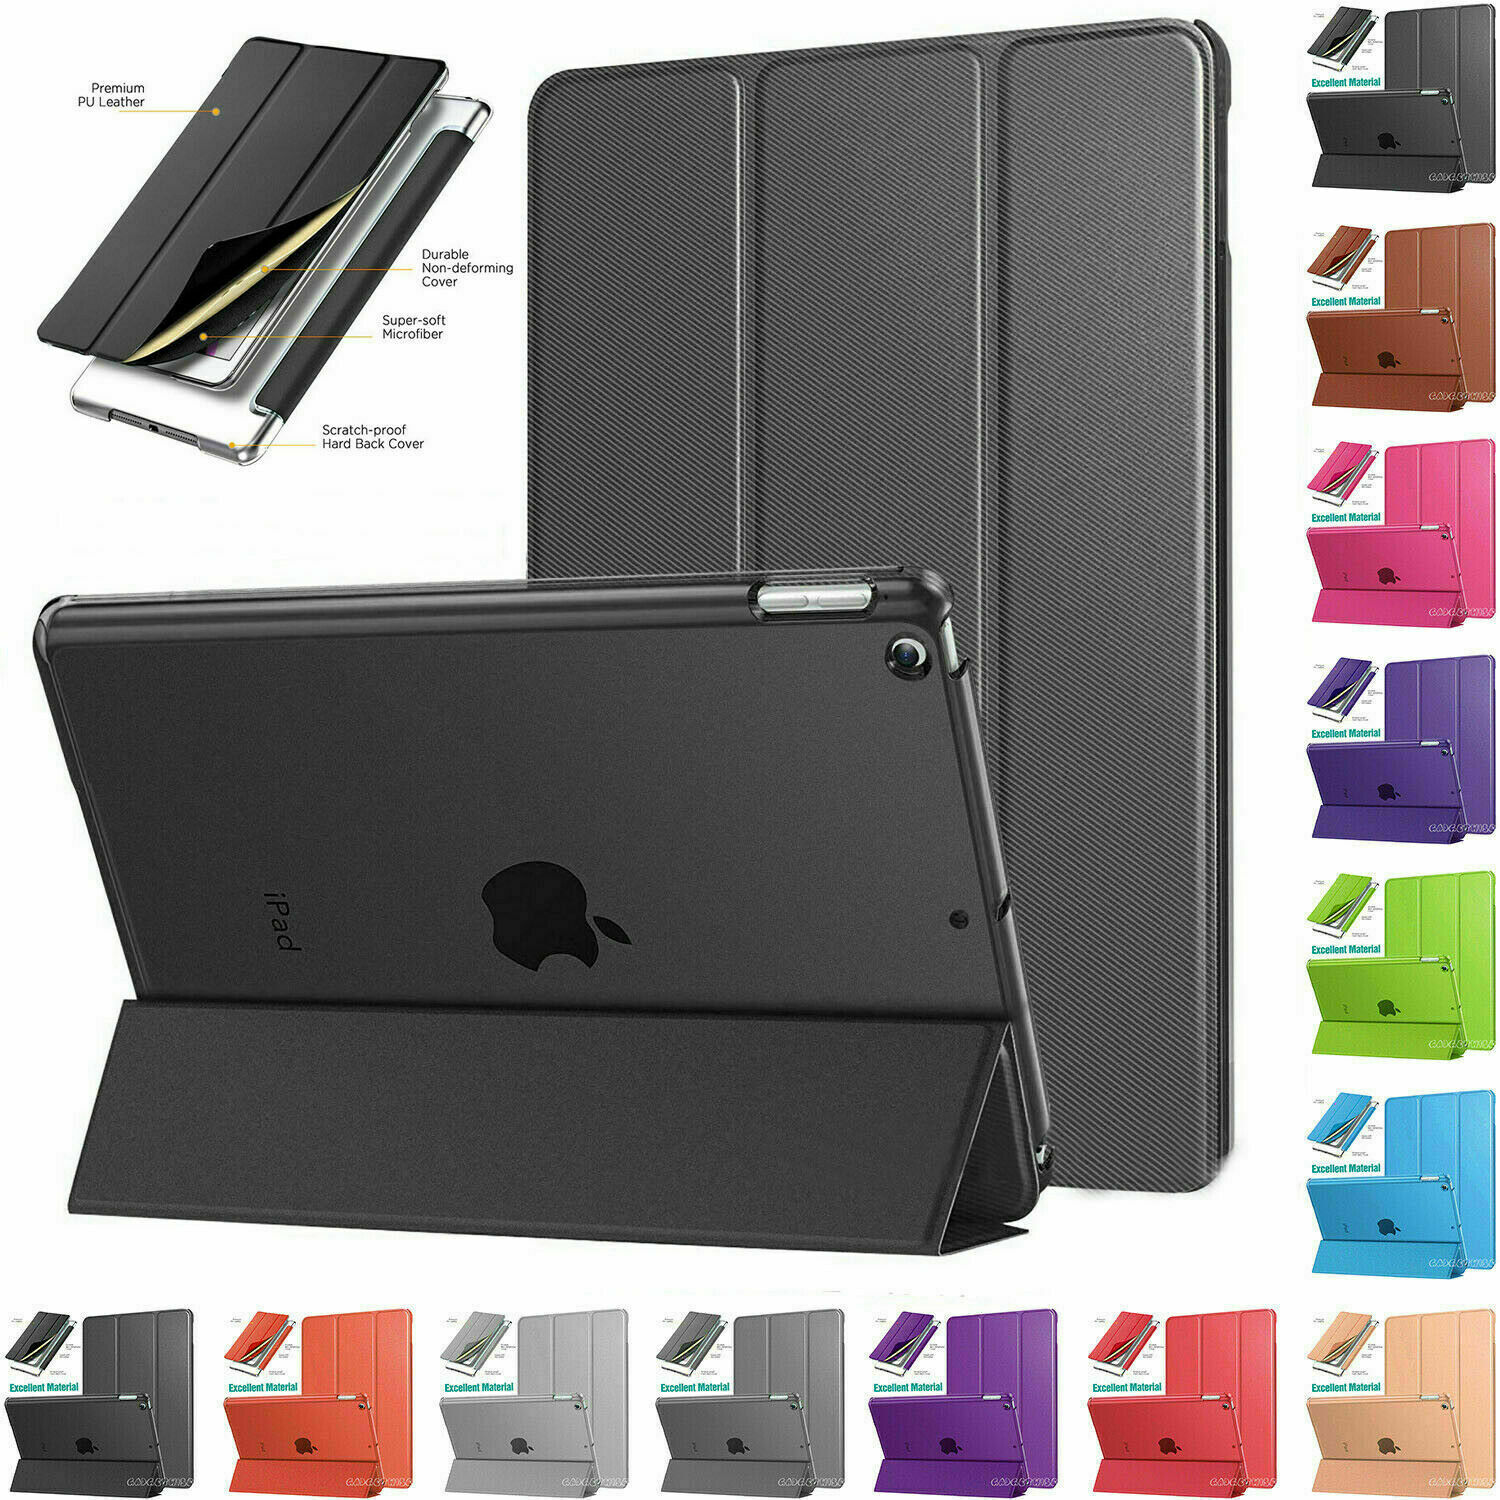
For Apple iPad 9th 8th 7th Generation 10.2 Case Smart Stand Cover 2021/2020/2019
Pricing: £4.99 to £7.99

For Apple iPad 10.2" 9th 8th 7th Generation Smart Stand Case Cover 2021-20-2019
Pricing: £3.49 to £6.89

For Apple iPad 9th Generation 10.2 (2021) PU Leather Smart Flip Stand Case Cover
Pricing: £4.49 To £5.90


To see more products in our shop click here
---
**Item Specifics**:
- **Brand**: Kundwana
- **Type**: Screen Protector
- **Material**: Tempered Glass
- **Features**: HD Clear, Scratch-Resistant, Anti-Fingerprint
- **Compatible Model**: iPad 10.2", 10.9", 9.7", Air, Pro 11", 12.9"
- **Packaging**: Comes in a 2-Pack
- **Condition**: New
---
**Description**:
Protect your iPad screen with our HD Tempered Glass Screen Protector – designed for clarity, durability, and seamless touch response.
🌟 **Key Features**:
- **HD Clear**: Ensures that your display remains sharp and vibrant.
- **Scratch-Resistant**: Made with high-quality tempered glass that protects against everyday wear and tear.
- **Anti-Fingerprint**: Specially coated to resist smudges, keeping your screen pristine.
- **Easy Installation**: Comes with all the tools and instructions needed for a bubble-free installation.
- **Universal Fit**: Compatible with various iPad models including iPad 10.2", 10.9", 9.7", Air, Pro 11", and 12.9".
Ensure the longevity and beauty of your iPad screen with this must-have protective accessory. With two in a pack, you have a backup or one for another device.
---
Certainly! Here's a concise yet detailed installation process for the HD Tempered Glass Screen Protector for an iPad:
---
**Installation Process for HD Tempered Glass Screen Protector**:
1. **Prepare Your Workspace**:
- Ensure you're in a dust-free environment. Dust particles can get trapped between the screen protector and the iPad screen, leading to bubbles.
- Lay your iPad on a flat, stable surface.
2. **Clean the iPad Screen**:
- Start by turning off your iPad to ensure you see any streaks or dust particles.
- Use the provided cleaning wipe (or a soft lint-free cloth) to gently clean the screen and remove fingerprints, smudges, and dust.
- If a dust-absorber sticker or microfiber cloth is included, use it to remove any remaining dust particles.
3. **Peel Off the Protective Layer**:
- On the tempered glass screen protector, there will be a protective film. Gently peel it off, ensuring you do not touch the adhesive side.
4. **Align the Screen Protector**:
- Carefully align the screen protector with the iPad screen, making sure to match camera holes, buttons, and other relevant cut-outs.
- Begin by aligning it from the top (near the camera) and work your way down.
5. **Apply the Screen Protector**:
- Once aligned, gently place the screen protector onto the iPad screen.
- Start from the centre and push outwards to remove any bubbles. You can use a squeegee or credit card to smooth it out further if necessary.
6. **Final Adjustments**:
- If any bubbles appear, gently lift the edge closest to the bubble and release the protector again, smoothing out the area.
- For persistent bubbles, use a cloth to push them towards the edge of the screen.
7. **Completion**:
- Once you're satisfied with the application, turn on your iPad and enjoy your newly protected screen!
---
Remember: Patience is key! If this is your first time applying a screen protector, it might take a bit of practice. Always read the specific instructions provided in your package as they may vary slightly depending on the brand and model of the screen protector.
---
Compatibility Table
| Apple iPad Model | Apple iPad Model Number | Apple iPad Released year |
|---|---|---|
| For Apple iPad Air (1st Generation) | A1474 (Wifi Only) A1475 (Wifi + Cellular) A1476 (Wifi + Cellular TD-LTE) | 2013 |
| For Apple iPad Air 2 | A1566 (Wifi Only) A1567 (Wifi + Cellular) | 2014 |
| For Apple iPad (5th Generation) | A1822 (Wifi Only) A1823 (Wifi + Cellular) | 2017 |
| For Apple iPad (6th Generation) | A1893 (Wifi Only) A1954 (Wifi + Cellular) | 2018 |
| For Apple iPad 10.2” (7th Generation) | A2200 A2198 A2232 A2197 | 2019 |
| For Apple iPad 10.2” (8th Generation) | A2428 A2429 A2430 A2270 | 2020 |
| For Apple iPad 10.2” (9th Generation) | A2603, A2604 | 2021 |
| For Apple iPad Pro 9.7” | A1673, A1674, A1675 | 2016 |
| For Apple iPad Pro 10.5” | A1709 A1701 | 2017 |
| For Apple iPad Air 3 | A2152 A2153 A2123 | 2019 |
| For Apple iPad Air 4 | A2316 A2324 A2072 A2325 | 2020 |
| For Apple iPad Air 5 | A2589, A2591 | 2022 |
| For Apple iPad Pro 11 1st Generation | A2231 A2230 A2068 | 2018 |
| For Apple iPad Pro 11 2nd Generation | A2460 A2459 A2301 | 2020 |
| For Apple iPad Pro 11 3rd Generation | A2200 A2198 A2197 (Global) | 2021 |
| For Apple iPad Pro 11 4th Generation | A2435 A2761 A2762 | 2022 |
| For Apple iPad Mini 1 2 3 | A1432 A1454 A1455 A1489 A1490 A1491 A1599 A1600 | 2012-14 |
| For Apple iPad Mini 4 5 | A1538 A1550 A2133 A2124 A2125 A2126 | 2015-2019 |
| For Apple iPad 12.9 4th Gen | A2229, A2069, A2232, A2233 | 2020 |
| For Apple iPad 12.9 5th Gen | A2378, A2461, A2379, A2462 | 2021 |
| For Apple iPad 12.9 6th Gen | A2764, A2437, A2766, A2436 | 2022 |
---
**Shipping**:
- **Free Shipping**: Protect your iPad without any additional shipping costs!
- **Dispatch Time**: Ships within 1-2 business days.
- **Delivery**: Estimated within 3-5 business days.
Experience premium protection and unparalleled clarity. Check our feedback and shop with confidence!
---
To see more products in our shop click here