1. Using advanced digital audio signal processing technology (DSP) and FM phase-locked loop modulation (PLL) technology to make the sound quality more realistic, more stable performance, long-term operating frequency without offset.
2. LCD display is more intuitive and accurate, with very low power consumption and minimal noise interference.
3. With automatic search station and storage station function, easy to operate.
4. Built-in 16-level digital volume adjustment, easy to complete by button operation.
5. Power-down automatic memory data before power-off.
6. Support serial AT command control.
7. The chip-type high-precision quartz crystal is used for frequency stabilization, and the temperature and voltage change the transmission frequency without drifting.
Product parameters:
Output power: 50mW
Audio frequency response range: 50Hz-18KHz
Transmission frequency:
Turn off campus broadcast 87.0MHz-108.0MHz, turn on campus broadcast 76.0MHz-108.0MHz
Frequency adjustment step: 0.1MHz/time (short press), 1.0MHz/time (long press)
Modulation mode: standard FM
Equivalent noise: ≥30dB (sound quality is close to CD sound quality)
Supply voltage: DC 3.0V-5.0V
Working current: 35mA
Transmitting antenna: 75cm rod antenna
Launch distance: The FM transmitter module is connected to a 75cm standard rod antenna, and the radio uses the Desheng PL-660. The open field is covered with a radius of 100 meters. (Note: The launch distance is for reference only, due to the difference in usage environment)
Note: This module is a radio-sensitive device. The interference from the power supply or nearby may affect the normal operation of the module. Therefore, it is recommended to supply a stable voltage to the power supply of the module by using a battery or a power frequency transformer. Can not use switching power supply (such as mobile phone charger, and any other switching power supply), charging treasure, switching DC-DC converter, there can be no working D-class power amplifier, microwave oven and other equipment that will generate high-frequency electromagnetic interference. Otherwise, the electromagnetic interference generated by these devices will be spatially coupled to the RF front end of the module, causing the received signal to generate noise.
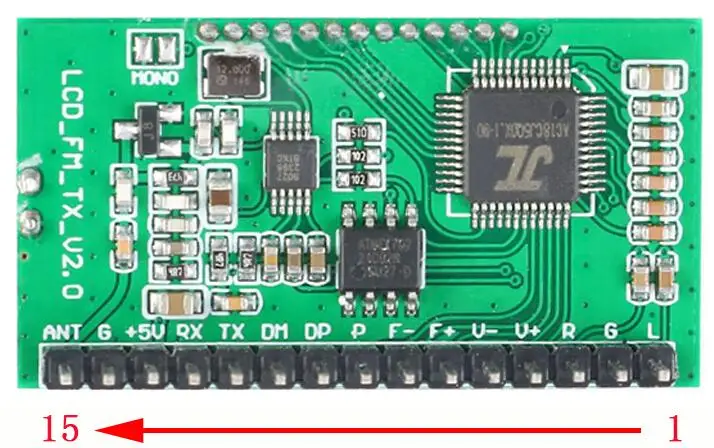
Symbol definition:
1 (L): left channel audio output
2(G): audio ground
3 (R): right channel audio output
4 (V+) : Short press volume + / long press continuous +
5 (V-): Short press volume - / long press continuous -
6(F+) : Short press a station / long press down to search for a station
7(F-) : Short press the previous station / long press to search for the station
8(P): Short press mute/long press full band search and save station
9 (DM): USB DM cable
10 (DP) : USB DP data cable
11 (TX): TTL serial port sender
12 (RX): TTL serial port receiver
13 (+5V): 5V power input (3-5V wide range)
14(G): power ground
15 (ANT): External FM radio antenna end
Instructions for use:
One: line connection
All function outputs of this module are reserved for external ports. Users need to connect external line modules to work normally.
<1>: Connect the audio cable
The corresponding ports AGND, Output R, and Output L of the module are respectively connected to the ground, left channel and right channel of the audio transmission line.
<2>: Connect the power cord
The module corresponds to the port GND, VCC is connected to the negative and positive poles of the power supply (battery) respectively. The normal working voltage of this module is 3.0-5.0V, and the supply voltage should not exceed this range.
<3>: Connect button
All the buttons of this module are reserved for port, and the customer can access the corresponding function buttons as needed. The button can be used with normal? Touch the button, one end is connected to the corresponding button port of the module, and the other end is connected to the module GND or AGND terminal. Part of the button has a long press function (such as volume +/- long press for continuous +/- volume), long press for more than 2 seconds is valid.
<4>: Connect the antenna
The ANT port is used to connect the FM antenna. In order to better transmit (receive) the FM signal, it is recommended to connect an external 75cm rod antenna, and there is no obstacle obstruction near the antenna.
<5>: Connect the USB cable
If you need the USB audio broadcasting function of this module, you need to connect the USB cable to the computer. The USB port has four wires, which are respectively connected to the VCC, USB_DM, USB_DP, and GND ports of the module. Because the computer USB comes with a 5V output, you can use the USB port to provide power directly from the USB port.
<6>: Connect to serial port (no need to connect to serial port control)
The module reserves the TTL level serial port control interface. The TTL serial port communicates with this module. It needs to connect the module's UART_RX, UART_TX and GND. It can use the external MCU (microcontroller) or computer serial port to send the relevant functions of the command control module. Note: Because the computer serial port level is not TTL level, you need to connect RS323 level to TTL when connecting to computer communication, flat switch device or use USB to TTL level serial port module to communicate with this module. Because the serial command control module requires a certain amount of computer expertise, buyers who do not understand need not toss. All the information see baby instructions, customer service does not provide technical guidance on this side.
Two: PC audio broadcasting
After connecting to the computer USB, this module will automatically enter the PC audio broadcast mode, the LCD screen will display the PC, the computer will automatically install the driver, and give the module the sound card device named "CD002", which is enabled in the computer sound settings. To enable this "CD002" audio device, the system audio can be transmitted by FM FM in this module. The nearby radio frequency can be adjusted to the same as the module's transmission frequency to listen to the computer end system transmitted by this module. Audio.
Three: Note:
1: The power supply voltage must not exceed the supply voltage range of this module.
2: Do not touch the back components of the module during work, so as not to affect the normal operation of the module or cause the short circuit to burn the module.
Four: user settings
This module can set the backlight status and whether to transmit the campus broadcast frequency band according to the specific usage of the user. The setting method is as follows. Press and hold VOL+ in the power-off state, and the VOL-key will be powered on. The LCD display C1 indicates that the campus broadcast C0 indicates off. The campus broadcast band is closed. When setting the backlight state, press and hold the upper and lower radio buttons at the same time in the power-off state. The B1 indicates that the backlight is always on, B0 indicates that the backlight is off for 20 seconds, and the setting is effective after the restart. To change the settings? Status repeat this step to switch. The factory setting is set to not open the campus broadcast band, and the backlight is off for 20 seconds without operation.
Button Edition FM Radio Digital Transmitter Module
Features:
1: Use advanced digital audio signal processing technology (DSP) and FM phase-locked loop modulation (PLL) to make the sound quality more realistic, more stable performance, no offset for long-term operating frequency.
2: LCD display is more intuitive and accurate, with very low power consumption and minimal noise interference.
3: Built-in 30-level digital volume adjustment, easy to complete by button operation.
4: Automatically remember the volume and frequency before power-off
5: Multi-channel audio input is automatically switched
6: Using high-precision patch quartz crystal frequency stabilization, temperature, voltage change, emission frequency no longer drifts
7: Support serial command control
Product parameters:
Output power: 100mW
Audio frequency response range: 50Hz-18KHz
Transmission frequency:
Turn off campus broadcast 87.0MHz-108.0MHz, turn on campus broadcast 76.0MHz-108.0MHz
Frequency adjustment step: 0.1MHz/time (short press), 1.0MHz/time (long press)
Modulation mode: standard FM
Channel: LINE/USB channel (stereo), MIC channel (mono)
Equivalent noise: ≥30dB (sound quality is close to CD sound quality)
Supply voltage: DC 3.0V-5.0V
Working current: 35mA
Transmitting antenna: 75cm rod antenna
Transmitting distance: FM transmitter module is connected with 75cm standard rod antenna, radio is used with Desheng PL-660, and the open cover is covered with a radius of 100 meters. (Note: The launch distance is for reference only, due to the difference in usage environment)
One: instructions for use
<1>: Power supply
The module corresponds to the port -, + is connected to the negative and positive poles of the power supply (battery), and the power supply is recommended to use a battery or transformer to reduce the voltage regulator. Switching power supplies without filters (such as mobile phone chargers, charging treasures, switch-mode DC-DC power supplies) cannot be used. Otherwise, high-frequency interference generated by the power supply unit may affect the normal operation of this module. The normal working voltage of this module is 3.0-5.0V, and the power supply voltage should not exceed this range.
<2>: button
Volume +/-: short press volume +/- 1, long press continuous +/-
Frequency +/-: Short press frequency +/- 0.1MHz, long press continuous +/- 1MHz
Mute: short press to switch mute/unmute
<3>: Antenna
The ANT port is used to connect the FM antenna. In order to better transmit the FM signal, it is recommended to connect an external 75cm rod antenna, and there is no obstacle obstruction near the antenna.
<4>: USB audio connection
If you need the USB audio broadcasting function of this module, you need to connect the USB cable to the computer. The USB port is compatible with the Phongtong mobile phone, so you can use the mobile phone USB cable to connect the module to the computer. Because the computer USB comes with 5V output, you can use the USB port to directly supply power to the module using the USB connection. After connecting to the computer USB, this module will automatically enter the PC audio broadcast mode, the LCD screen will display the PC, the computer will automatically install the driver, and give the module a name. The sound card device of "CD002" is in the computer sound setting. Enable and enable the audio device of this "CD002". The audio of the brain system can be transmitted by FM FM in this module. The frequency of the nearby radio is adjusted to match the frequency of the module. You can listen to the computer launched by this module. End system audio.
<5>: LINE audio connection
If you need the LINE (line input) channel of this module as the sound source, just plug one end of the audio cable into the 3.5mm audio jack of the module and the other end into your audio device (such as the phone headset hole). The module automatically switches to the LINE channel as the source of the FM transmission. The nearby FM radio can be adjusted to match the transmission frequency of this module. Listen to the audio from the mobile terminal.
<6>: FM wireless microphone
If you need the MIC of this module to be transmitted as a sound source, just unplug the LINE cable and USB cable (ie LINE and USB are not connected), the module automatically transfers to the MIC channel as the FM sound source. This module comes with high sensitivity station. The polar microphone can be applied to wireless microphones, maternal and child care, etc. as needed. When using, pay attention to adjust the emission volume of this module to the best pickup effect.
<7>: Serial port control (no need for serial port control function)
The module reserves the TTL level serial port control interface. The TTL serial port communicates with this module. It needs to connect the module's UART_RX, UART_TX and GND. It can use the external MCU (microcontroller) or the computer serial port to send commands instead of the button control module. Note: Because the computer serial port level is not TTL level, you need to connect RS323 level to TTL level when connecting to computer communication. Replace the device or use USB to TTL level serial port module to communicate with this module. Because the serial command control module needs a certain computer professional knowledge, buyers who do not understand need not toss, use the button to directly operate the module. All the information see Bao? Bei, the customer service does not provide technical guidance in this regard.
Two: user-defined settings:
1: Backlight LED mode setting
In the power-off state, press and hold the upper and lower radio buttons at the same time. The display B1 indicates that the backlight is always on, and B0 indicates that the backlight is turned off for 20 seconds. After the restart, the settings take effect. (The factory default setting is backlight 20 seconds delay off).
2: Turn on/off the campus broadcast band
Press and hold VOL+ in the power-off state, and then power on the LCD. The C1 indicates that the campus broadcast C0 is turned off to turn off the campus broadcast band. After the restart, the settings take effect. (The factory default setting is to turn off the campus broadcast band).
3: Stereo/Mono Transmit Mode Settings
There are two solder joints M and G on the back of the module. The two terminals are short-circuited for mono system transmission, and the two points are disconnected for stereo system? (The factory default is stereo system transmission). Note: The audio input to the module must be met in stereo mode. It is stereo and the radio is stereo to achieve stereo. (Do not take a single speaker (mono) to the receiver or the audio signal input to the module is mono, how there is no stereo effect!!!).
Three: Note:
1: Please confirm that the power polarity and power supply voltage are correct and then power on. If the voltage input exceeds 5V or the positive and negative poles of the power supply are reversed, it can cause permanent damage to the module.
2: The hand cannot touch the back component of the module during work, so as not to affect the normal operation of the module.
This module is a circuit board with components installed, and the buyer needs to have certain knowledge of electronic operation. Please buyers to see the baby instructions,? Do not understand the place to ask first to determine that they have the ability to operate and then buy, for those who do not understand electronic technology, do not recommend buying? Buy this module! So as not tossing, it’s not a problem! Thank you for your cooperation!
Applications: FM wireless audio, USB PC audio broadcasting, wireless microphone, maternal and child monitoring.