
Product Name:
1PCS Red Mini LED Board for Arduino UNO MEGA2560 Nano Breadboard starter kit
Packing list:
1 pcs Red 6 bit LED's Board;
Description:
Can be inserted directly into Arduino uno mega2560,Ideal for linking up to your Arduino UNO Mini Nano Mega2560 etc,or others MCU ( AVR STM32 ARM PIC AT89C51 STC MSP430 FPGA CPLD etc.)
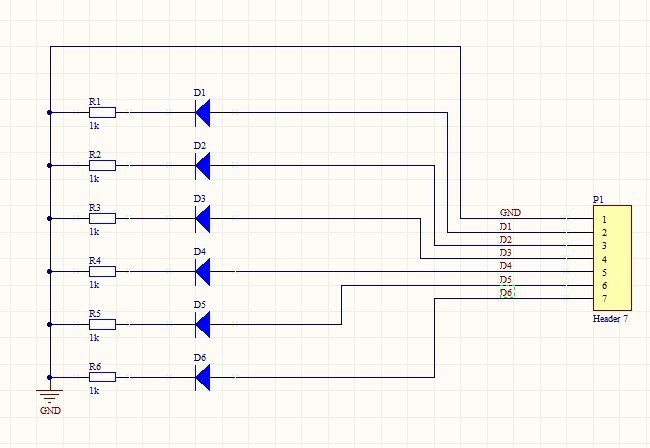
1 6 bit RED Common Cathode LEDS.
2 7 PIN OUT 2.54mm
3 1K ohm Limiting resistor
4 Power Supply Voltage: 3.3-12V;
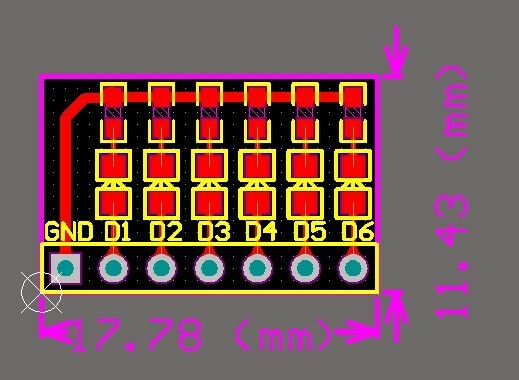
5 Size: 17.78MM x 11.43MM.
PCB :
Circuit schematics :
Connection with Arduino(Only 6 bit LED's Board ,Does not include ARDUINO UNO R3) :
Arduino uno/mega2560 Code
//******************************************************//
/*
Arduino_6led
This example code is in the public domain.
*/
// give it a name:
int D1 = 13;
int D2 = 12;
int D3 = 11;
int D4 = 10;
int D5 = 9;
int D6 = 8;
// the setup routine runs once when you press reset:
void setup() {
// initialize the digital pin as an output.
pinMode(D1, OUTPUT);
pinMode(D2, OUTPUT);
pinMode(D3, OUTPUT);
pinMode(D4, OUTPUT);
pinMode(D5, OUTPUT);
pinMode(D6, OUTPUT);
}
// the loop routine runs over and over again forever:
void loop() {
digitalWrite(D1, HIGH); // turn the LED on (HIGH is the voltage level)
delay(200); // wait for a 200 Millisecond
digitalWrite(D1, LOW); // turn the LED off by making the voltage LOW
digitalWrite(D2, HIGH); // turn the LED on (HIGH is the voltage level)
delay(200); // wait for a Millisecond
digitalWrite(D2, LOW); // turn the LED off by making the voltage LOW
digitalWrite(D3, HIGH); // turn the LED on (HIGH is the voltage level)
delay(200); // wait for a Millisecond
digitalWrite(D3, LOW); // turn the LED off by making the voltage LOW
digitalWrite(D4, HIGH); // turn the LED on (HIGH is the voltage level)
delay(200); // wait for a Millisecond
digitalWrite(D4, LOW); // turn the LED off by making the voltage LOW
digitalWrite(D5, HIGH); // turn the LED on (HIGH is the voltage level)
delay(200); // wait for a Millisecond
digitalWrite(D5, LOW); // turn the LED off by making the voltage LOW
digitalWrite(D6, HIGH); // turn the LED on (HIGH is the voltage level)
delay(200); // wait for a Millisecond
digitalWrite(D6, LOW); // turn the LED off by making the voltage LOW
}
//******************************************************//
|
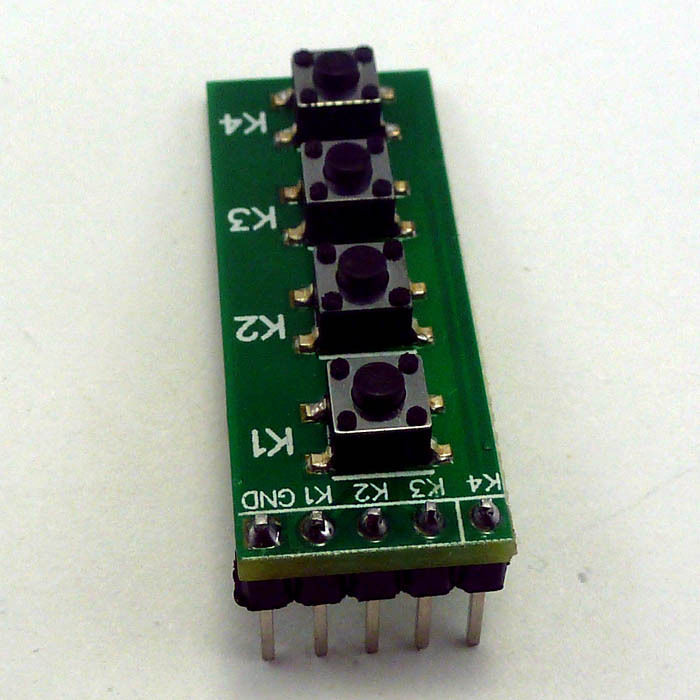
Brand:Eletechsup Moduct Name : 4 Button Key Module Switch Keyboard for Arduino UNO MEGA2560 Breadboard Module No.: TB371
 Description:
Can be inserted directly into Arduino uno mega2560,Ideal for linking up to your Arduino UNO Mini Nano Mega2560 Breadboard etc,or others MCU ( AVR STM32 ARM PIC AT89C51 STC MSP430 STM8 FPGA CPLD etc.)
1 4-button Common Cathode key module .
2 " GND K1 K2 K3 K4" 4 PIN OUT 2.54mm
3 Size: 12.7MM x 33MM.
 Circuit schematics :
Arduino uno/mega2560 Code
//******************************************************//
/*
Arduino_4key_uart
This example code is in the public domain.
*/
// Define key pin
int K1 = 13;
int K2 = 12;
int K3 = 11;
int K4 = 10;
// variables will change:
int buttonState = 0; // variable for reading the pushbutton status
// the setup routine runs once when you press reset:
void setup() {
// initialize the keys pin as an input.
pinMode(K1, INPUT);
pinMode(K2, INPUT);
pinMode(K3, INPUT);
pinMode(K4, INPUT);
//Activate key pin internal pull-up resistors
digitalWrite(K1, HIGH);
digitalWrite(K2, HIGH);
digitalWrite(K3, HIGH);
digitalWrite(K4, HIGH);
// initialize serial communications at 9600 bps:
Serial.begin(9600);
}
// the loop routine runs over and over again forever:
void loop() {
buttonState = digitalRead(K1);
if(!buttonState)Serial.print("k1 \n" );
do
{
buttonState = digitalRead(K1);
}
while(!buttonState);//Wait button release
buttonState = digitalRead(K2);
if(!buttonState)Serial.print("k2 \n" );
do
{
buttonState = digitalRead(K2);
}
while(!buttonState);//Wait button release
buttonState = digitalRead(K3);
if(!buttonState)Serial.print("k3 \n" );
do
{
buttonState = digitalRead(K3);
}
while(!buttonState);//Wait button release
buttonState = digitalRead(K4);
if(!buttonState)Serial.print("k4 \n" );
do
{
buttonState = digitalRead(K4);
}
while(!buttonState);//Wait button release
delay(100);
}
|