Up for sale is a brand-new programmable Smart ANT Battery Management System (BMS), full 10S-24S
range (& the newest Bluetooth App) with 450A peak discharge current
and 180A continuous discharge current.
No.1 choice among analogue devices, this BMS stands out with its rich set of features, robust protection parameters, unmatched reliability, and durability.
I've personally trusted earlier ANT BMS
versions for years in my own high-powered battery packs. It's a choice that's
also been validated by satisfied customers.
This is the newest & most powerful version
of this 2-layer form factor.
UK Stock. The BMS will be carefully wrapped and dispatched the same or the next working day using Royal Mail Tracked 24 (or another quick) delivery service.
The package will include: 1 x BMS, 24 x balancing wires,
4 x external temperature sensors, ON/OFF button.
Local collection in person is also available (if you
are local / need the BMS as soon as possible). Item location: London (E12), UK.
You will not need to pay any additional VAT or customs tax if you are a buyer from the UK.
I can program the BMS specifically for your battery
pack and your needs, saving your time and effort. Please contact me using
eBay messages and let me know:
1) What type
of cells do you use (e.g., LG MH1 18650), and what is the chemistry of your
battery pack - Li-Ion, LiFePO4, or LTO?
2) Nominal,
minimum (cut-off), and maximum (fully charged) voltage of the whole battery pack.
3) How many
cells/sections are in your battery pack (S-number)?
4) Capacity
of the battery pack (Ah).
5) Any other
specific parameters and their values if you need them.
If I do not receive any messages from you within 2-3
hours after purchase, I will send the BMS with the default factory settings,
and you will be able to configure all settings yourself. I have sold many of
these BMS units, and based on my experience, I offer this basic setup to all
customers. Even in the unlikely event that you encounter issues with your
Bluetooth connection, you will have a ready-to-go unit upon arrival for
immediate use.
MAIN TECHNICAL
SPECS
·
Supports:
10S-24S (programmable) Li-ion battery (30V-102V Li-ion battery cells)
13S-24S (programmable) LiFePO4 battery (30V-88V Lithium iron phosphate battery
cells)
15S-24S (programmable) LTO/TiLion battery (30V-68V Lithium-titanate battery
cells)
·
Peak discharge current: 450A
(programmable)
·
Continuous discharge current: 180A
(programmable)
·
Charge current: 50A (default,
programmable)
·
Balance current: 10mA-200mA (programmable)
· Same charge/discharge port ("C-").
·
Live cells (sections) monitoring (each cell (section),
incl. min/max/avg cell voltage), Ah, Battery Voltage, Power, Current,
Temperature using the Bluetooth app.
·
High-precision coulomb meter function, based on
current and time scoring, accurately calculates the remaining capacity of
the battery, battery charge, etc.
·
Programmable double independent real-time under- and overvoltage protection (for
sections and the whole battery pack), 2-Level discharge over-current,
short-circuit protection, cell difference protection.
·
Independent 6-way temperature control (4 x
external battery temperature sensors, 1 x built-in MOSFET temperature sensor,
and 1 x built-in Balance temperature sensor). You can set all
temperature protection parameters via the app.
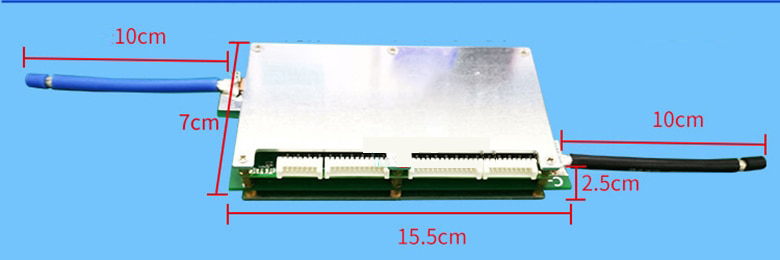
· BMS size: 155(L)x70(W)x25mm(H).
· BMS weight: 420g.
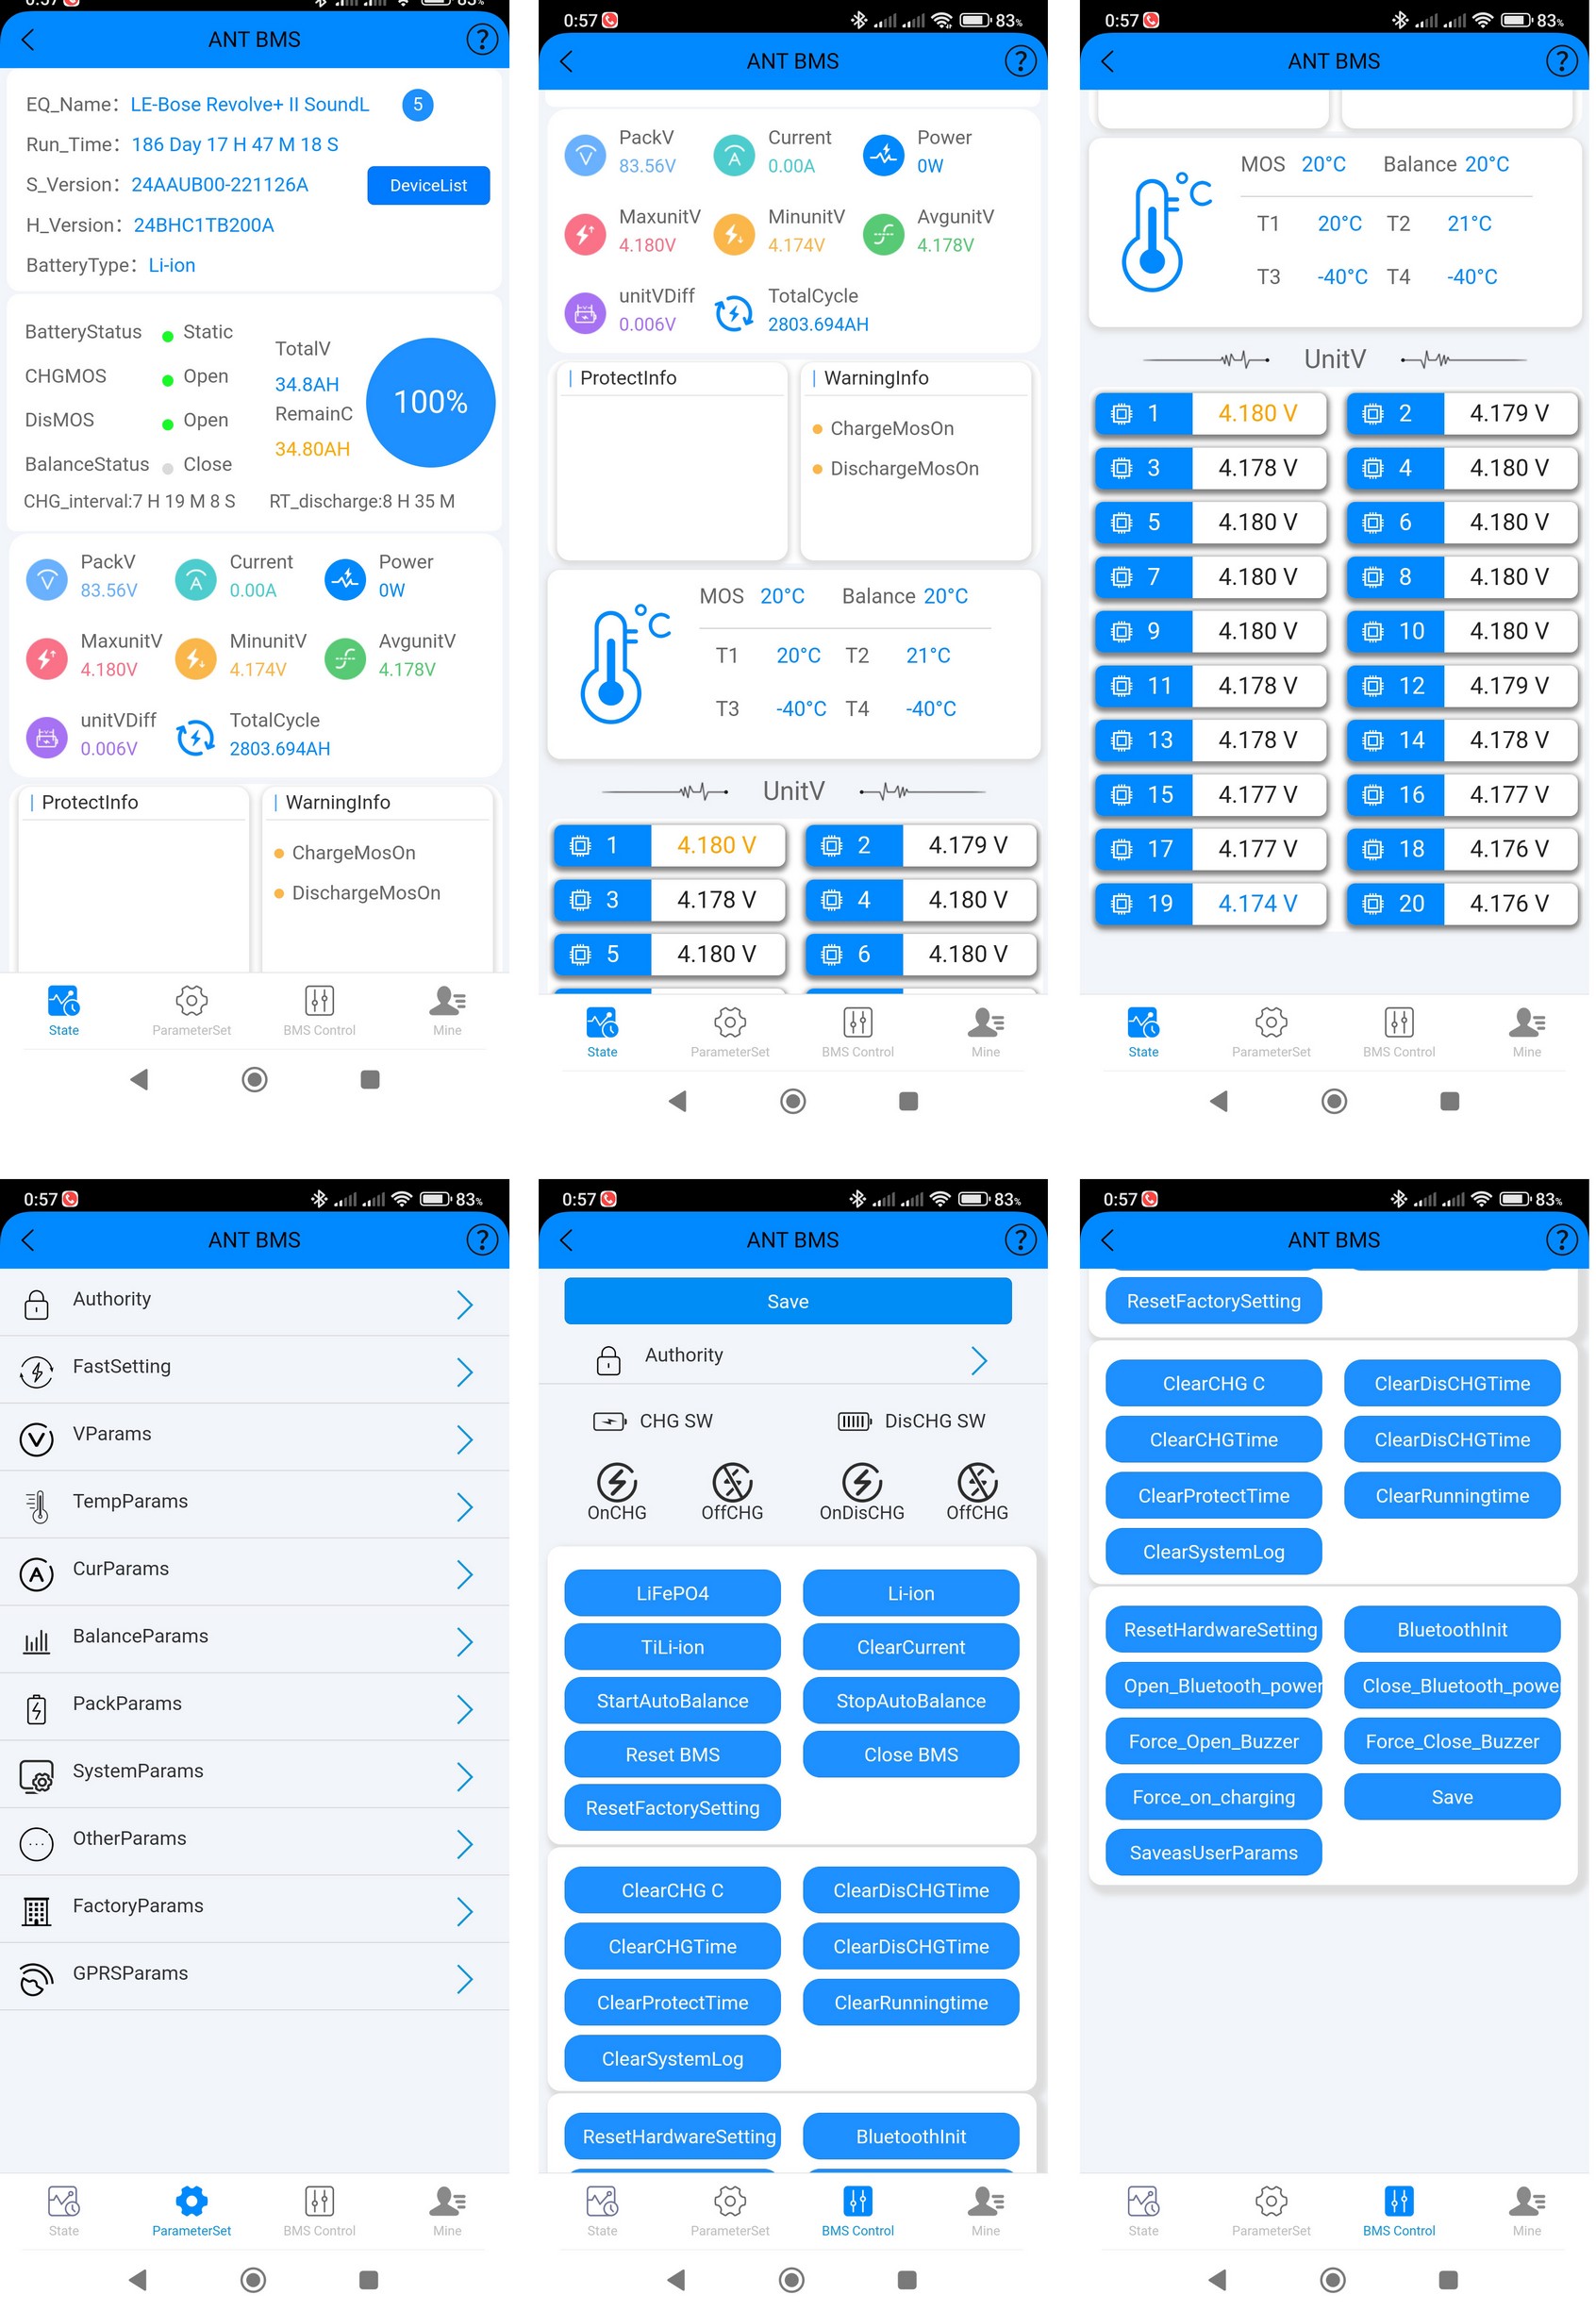
BLUETOOTH CONNECTION
& ANT BMS APP
After wiring the BMS, you can establish the initial
Bluetooth connection/pairing, which is well explained in the video (please copy
and follow the link below*):
* In the video, I explain how to connect the less powerful 300A version of
the Ant BMS via Bluetooth. The connection for this newer 450A version is done
in a similar manner.
https://youtu.be/xovmexvc42c
For Android smartphone/tablet
users, there is the newest fully functional app available. I will send you
the link to the app after the purchase via eBay messages along with some
additional useful instructions. I personally use it with this BMS and can
confirm that it works excellently, and you should not experience any issues
with the Android app.
If you are an iPhone (iOS) user and would like
to program the BMS with an iPhone, please note that this BMS has the latest firmware,
and the app to program it via iPhone has not been updated yet. However, you can
still use this older version iPhone app from the App Store to view (only view)
the current status of your battery pack and cell (sections) state (all readings
on the main screen): battery voltage, Ah, cell difference, remaining capacity,
power, battery temperature, etc. But again, on an iPhone (iOS), you will not be
able to set up the BMS or make changes to the settings.
If you are an iPhone user and do not have another/spare Android smartphone/tablet, you can contact me via eBay messages, and I will program the BMS specifically for your battery pack and your needs. Just provide me with the details of your battery pack as described above in this listing. In this case, you will receive your BMS in a ready-to-solder condition and use your iPhone only for viewing the status of your battery and cells.
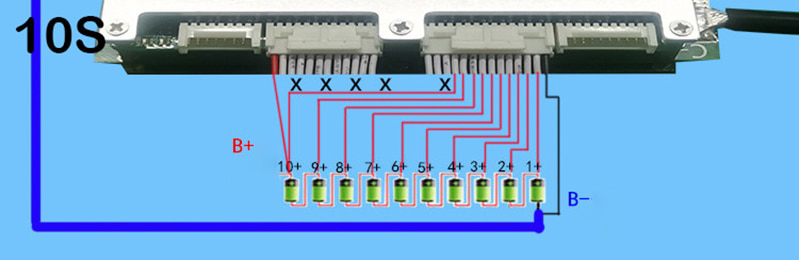
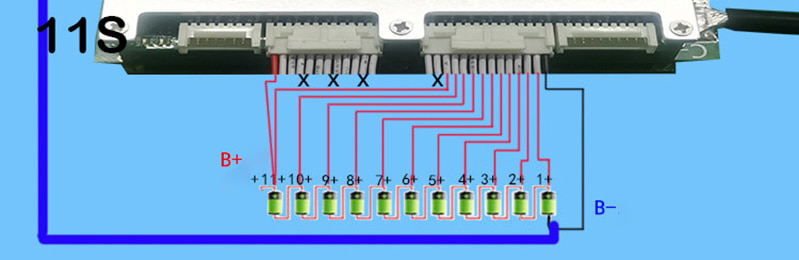
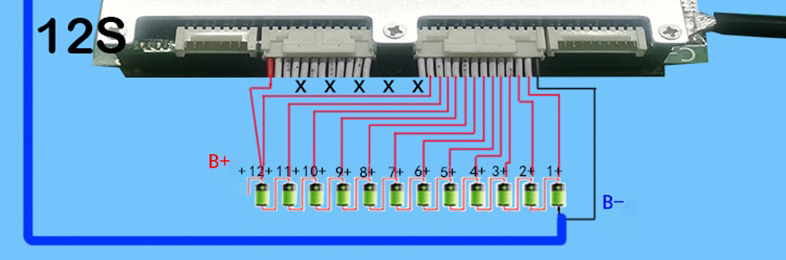
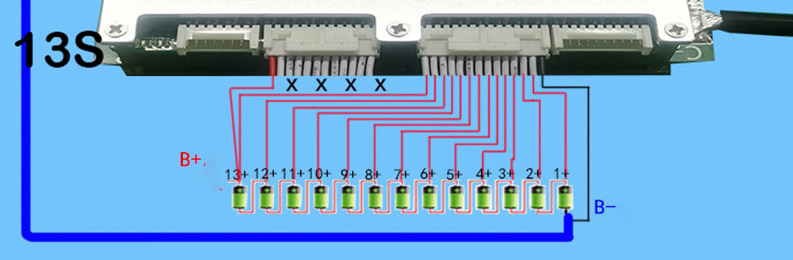
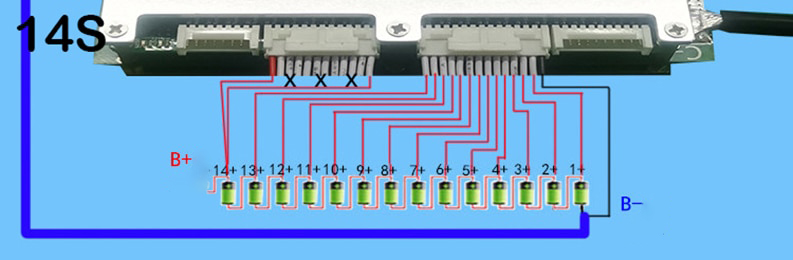
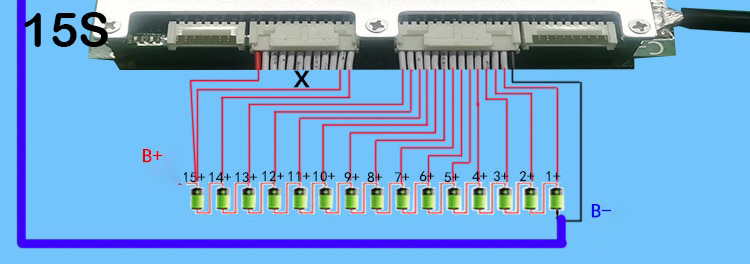
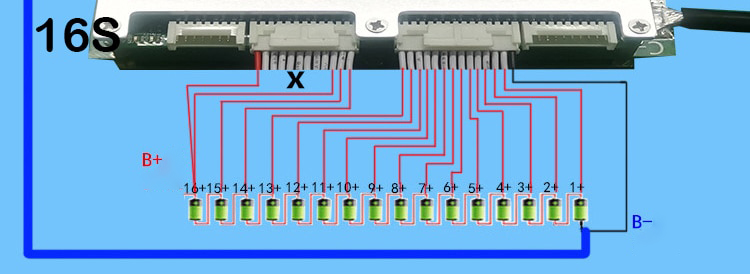
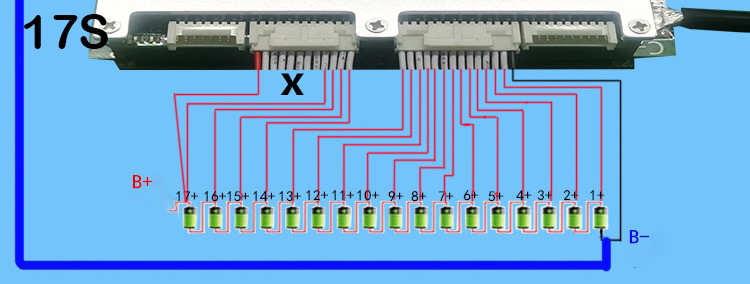
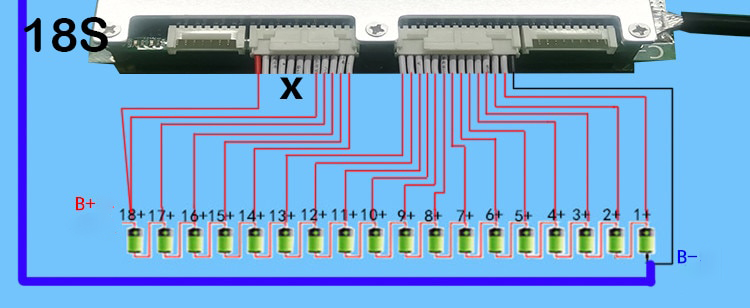
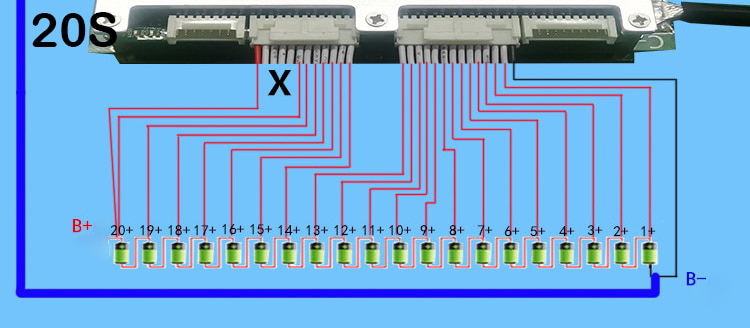
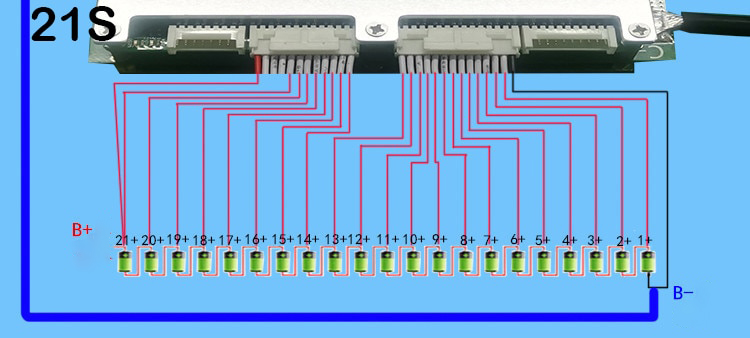
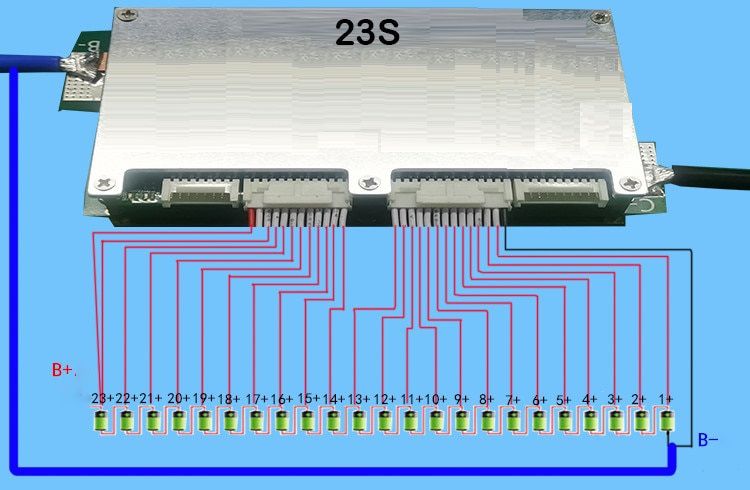
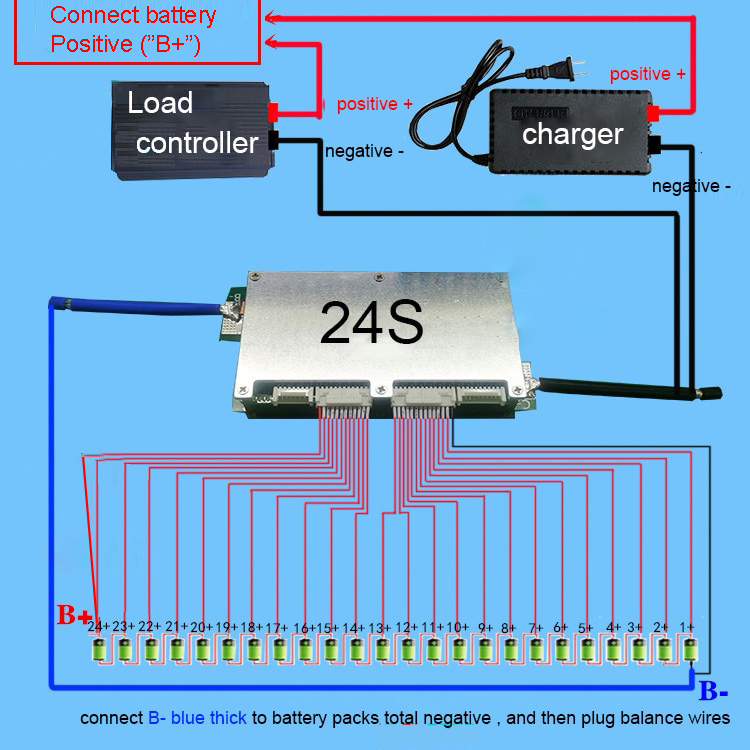
Please connect the
balancing wires according to the number of cells (sections) using the
pictures (schematics) in this listing below.
Do not attach/plug in the balancing wires’ connectors to BMS until you have
attached and checked all balancing wires on the cells
(sections) of the battery pack.
Check the voltage on every pin of the balancing connector relative to the minus/ground
of the battery pack. If you have connected everything correctly, the
voltage should gradually increase on every next pin (until you reach
the last section of your battery pack).
Also, do not forget to connect
the last red balancing wire to the last section of your battery pack (or in
other words, to the "+" of your battery pack). Please, see the
pictures/schematics below for reference.
* This product is
intended for use by experienced individuals. Please note that I am not
responsible for any failures, damages, or incidents resulting from the failure
to observe safety measures during the connection and operation of this BMS. *
STARTING, SHUTTING DOWN AND RESTARTING THE BMS
After installing and
programming the BMS, no additional actions are required during everyday use.
However, it is helpful to understand the operational algorithms in case of
faults or if you wish to completely switch off your BMS, etc.
·
Turning ON. After installing, press the power button shortly to turn on the
BMS. Now you can connect, monitor and program it using Bluetooth app.
·
Restarting. If the BMS has turned off due to the activation of one of the protection
functions, restart the BMS by pressing the button for an extended period (5
sec), releasing it, and then pressing the same button shortly.
Alternatively, restart it using the Bluetooth App (“Reset BMS”). Additionally,
using the app, you can identify the specific cause that triggered the BMS to
enter protection mode.
·
Shutting down. During normal operation of the protection board, press and hold the
button for over 5 seconds. After releasing the button, the protection board
will automatically power off, cease operation, and consume zero power. Also, you can program a standby time: if the
discharge MOSFETs (or simply - load) are not turned on for more than 3000
minutes (adjustable via the app), the protection board will automatically turn
off the main power, stop working, and consume zero power. Once you connect the
load, the BMS will 'wake up' and turn on automatically.
BALANCING WIRES CONNECTION SCHEMATICS
(10S 11S 12S 13S 14S 15S 16S 17S 18S 19S
20S 21S 22S 23S 24S)

Feel
free to ask questions