WDPS6005 60V 5A CNC Power Supply DC Adjustable Step Down Power Supply Module 2.8" Color Screen CV CC
Attention:
Please read introductions carefully before use. The module has passed tests before delivery. After receiving the goods, please browse its wiring method first, and then power on.
Version Introduction:
- WDPS6005: Without communication for MODBUS.
- WDPS6005M: With communication for MODBUS. The power supply for MODBUS version has an RS485 communication interface, which can be set or collected by a host computer software, and it can also communicate with computers, PLC, DCS, smart meters and other equipment!
- Other functions of these two versions are the same!
PS: If you buy the version for MODBUS, it is recommended to use our USB to 485 module to avoid compatibility issues with other brands of serial port modules causing it to fail to communicate normally and waste your time. If the USB to 485 module is needed, please contact us to pay extra money. Thank you!
Product Parameters:
- Input voltage: DC 6V-70V
- Output voltage: DC 0-60V continuously adjustable (It can only be used as a step-down module, the input voltage must be greater than the output voltage by more than 1V)
- Output current: 0-5A continuously adjustable
- Output power: maximum 300W
- Working temperature: -10 to 75â
- Resolution: voltage 0.01V, current 0.001A
- Accuracy: voltage 0.3%±3 digits, current 0.5%±5 digits
- Conversion efficiency: up to 95%
- Short circuit protection: Yes, the constant current value currently set
- Input reverse connection protection: Yes
- Output anti-backflow: Yes
- Wiring mode: terminal VI+ is input positive, VO+ is output positive, B+ is a dedicated interface for charging
- Module size: 120 x 64 x 72mm (LxWxH)
- Opening size: 117 x 60mm (LxW)
- Weight: 223g
Package Included:
- 1 x CNC Power Supply Module
Note:
- RS485 port for Modbus communication is only for MODBUS version. Pictures below are for reference only.
- Battery is not included in the package.
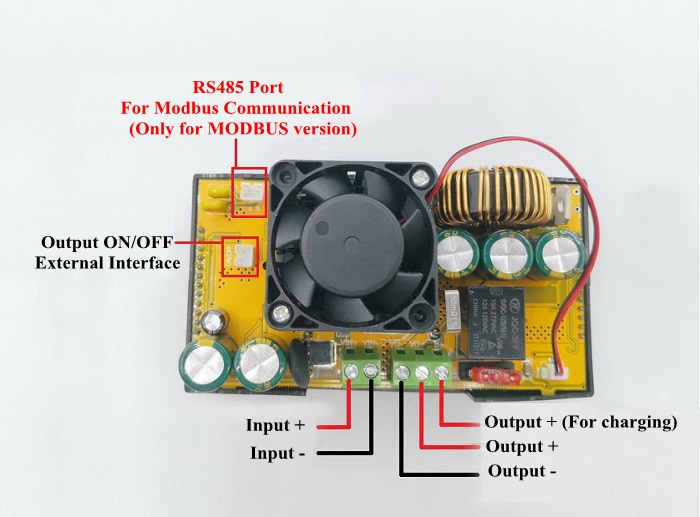
Note: Charging a battery, the positive electrode must be connected to the dedicated B+ interface for charging. There is anti-backflow and overcharge protection. Automatically disconnect after the battery is fully charged. Battery is not included.
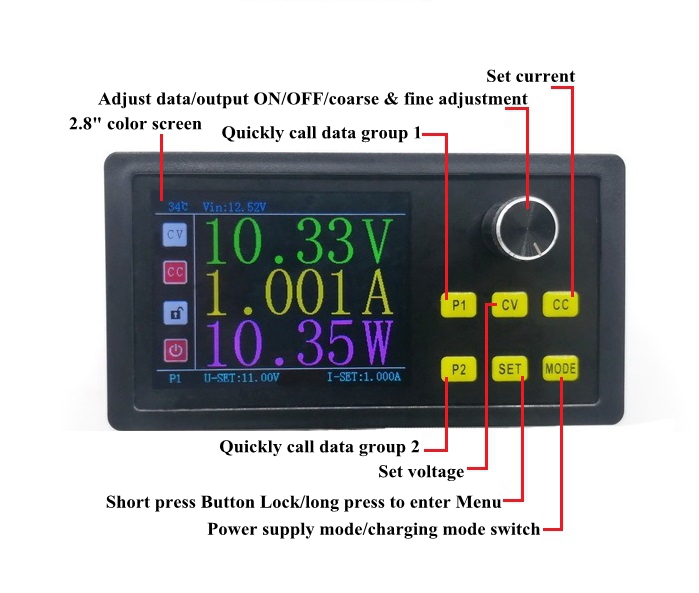
Setting Instructions:
Output ON/OFF Settings:
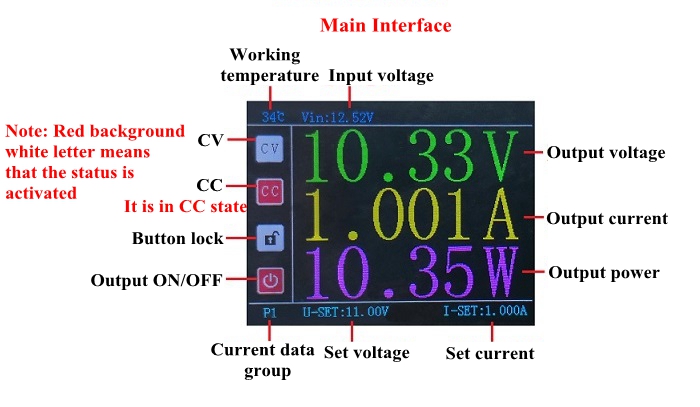
In the main interface, directly short press code switch to open or close output terminal voltage. When closed, voltage, current, and power all display 0.
Button Lock Settings:
In the main interface, short press SET key directly to turn on or off button lock function. When locked, all other keys are invalid.
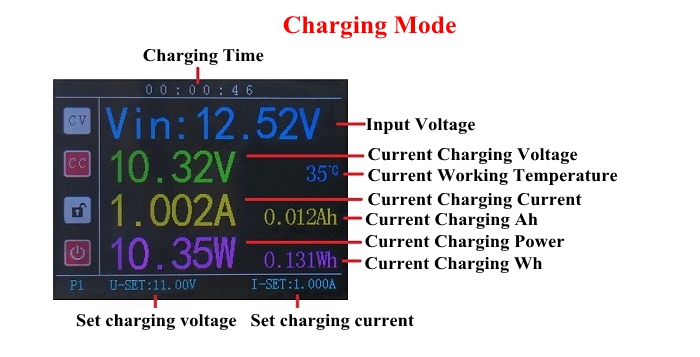
Charging Mode Switch:
The output must be turned off (short press code switch to switch output), press MODE button to enter charging mode. The positive output of the output must be connected to B+ terminal, which has a backflow prevention function and automatically turns off the output after fully charged to protect your battery from overcharging. Press MODE again to switch back to mode. (Note: One minute after starting charging, when the detected charging current is less than 5% of the set current, it is considered that the battery is fully charged and it will automatically disconnect).
Output Voltage Setting:
Short press CV key, U-SET font below will be displayed in red, rotary coding switch can adjust the current output voltage value, and short press the coding switch can switch between coarse and fine adjustment. After adjustment, long press CV key to save and exit. (You can also enter SET menu to set the current voltage)
Output Current Setting:
Short press CC button, the lower I-SET font will be displayed in red, rotary coding switch can adjust output current value, and short pressing the coding switch can switch between coarse and fine adjustment. After adjusting, long press CC button to save and exit. (You can also enter the SET menu to set the current) (Note: The CC status indicator will be converted to white on a red background when it is in constant current state! The constant current mode can only be used when the actual load output current is greater than the set current, otherwise it will work in a constant voltage state. When the current is adjusted to 2A, it does not mean that any connected equipment will become 2A.)
Quick Data Group Setting:
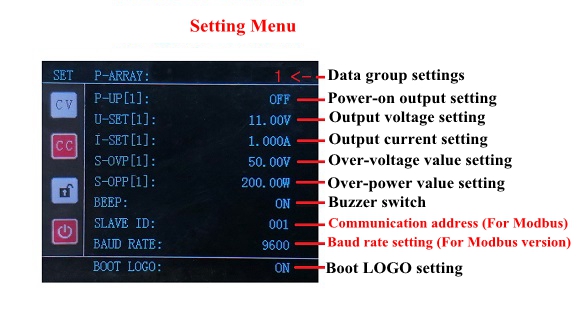
The output must be turned off (short press code switch to switch output), and long press SET button to enter setting menu interface. Press SET key to select setting items in turn, locate P-ARRAY item, and rotate the coding switch to adjust the current value. (10 different data groups can be set, each group can set different values, you can directly press P1 or P2 key to quickly call P1 and P2 CNC data groups, and other groups need to be called in the setting menu.)
Power-on Output ON/OFF Setting:
The output must be turned off (short press code switch to switch output), and long press SET button to enter the setting menu interface. Press SET key to select setting items in turn, locate P-UP item, and rotate the coding switch to adjust the current value. (When set to OFF, the current data group output is off when power on. When set to ON, the current data group output is on when power on.)
Over-voltage Setting:
The output must be turned off (short press code switch to switch output), and long press SET button to enter the setting menu interface. Press SET key to select setting items in turn, locate S-OVP item, and rotate the coding switch to adjust the current value. Short press the code switch to switch coarse and fine adjustment. After adjustment, press SET button to exit the last item. (When the input voltage exceeds the set value, the output will be automatically turned off.)
Over-power Setting:
The output must be turned off (short press code switch to switch output), and long press SET button to enter the setting menu interface. Press SET key to select setting items in turn, locate S-OPP item, and rotate the coding switch to adjust the current value. Short press the code switch to switch coarse and fine adjustment. After adjustment, press SET button to the the last item to exit. (When the output power exceeds the set value, the output will be automatically turned off.)
Buzzer Settings:
The output must be turned off (short press code switch to switch output), and long press SET button to enter the setting menu interface. Press SET key to select setting items in turn, locate BEEP item, rotate the coding switch to adjust the current value, ON is to turn on the buzzer, and each operation buzzer will beep at this time; OFF is to turn off the buzzer.
2.All major credit cards are accepted through secure payment processor PayPal.
3.Payment must be received within 7 business days of auction closing.
4.We ship to your eBay or Paypal address. Please make sure your eBay and Paypal address is correct before you pay.
2. If you purchased in improper condition, please NOTE that the sipping and handling fee will not be refund, all return shipping fee should paid by the buyer unless item DOA.
3. We reserve the right to refuse any returns for objective reasons.
2. Avoiding some unnecessary trouble, please check with your country's customs office to inform us what we should declare its value before shipping.
2. If you are satisfied with the product you received, please kindly leave us a positive feedback and 5 star DSR. If there is any problem of your order, please feel free to contact us firstly, we are responsible and credible seller, will follow it for you asap.

On Sep-04-20 at 01:33:39 PDT, seller added the following information: