192-Ounce Kit
1-Gallon of Resin and 1/2-Gallon of Curing Agent
Combined Volume of 1.5 gallons
100% Solids Formulation
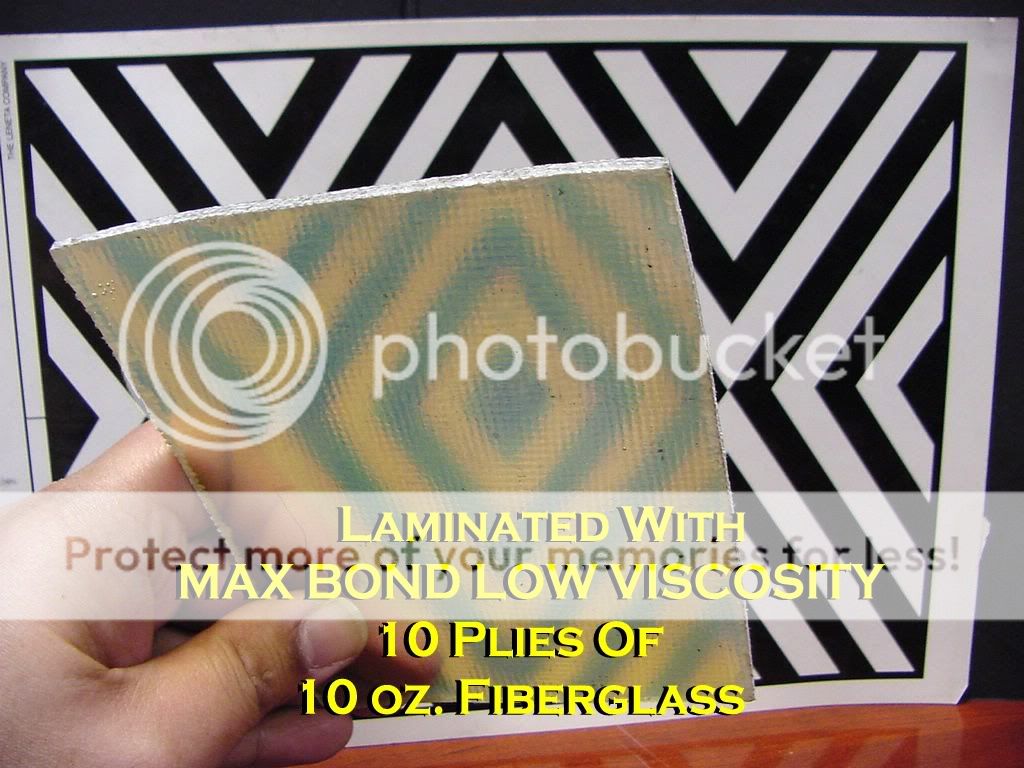
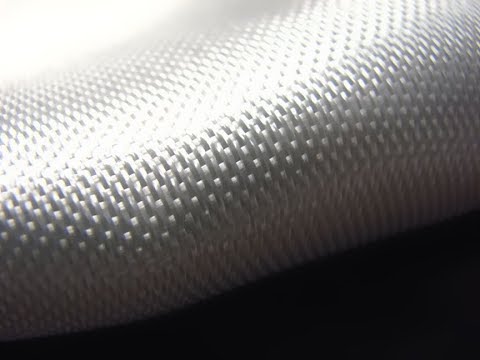
Wood Was Sealed And Then Fiberglass Reinforced With MAX PCR A/B
DESCRIPTION
MAX PCR A/B is a two-component epoxy based resin system formulated to provide excellent sealing properties for wood and porous substrates. It is specially designed as a protective coating and penetrating sealant against the marine environment, water, alkali and acidic compounds. MAX PCR A/B exhibits excellent resistance to various solvents, gasoline and prevents microbial and fungal infestation preserving the wood' structural properties.
MAX PCR A/B demonstrates durability and exceptional adhesion to wood, stone, masonry and concrete substrates.
MAX PCR A/B can also be utilized to stabilize and encapsulate rotted or damaged wood and prevent further deterioration. It will stabilize damaged wood by sealing the porosity to retard propagation of any fungal growth and reinforce wood rot by binding the wood fibers into a homogenized wood/resin composite. The cured coating will have a high gloss and “blush-free” finish that is receptive to a top coat finish formulation such as the MAX PCR A/B can withstand extremely cold temperatures and repeated thermal cycling without fracturing or peeling. It is resistant to deterioration due to fungal infestation, alkali damage from cementitious efflorescence and continuous water immersion.
MAX PCR A/B is supplied 100% solids (no solvent) and does not contain Ozone Depleting Chemicals.
SAVE MONEY BY ADDING THE SOLVENT AT THE POINT OF USE
Undiluted Volume: This Kit Is 100% Solids and Undiluted
Non-Flammable: Store Safely
Lower Shipping Cost: Shipping Classification Is Non-Flammable
Product Stability: Undiluted Resin System Maintains Its Physical Stability Much Longer
Reduced Packing Cost: Flammable Resins Require Special Packaging
Controlled Performance: Use Undiluted for fiberglassing Application/ Slightly Dilute As Recommended For Wood Sealing Application
Other Commercial Epoxy Penetrating systems contain highly toxic solvents such as toluene, naphtha and other aromatic solvents that are also considered as an environmental pollutant. Most epoxy penetrating solutions utilize and overuse slow evaporating solvents creating a weak resin barrier. These solvents do not take part in the polymerization process and if any unevaporated solvent cures within the resin matrix, it will lower the chemical resistance and mechanical properties of the penetrating resin.
Solvents entrapped within the cured epoxy matrix will continue to evaporate and cause dimensional shrinkage and cause the wood to drastically warp.
Adding the proper solvent will lower the dynamic surface tension of the resin thus improving the penetrating properties. It will also extend the working time providing longer penetrating periods.
MAX PCR A/B is supplied solvent free to save cost on packaging and shipping of an easy to incorporate Acetone solvent that will effectively lower the viscosity of the mixed resin and make an excellent wood penetrating sealer. Acetone is also considered as a None Hazardous Air Polluting Substance (None-HAPS) and is exempt under AQMD (Rule 102 Group 1, RULE 1107 and 1113) and EPA guidelines and mandates governing the release of petroleum-based solvents.
Using acetone as fast evaporating thinner, no more than 7% by weight or by volume, demonstrates the lowest loss of performance due to residual acetone within the cured resin matrix. Residual solvents entrapment will typically act as a plasticizer in the resin matrix causing lowered mechanical properties. Acetone is widely available at most paint or hardware store and can be added at the time of use. Other solvents can be used but acetone demonstrates the best results.
The recommended 7% addition to the mixed MAX PCR resin provides the highest viscosity reduction and lowering of the epoxy resin's dynamic surface tension allowing deeper penetration while evaporating efficiently from the system prior to the epoxy curing into a solid phase.
The fast evaporation and volatility of the acetone reduce any plasticizing effect upon cure of the resin matrix. Entrapment of any solvent within the cured epoxy matrix will eventually evaporate causing volume shrinkage, porosity, and loss of water-resistant properties.
Any entrapped solvent will act as a fugitive solvent that will lower the water and chemical resistance of the cured resin.
THIS KIT INCLUDES A SET OF YORKER CAPS FOR CONTROLLED DISPENSING
.
PHYSICAL AND CURED MECHANICAL PROPERTIES
Hardness
75 Shore D
Tensile Strength
10,900 psi
Tensile Modulus
517.5 kpsi
Elongation @ Break
2.9 %
HDT
73oC @ 66 psi
Flexural Strength
17,000 psi
Flexural Modulus
546.0 kpsi
Compressive Strength
12,800 psi at failure
Tensile Shear Strength
9,400 psi
Weight Gain 2 Hour Water Boil
2.3 %
Operating Temperature
-80oC to 100oC
Typical Coverage Data
Hardness
75 Shore D
Tensile Strength
10,900 psi
Tensile Modulus
517.5 kpsi
Elongation @ Break
2.9 %
HDT
73oC @ 66 psi
Flexural Strength
17,000 psi
Flexural Modulus
546.0 kpsi
Compressive Strength
12,800 psi at failure
Tensile Shear Strength
9,400 psi
Weight Gain 2 Hour Water Boil
2.3 %
Operating Temperature
-80oC to 100oC
The coverage of will depend on the applied coating thickness, surface roughness and the solvent dilution of the MAX PCR. Other factors as loss from the application and ambient temperature during application will also greatly affect the coating coverage. The following values are base on theoretical calculations and actual data from usage on sealed MDF wood board. The thickness value is measure after cured or DFT (Dry Film Thickness).
Volume Resin | Dry Film Thickness | Coverage Area | Application Note |
1 Gallon | 0.001 | Theoretical Coverage | No solvent dilution |
1.5 Gallon Kit | 0.002 * | 1203.00 sq/ft | HVLP spray** |
1.5 Gallon Kit | 0.010* | 220.6 sq/ft | Roller applied** |
1.5 Gallon Kit | 0.020 * | 130.0 sq/ft | Brush Applied** |
96 Ounce Kit | 0.002 * | 601.00 sq/ft | HVLP Spray** |
96 Ounce Kit | 0.010 * | 120.3 sq/ft | Roller applied** |
96 Ounce Kit | 0.020* | 60.1 sq/ft | Brush Applied** |
*Topcoat thickness using application note on pressure treated marine plywood
**5% Acetone Dilution
BASICS STEPS OF WOOD SEALING AND WATERPROOFING
Click here to download our step-by-step wood coating and waterproofing bulletin


Fiberglassing over the seal wood for increase strength and stability
COMPLETE 22' MOTOR BOAT REDECKING WITH
MAX PCR A/ B: Used For Wood Sealing/Waterproofing
Materials Needed For Boat Wood Deck Replacement
ITEM
DESCRIPTION
Up to 23-Foot Motor Boat
Up to 18-Foot Motor Boat
MAX PCR A/B
Wood Sealing, Waterproofing, Fiberglassing
MAX PIGMENT PASTE
Colorant For Epoxy Resin
MAX BOND THIXOTROPIC A/B
Non-Sagging Structural Marine Adhesive
FIBERGLASS FABRIC
Structural Reinforcement Fabric
DIGITAL PRECISION SCALE
Weighing And Proportioning
MIXING KIT
Mixing Cups, Stir Sticks, Syringes, Gloves

Fiberglassing over the seal wood for increase strength and stability
COMPLETE 22' MOTOR BOAT REDECKING WITH
MAX PCR A/ B: Used For Wood Sealing/Waterproofing
Materials Needed For Boat Wood Deck Replacement
|
ITEM |
DESCRIPTION |
Up to 23-Foot Motor Boat |
Up to 18-Foot Motor Boat |
|
MAX PCR A/B |
Wood Sealing, Waterproofing, Fiberglassing |
||
|
MAX PIGMENT PASTE |
Colorant For Epoxy Resin |
||
|
MAX BOND THIXOTROPIC A/B |
Non-Sagging Structural Marine Adhesive |
||
|
FIBERGLASS FABRIC |
Structural Reinforcement Fabric |
||
|
DIGITAL PRECISION SCALE |
Weighing And Proportioning |
||
|
MIXING KIT |
Mixing Cups, Stir Sticks, Syringes, Gloves |
PRACTICAL GUIDE ON HOW TO USE THIS RESIN SYSTEM
Review All Published Data Regarding This Product.
Proper Usage Data And Other Detailed Information Are Posted At This Page.
Mix the Resin And Curing Agent Only After The Surface Is Prepared For Application.
STEP 1. SURFACE PREPARATION
The quality of adhesion of any coating or adhesive application is dependent on how well the surface is prepared. The resin system must be able to properly 'wet-out' the surface to form a continuous film. Surfaces demonstrating poor wettability prevents the liquid resin from forming a cohesive bond. Improper surface wetting yields poor adhesion and will delaminate during use.
Wetting is the ability of a liquid to interfaces or wet-out a solid surface; its dynamics is expressed as surface tension. A surface that demonstrates low surface tension, such as waxed surface, oily surface or slick plastics like Teflon will prevent the liquid resin to wet-out and cause poor adhesion.
In the same respect, if the surface is coated from a previous application, the epoxy adhesion is limited to adhesion quality of the primary coating is applied over. Make sure to remove any loose or peeling old coating before application to avoid delamination. If possible remove the old coating by mechanical sanding or power washing so the applied epoxy is in direct contact with the base substrate. Applying a coating over oil-based stain should be avoided.
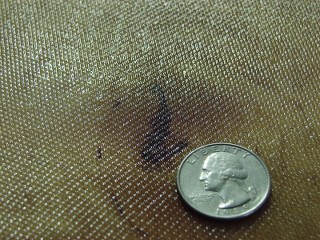
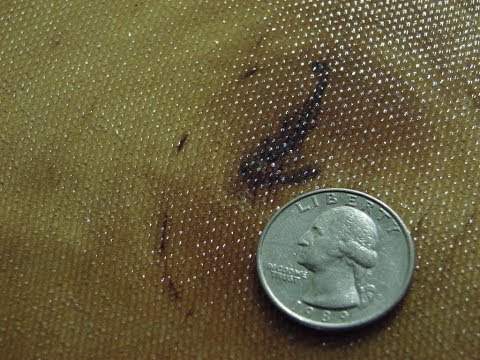
POOR WETTING OF THE RESIN (CRAWLING) DUE TO OIL-BASED STAIN APPLIED ON WOOD

To achieve good surface wetting and crerate a strong bond, ensure the surface is oil-free. Degrease the surface and lightly sand to improve surface wetting. 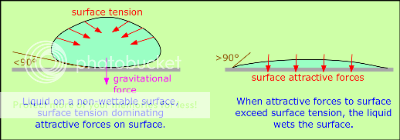
The Following Surface Preparation Procedures Are Recommended.
METALS AND CONCRETE
Degrease Metals– Wipe surface with a lint-free rag dampened with Methyl Ethyl Ketone (MEK) or acetone to remove all oil, dirt, and grease.
Degrease Concrete- Use 2 cups of TSP (trisodium phosphate) detergent per 5 gallons of hot water and scrub with a stiff deck brush. Rinse with water and allow to dry.
Etch Metals – For optimum results, metal parts should be immersed in a chromic acid bath solution consisting of:
Sodium Dichromate
4 Parts By Weight
Sulfuric Acid
10 Parts By Weight
Water
30 Parts By Weight
The solution is held at 160°F (71°C), and the parts left immersed for 5 to 7 minutes. Rinse – remove metal parts from etching bath and rinse with clean water. (distilled water is recommended).
Etch Concrete- Use commercially sold concrete etching solution (hydrochloric acid based works best). Neutralized per instructions, rinse and allow to dry thoroughly.
ALTERNATE PROCEDURE
Degrease, scour and dry – Often etching as outlined above is not practical. The metal surfaces may be cleaned by degreasing as noted above, scouring with an alkaline cleanser followed by rinsing and drying.
Degrease and dry – Degrease the surface as noted above, sand or sandblast the surface lightly but thoroughly. Rinse with acetone or Methyl Ethyl Ketone (MEK), and dry.
GLASS
Degrease – With MEK as above, or with a strong boiling solution of a good grade household detergent.
Etch – For optimum results, degreasing can be followed by the chromic acid bath outlined above.
WOOD
Sand – Bonding surfaces should be sanded lightly, but thoroughly to remove all external contamination.
Clean – Carefully remove all dust, or particles of wood from sanded areas. A stiff and clean brush or compressed air can be used.
PLASTIC
Clean – Remove all dirt, oil, or other surfaces contaminated with detergent soap or degreasing solvent and water, followed by thorough rinsing and drying. A solvent that does not have a detrimental effect may also be used.
Sand – Surfaces to be bonded should be sanded lightly, but thoroughly to remove surface sheen.
Clean – Carefully remove all dust or particles of plastic from the sanded area. A clean brush, lint-free cloth, or compressed air may be used.
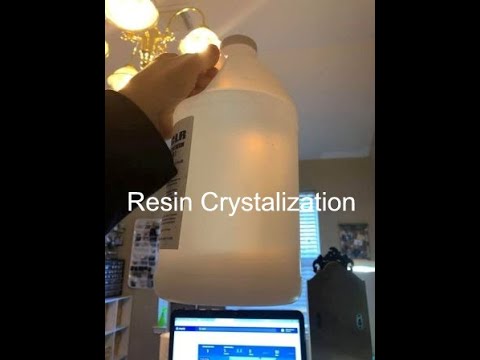
CHECK THE PART A OR RESIN BOTTLE FOR CRYSTALLIZATION
During the winter months, the PART A or RESIN component may crystallize and cause poor cure performance. Our MAX Epoxy Resins are formulated with high purity grade resin polymers which makes it prone to crystallization when exposed to temperatures below 57°F. Crystallization can also occur after the resin has been stored over a period. It will appear as a waxy white mass at the bottom of the bottle. The PART A or RESIN component must be in its liquid form to thoroughly mix with the PART B or curing agent to achieve full cure.
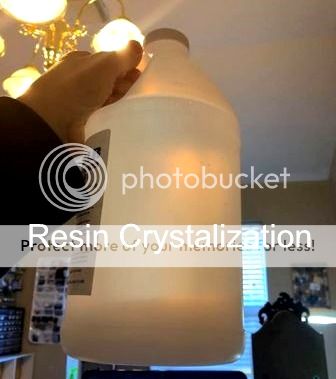
DO NOT USE UNLESS PROCESSED
View the following video for identification and processing.
DETERMINE THE AMOUNT THE BATCH SIZE NEEDED
Begin by mixing a small batch to gain experience with the polymerization process of the MAX PCR resin system. Blending amounts greater than 1000.0 grams or 1 quart in volume requires careful mixing and ensuring the mixed resin is applied and used within the established working time to prevent exothermic "run-away" reaction. Do not let the mixed resin to sit in mass greater than 10 minutes. The heat generated during polymerization will accelerate the chemical reaction and cause a 'run-away' reaction to occur that can generate temperatures above 300°F and cause an uncontrollable chemical reaction. Mix the proper amount of resin and curing agent and apply within 10-15 minutes to avoid this from occurring. Calculate the amount to be mixed by measuring the length x width x thickness of the area to be coated to obtain the cubic volume of the resin needed. Use These Factors To Convert Gallon Needed Into Volumetric Or Weight Measurements.
Fluid Gallon To Volume Conversion
1 Gallon = 231 Cubic Inches
1 Gallon = 128 Ounces
1 Gallon = 3.7854 Liters
1 Gallon = 4 Quarts
1 Gallon = 16 Cups
Fluid Gallon Mass Conversions
1 Gallon Of Mixed Unfilled Epoxy Resin = 9.23 Pounds
1 Gallon Of Mixed Unfilled Epoxy Resin = 4195 Grams
Take into account that some of the coating thickness will be absorbed into the porosity. Mix a batch of the MAX PCR at the proper 2:1 mix ratio and apply it onto the bare wood first, and allow to cure until it has set dry to the touch. This application will seal the surface and prevent further absorption and prevent air bubbles from outgassing that will cause unsightly bubbles from getting entrapped in the coating. The sealing application will also cause "grain-raining' to occur.

When a liquid coating is applied over wood, fibers will begin to swell as it gets impregnated with the resin.
This will produce what is called 'grain raising' to occur. Raised grains are small end fibers protruding from the coating causing unsightly unevenness. Allow the applied resin to cure and lightly sand the surface using fine-grit sandpaper. Once the surface is prepared, apply the second coat of MAX PCR which will yield a smooth blemish free coating.
CALCULATING HOW MUCH RESIN TO MIX
The coating thickness is a big factor that dictates resin coverage. For protective coatings, a minimum coating thickness of 0.010-inch or 10 mils is recommended. Thicker coating thickness up to 0.500 mils or 1/2 inch per can be applied; however, consider the exothermic heat the resin produces when cured in a concentrated mass. The larger the mass, the higher the exothermic temperature is generated, the shorter the working time
To calculate coating thickness of 0.010-inch or 10 mils is recommended.
Calculation: 1608 / 10 = 160.8 Square Feet 1 Gallon Coverage
For high-build or thick casting of 1/2 inch (500.0 mils)
Calculation: 1608 / 500 = 3.21 Square Feet 1 Gallon Coverage
MIXING PROCEDURE
The two components must be mixed thoroughly to eliminate problems such as tacky or uncured spots. Use the "two container method" as demonstrated in this video demonstration, which ensures a homogeneous mixture of the resin and curing agent.
PROPER MIXING TECHNIQUE

How To Mix Epoxy Resin For Food Contact Coating. Avoid Tacky Spots, Minimize Air Bubble When Mixing - YouTube
Video will open in a new window
Using the eBay App? Paste link into a browser window:
TWO CUP MIXING METHOD TO AVOID TACKY SPOTS
APPLICATION DEMONSTRATIONS
Review All Published Data Regarding This Product.
Proper Usage Data And Other Detailed Information Are Posted At This Page.
Mix the Resin And Curing Agent Only After The Surface Is Prepared For Application.
STEP 1. SURFACE PREPARATION
The quality of adhesion of any coating or adhesive application is dependent on how well the surface is prepared. The resin system must be able to properly 'wet-out' the surface to form a continuous film. Surfaces demonstrating poor wettability prevents the liquid resin from forming a cohesive bond. Improper surface wetting yields poor adhesion and will delaminate during use.
Wetting is the ability of a liquid to interfaces or wet-out a solid surface; its dynamics is expressed as surface tension. A surface that demonstrates low surface tension, such as waxed surface, oily surface or slick plastics like Teflon will prevent the liquid resin to wet-out and cause poor adhesion.
In the same respect, if the surface is coated from a previous application, the epoxy adhesion is limited to adhesion quality of the primary coating is applied over. Make sure to remove any loose or peeling old coating before application to avoid delamination. If possible remove the old coating by mechanical sanding or power washing so the applied epoxy is in direct contact with the base substrate. Applying a coating over oil-based stain should be avoided.
POOR WETTING OF THE RESIN (CRAWLING) DUE TO OIL-BASED STAIN APPLIED ON WOOD
The Following Surface Preparation Procedures Are Recommended.
METALS AND CONCRETE Degrease Metals– Wipe surface with a lint-free rag dampened with Methyl Ethyl Ketone (MEK) or acetone to remove all oil, dirt, and grease. Etch Metals – For optimum results, metal parts should be immersed in a chromic acid bath solution consisting of:
The solution is held at 160°F (71°C), and the parts left immersed for 5 to 7 minutes. Rinse – remove metal parts from etching bath and rinse with clean water. (distilled water is recommended). Etch Concrete- Use commercially sold concrete etching solution (hydrochloric acid based works best). Neutralized per instructions, rinse and allow to dry thoroughly. ALTERNATE PROCEDURE Degrease and dry – Degrease the surface as noted above, sand or sandblast the surface lightly but thoroughly. Rinse with acetone or Methyl Ethyl Ketone (MEK), and dry. | GLASS Degrease – With MEK as above, or with a strong boiling solution of a good grade household detergent. Etch – For optimum results, degreasing can be followed by the chromic acid bath outlined above. WOOD Sand – Bonding surfaces should be sanded lightly, but thoroughly to remove all external contamination. Clean – Carefully remove all dust, or particles of wood from sanded areas. A stiff and clean brush or compressed air can be used. PLASTIC Clean – Remove all dirt, oil, or other surfaces contaminated with detergent soap or degreasing solvent and water, followed by thorough rinsing and drying. A solvent that does not have a detrimental effect may also be used. Sand – Surfaces to be bonded should be sanded lightly, but thoroughly to remove surface sheen. Clean – Carefully remove all dust or particles of plastic from the sanded area. A clean brush, lint-free cloth, or compressed air may be used. |
CHECK THE PART A OR RESIN BOTTLE FOR CRYSTALLIZATION
During the winter months, the PART A or RESIN component may crystallize and cause poor cure performance. Our MAX Epoxy Resins are formulated with high purity grade resin polymers which makes it prone to crystallization when exposed to temperatures below 57°F. Crystallization can also occur after the resin has been stored over a period. It will appear as a waxy white mass at the bottom of the bottle. The PART A or RESIN component must be in its liquid form to thoroughly mix with the PART B or curing agent to achieve full cure.
DO NOT USE UNLESS PROCESSED
View the following video for identification and processing.
Fluid Gallon To Volume Conversion
1 Gallon = 231 Cubic Inches
1 Gallon = 128 Ounces
1 Gallon = 3.7854 Liters
1 Gallon = 4 Quarts
1 Gallon = 16 Cups
Fluid Gallon Mass Conversions
1 Gallon Of Mixed Unfilled Epoxy Resin = 9.23 Pounds
1 Gallon Of Mixed Unfilled Epoxy Resin = 4195 Grams
Take into account that some of the coating thickness will be absorbed into the porosity. Mix a batch of the MAX PCR at the proper 2:1 mix ratio and apply it onto the bare wood first, and allow to cure until it has set dry to the touch. This application will seal the surface and prevent further absorption and prevent air bubbles from outgassing that will cause unsightly bubbles from getting entrapped in the coating. The sealing application will also cause "grain-raining' to occur.
When a liquid coating is applied over wood, fibers will begin to swell as it gets impregnated with the resin.
This will produce what is called 'grain raising' to occur. Raised grains are small end fibers protruding from the coating causing unsightly unevenness. Allow the applied resin to cure and lightly sand the surface using fine-grit sandpaper. Once the surface is prepared, apply the second coat of MAX PCR which will yield a smooth blemish free coating.
CALCULATING HOW MUCH RESIN TO MIX
The coating thickness is a big factor that dictates resin coverage. For protective coatings, a minimum coating thickness of 0.010-inch or 10 mils is recommended. Thicker coating thickness up to 0.500 mils or 1/2 inch per can be applied; however, consider the exothermic heat the resin produces when cured in a concentrated mass. The larger the mass, the higher the exothermic temperature is generated, the shorter the working time
To calculate coating thickness of 0.010-inch or 10 mils is recommended.
Calculation: 1608 / 10 = 160.8 Square Feet 1 Gallon Coverage
For high-build or thick casting of 1/2 inch (500.0 mils)
Calculation: 1608 / 500 = 3.21 Square Feet 1 Gallon Coverage
MIXING PROCEDURE
The two components must be mixed thoroughly to eliminate problems such as tacky or uncured spots. Use the "two container method" as demonstrated in this video demonstration, which ensures a homogeneous mixture of the resin and curing agent.
PROPER MIXING TECHNIQUE
How To Mix Epoxy Resin For Food Contact Coating. Avoid Tacky Spots, Minimize Air Bubble When Mixing - YouTube
Video will open in a new window
Using the eBay App? Paste link into a browser window:
TWO CUP MIXING METHOD TO AVOID TACKY SPOTS
APPLICATION DEMONSTRATIONS
Condition the ambient temperature to 75°F for best results. Ensure that the work area is dust free and well ventilated. MAX PCR is self-leveling and will continue to flow until it polymerization converts it to a solid phase. It can be applied by using a bristle or high-density foam brush/roller or poured into place. MAX PCR is self-leveling, ensure the surface is level and secure any leaks by using tape to create a temporary patch and prevent leakage.
ADDING COLOR
MAX COLOR KIT https://www.ebay.com/itm/311946633043
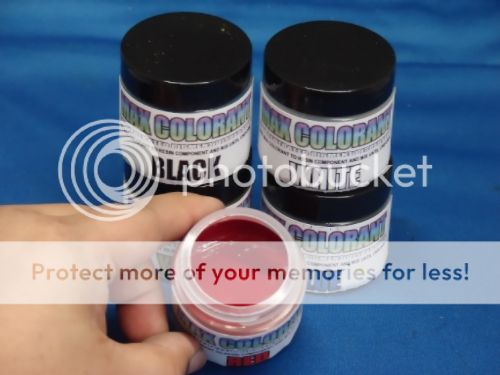
ADDING COLOR
MAX COLOR KIT https://www.ebay.com/itm/

COMPOSITE FABRICATING BASIC GUIDELINES By resolute definition, a fabricated COMPOSITE material is a manufactured collection of two or more ingredients or products intentionally combined to form a new homogeneous material that is defined by its performance that should uniquely greater than the sum of its individual parts. This method is also defined as a SYNERGISTIC COMPOSITION.
COMPOSITE MATERIAL COMPOSITION
REINFORCING FABRIC & IMPREGNATING RESIN
 PLUS
PLUS 
'ENGINEERED PROCESS'
EQUALS
COMPOSITE LAMINATE WITH THE BEST WEIGHT TO STRENGTH PERFORMANCE
With respect to the raw materials selection -fabric and resin, the fabricating process and the and curing and test validation of composite part, these aspects must be carefully considered and in the engineering phase of the composite.
Step One: Fabric Selection TYPES OF FABRIC WEAVE STYLE AND SURFACE FINISHING
FOR RESIN TYPE COMPATIBILITY
Fabrics are generally considered ”balanced” if the breaking strength is within 15% warp to fill and are best in bias applications on lightweight structures. “Unbalanced” fabrics are excellent when a greater load is required one direction and a lesser load in the perpendicular direction.
- Tow: The bundle of individual carbon filaments used to weave carbon fabric. 50k tow means there are 48-50,000 carbon filaments in the tow. Smaller tow i.e. 12k, 6k, 3k and 1k are obtained by dividing the 50k tow into smaller bundles.
- Thread Count: The number of threads (tow in carbon and yarn in Aramid) per inch. The first number will be the warp count and the second will be the fill count.
- Fill: The threads that run the width of the roll or bolt and perpendicular to the warp threads.
- Warp: The threads that run the length of the roll or bolt and perpendicular to the fill threads.
- Finish: The chemical treatment to fiberglass making it compatible with resin systems, therefore improving the bond between the fiber and the resin. Finishing fiberglass typically decreases the fiber strength by as much as 50%. Both Silane and Volan finishes are epoxy compatible. Historically, Volan has been considered a softer finish for a more pliable fabric, but recent advances have yielded some excellent soft Silane finishes.
- Thickness: Measured in fractions of an inch. The thicker the fabric the more resin required to fill the weave to obtain a surface-smooth finished part.
Weaves:
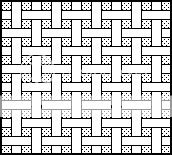
- Plain weave means the warp and fill threads cross alternately. This is the most common weave.
- 4 Harness (4 HS Satin or crowfoot) weave means the fill thread floats over three warp threads, then under one warp thread. This weave is more pliable than the plain weave, therefore conforms to complex curves more easily.
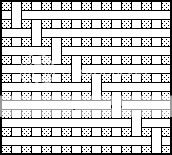
- 8 Harness (8 HS Satin) weave means the fill thread floats over seven warp threads, then under one warp thread. This weave is the most pliable of the standard fiberglass weaves.
- 2 x 2 Twill weave means the fill thread floats over two warp threads, then fewer than two warp threads. This weave is found most commonly in carbon fabrics and is more pliable than plain weave.
Most fabrics are stronger in the warp than the fill because higher tension is placed on the warp fiber keeping it straighter during the weaving process. Rare exceptions occur when a larger, therefore stronger thread is used in the fill direction than the warp direction.
PLAIN WEAVE
Is a very simple weave pattern and the most common style. The warp and fill yarns are interlaced over and under each other in alternating fashion. Plain weave provides good stability, porosity and the least yarn slippage for a given yarn count.
8 HARNESS SATIN WEAVE
The eight-harness satin is similar to the four-harness satin except that one filling yarn floats over seven warp yarns and under one.
This is a very pliable weave and is used for forming over curved surfaces.
4 HARNESS SATIN WEAVE
The four-harness satin weave is more pliable than the plain weave and is easier to conform to curved surfaces typical in reinforced plastics. In this weave pattern, there is a three by one interfacing where a filling yarn floats over three warp yarns and under one.
2x2 TWILL WEAVE
Twill weave is more pliable than the plain weave and has better drivability while maintaining more fabric stability than a four or eight harness satin weave. The weave pattern is characterized by a diagonal rib created by one warp yarn floating over at least two filling yarns.


SATIN WEAVE TYPE CONFORMITY UNTO CURVED SHAPES
Plain Weaves, Bi-axial, Unidirectional Styles For Directional High Strength Parts Use this weave style cloth when high strength parts are desired. It is ideal for reinforcement, mold making, aircraft and auto parts tooling, marine, and other composite lightweight applications. FIBERGLASS FINISHING FOR RESIN COMPATIBILITY All of the fiberglass fabrics is woven By HEXCEL COMPOSITES, a leading manufacturer of composite materials engineered for high-performance applications in marine, aerospace for commercial and military, automotive, sporting goods and other application-critical performance. These fabrics are 100% epoxy-compatible and will yield the best mechanical properties when properly fabricated.
Finishing Cross Reference And Resin Type Compatibility
RESIN COMPATIBILITY
Burlington
Industries
Clark Schwebel
J.P Stevens
Uniglass Industries
Epoxy, Polyester
VOLAN A
VOLAN A
VOLAN A
VOLAN A
Epoxy, Polyester
I-550
CS-550
S-550
UM-550
Phenolic, Melamine
I-588
A1100
A1100
A1100
Epoxy, Polyimide
I-589
Z6040
S-920
UM-675
Epoxy
I-399
CS-272A
S-935
UM-702
Epoxy
CS-307
UM-718
Epoxy
CS-344
UM-724
Silicone
112
112
n-pH (neutral pH)
AVAILABLE FIBERGLASS, CARBON FIBER, AND KEVLAR FABRICS
HEXCEL 120 1.5-OUNCE FIBERGLASS PLAIN WEAVE 5 YARDS
HEXCEL 120 1.5-OUNCE FIBERGLASS PLAIN WEAVE 10 YARDS
HEXCEL 7532 7-OUNCE FIBERGLASS PLAIN WEAVE 5 YARDS
HEXCEL 1584 26 OUNCE FIBERGLASS SATIN WEAVE 3 YARDS
HEXCEL 1584 26 OUNCE FIBERGLASS SATIN WEAVE 5 YARDS
FIBERGLASS 45+/45- DOUBLE BIAS 3 YARDS
CARBON FIBER FABRIC 3K 2x2 TWILL WEAVE 6 OZ. 3 YARDS
CARBON FIBER FABRIC 3K PLAIN WEAVE 6 OZ 3 YARDS
KEVLAR 49 HEXCEL 351 PLAIN WEAVE FABRIC 2.2 OZ
Step Two: Choose The Best Epoxy Resin System For The Application The epoxy resin used in fabricating a laminate will dictate how the FRP will perform when load or pressure is implied on the part. To choose the proper resin system, consider the following factors that is crucial to a laminate's performance. SIZE AND CONFIGURATION OF THE PART (NUMBER OF PLIES AND CONTOURED, FLAT OR PROFILED) CONSOLIDATING FORCE (FREE STANDING DRY OR HAND LAY-UP, VACUUM BAG OR PLATEN PRESS CURING) CURING CAPABILITIES (HEAT CURED OR ROOM TEMPERATURE CURED) LOAD PARAMETERS (SHEARING FORCE, TORSIONAL AND DIRECTIONAL LOAD, BEAM STRENGTH)ENVIRONMENTAL EXPOSURE The principal role of the resin is to bind the fabric into a homogeneous rigid substrate (OPERATING TEMPERATURE, AMBIENT CONDITIONS, CHEMICAL EXPOSURE, CYCLIC FORCE LOADING) MATERIAL AND PRODUCTION COST(BUYING IN BULK WILL ALWAYS PROVIDE THE BEST OVERALL COSTS)
These factors will dictate the design and the composition of the part and must be carefully considered during the design and engineering phase of the fabrication.
By resolute definition, a fabricated COMPOSITE material is a manufactured collection of two or more ingredients or products intentionally combined to form a new homogeneous material that is defined by its performance that should uniquely greater than the sum of its individual parts. This method is also defined as a SYNERGISTIC COMPOSITION.
COMPOSITE MATERIAL COMPOSITION
REINFORCING FABRIC & IMPREGNATING RESIN
PLUS
'ENGINEERED PROCESS'
EQUALS
COMPOSITE LAMINATE WITH THE BEST WEIGHT TO STRENGTH PERFORMANCE
With respect to the raw materials selection -fabric and resin, the fabricating process and the and curing and test validation of composite part, these aspects must be carefully considered and in the engineering phase of the composite.
TYPES OF FABRIC WEAVE STYLE AND SURFACE FINISHING
FOR RESIN TYPE COMPATIBILITY
Fabrics are generally considered ”balanced” if the breaking strength is within 15% warp to fill and are best in bias applications on lightweight structures. “Unbalanced” fabrics are excellent when a greater load is required one direction and a lesser load in the perpendicular direction.
- Tow: The bundle of individual carbon filaments used to weave carbon fabric. 50k tow means there are 48-50,000 carbon filaments in the tow. Smaller tow i.e. 12k, 6k, 3k and 1k are obtained by dividing the 50k tow into smaller bundles.
- Thread Count: The number of threads (tow in carbon and yarn in Aramid) per inch. The first number will be the warp count and the second will be the fill count.
- Fill: The threads that run the width of the roll or bolt and perpendicular to the warp threads.
- Warp: The threads that run the length of the roll or bolt and perpendicular to the fill threads.
- Finish: The chemical treatment to fiberglass making it compatible with resin systems, therefore improving the bond between the fiber and the resin. Finishing fiberglass typically decreases the fiber strength by as much as 50%. Both Silane and Volan finishes are epoxy compatible. Historically, Volan has been considered a softer finish for a more pliable fabric, but recent advances have yielded some excellent soft Silane finishes.
- Thickness: Measured in fractions of an inch. The thicker the fabric the more resin required to fill the weave to obtain a surface-smooth finished part.
Weaves:
- Plain weave means the warp and fill threads cross alternately. This is the most common weave.
- 4 Harness (4 HS Satin or crowfoot) weave means the fill thread floats over three warp threads, then under one warp thread. This weave is more pliable than the plain weave, therefore conforms to complex curves more easily.
- 8 Harness (8 HS Satin) weave means the fill thread floats over seven warp threads, then under one warp thread. This weave is the most pliable of the standard fiberglass weaves.
- 2 x 2 Twill weave means the fill thread floats over two warp threads, then fewer than two warp threads. This weave is found most commonly in carbon fabrics and is more pliable than plain weave.
Most fabrics are stronger in the warp than the fill because higher tension is placed on the warp fiber keeping it straighter during the weaving process. Rare exceptions occur when a larger, therefore stronger thread is used in the fill direction than the warp direction.
PLAIN WEAVE Is a very simple weave pattern and the most common style. The warp and fill yarns are interlaced over and under each other in alternating fashion. Plain weave provides good stability, porosity and the least yarn slippage for a given yarn count. | 8 HARNESS SATIN WEAVE The eight-harness satin is similar to the four-harness satin except that one filling yarn floats over seven warp yarns and under one. This is a very pliable weave and is used for forming over curved surfaces. | 4 HARNESS SATIN WEAVE The four-harness satin weave is more pliable than the plain weave and is easier to conform to curved surfaces typical in reinforced plastics. In this weave pattern, there is a three by one interfacing where a filling yarn floats over three warp yarns and under one. | 2x2 TWILL WEAVE Twill weave is more pliable than the plain weave and has better drivability while maintaining more fabric stability than a four or eight harness satin weave. The weave pattern is characterized by a diagonal rib created by one warp yarn floating over at least two filling yarns. |
| | | |
All of the fiberglass fabrics is woven By HEXCEL COMPOSITES, a leading manufacturer of composite materials engineered for high-performance applications in marine, aerospace for commercial and military, automotive, sporting goods and other application-critical performance. These fabrics are 100% epoxy-compatible and will yield the best mechanical properties when properly fabricated.
Finishing Cross Reference And Resin Type Compatibility
RESIN COMPATIBILITY | Industries | Clark Schwebel | J.P Stevens | Uniglass Industries |
Epoxy, Polyester | VOLAN A | VOLAN A | VOLAN A | VOLAN A |
Epoxy, Polyester | I-550 | CS-550 | S-550 | UM-550 |
Phenolic, Melamine | I-588 | A1100 | A1100 | A1100 |
Epoxy, Polyimide | I-589 | Z6040 | S-920 | UM-675 |
Epoxy | I-399 | CS-272A | S-935 | UM-702 |
Epoxy | | CS-307 | | UM-718 |
Epoxy | | CS-344 | | UM-724 |
Silicone | 112 | 112 | | n-pH (neutral pH) |
AVAILABLE FIBERGLASS, CARBON FIBER, AND KEVLAR FABRICS
HEXCEL 120 1.5-OUNCE FIBERGLASS PLAIN WEAVE 5 YARDS | |
HEXCEL 120 1.5-OUNCE FIBERGLASS PLAIN WEAVE 10 YARDS | |
HEXCEL 7532 7-OUNCE FIBERGLASS PLAIN WEAVE 5 YARDS | |
HEXCEL 1584 26 OUNCE FIBERGLASS SATIN WEAVE 3 YARDS | |
HEXCEL 1584 26 OUNCE FIBERGLASS SATIN WEAVE 5 YARDS | |
FIBERGLASS 45+/45- DOUBLE BIAS 3 YARDS | |
|
|
CARBON FIBER FABRIC 3K 2x2 TWILL WEAVE 6 OZ. 3 YARDS | |
CARBON FIBER FABRIC 3K PLAIN WEAVE 6 OZ 3 YARDS | |
|
|
KEVLAR 49 HEXCEL 351 PLAIN WEAVE FABRIC 2.2 OZ |
Step Three:
Step Three:
Pre-lay-up notes
- Lay out the fabric and pre-cut to size and set aside
- Avoid distorting the weave pattern as much as possible
- For fiberglass molding, ensure the mold is clean and adequate mold release is used
- View our video presentation above "MAX EPOXY RESIN MIXING TECHNIQUE"
- Mix the resin only when all needed materials and implements needed are ready and within reach
Mix the proper amount of resin needed and be accurate proportioning the resin and curing agent. Adding more curing agent than the recommended mix ratio will not promote a faster cure. Over saturation or starving the fiberglass or any composite fabric will yield poor mechanical performance. When mechanical load or pressure is applied to the composite laminate, the physical strength of the fabric should bear the stress and not the resin. If the laminate is over saturated with the resin it will most likely to fracture or shatter instead of rebounding and resist damage.
Don’t how much resin to use to go with the fiberglass?
A good rule of thumb is to maintain a minimum of 30 to 35% resin content by weight, this is the optimum ratio used in high-performance prepreg (or pre-impregnated fabrics) typically used in aerospace and high-performance structural application.
For general hand lay-ups, calculate using 60% fabric weight to 40% resin weight as a safety factor. This will ensure that the fabricated laminate will be below 40% resin content depending on the waste factor accrued during fabrication.
Place the entire pre-cut fiberglass to be used on a digital scale to determine the fabric to resin weight ratio. Measuring by weight will ensure accurate composite fabrication and repeatability, rather than using OSY data.
THE USE OF A WEIGHING SCALE IS HIGHLY RECOMMENDED

Purchase this scale with any of our product offering and the shipping cost of the scale is free.
https://www.ebay.com/itm/222630300203
A good rule of thumb is to maintain a minimum of 30 to 35% resin content by weight, this is the optimum ratio used in high-performance prepreg (or pre-impregnated fabrics) typically used in aerospace and high-performance structural application. For general hand lay-ups, calculate using 60% fabric weight to 40% resin weight as a safety factor. This will ensure that the fabricated laminate will be below 40% resin content depending on the waste factor accrued during fabrication.
Place the entire pre-cut fiberglass to be used on a digital scale to determine the fabric to resin weight ratio. Measuring by weight will ensure accurate composite fabrication and repeatability, rather than using OSY data.
Typical fabric weight regardless of the weave pattern
1 ounce per square yard is equal to 28.35 grams
1 square yard equals to 1296 square inches (36 inches x 36 inches)
FOR EXAMPLE
1 yard of 8-ounces per square yard (OSY) fabric weighs 226 grams
1 yard of 10-ounces per square yard (OSY) fabric weighs 283 grams
Ounces per square yard or OSY is also known as aerial weight, which is the most common unit of measurement for composite fabrics. To determine how much resin is needed to adequately impregnate the fiberglass, use the following equation:
(Total Weight of Fabric divided by 60%)X( 40%)= weight of mixed resin needed
OR
fw= fabric weight
rc= target resin content
rn=resin needed
MASTER EQUATION
(fw/60%)x(40%)=rn
FOR EXAMPLE
1 SQUARE YARD OF 8-OSY FIBERGLASS FABRIC WEIGHS 226 GRAMS
(226 grams of dry fiberglass / 60%) X 40% = 150.66 grams of resin needed
So for every square yard of 8-ounce fabric, it will need 150.66 grams of mixed resin.
Computing For Resin And Curing Agent Amount
150.66 grams of resin needed
MIX RATIO OF RESIN SYSTEM IS 2:1 OR
50 PHR (per hundred resin)
2 = 66.67% (2/3)
+
1 = 33.33%(1/3)
=
(2+1)=3 or (66.67%+33.33%)=100% or (2/3+1/3)= 3/3
150.66 x 66.67%= 100.45 grams of Part A RESIN
150.66 x 33.33%= 50.21 grams of Part B CURING AGENT
100.45 + 50.21 = 150.66 A/B MIXTURE
GENERAL LAY-UP PROCEDURE
Apply the mixed resin onto the surface and then lay the fabric and allow the resin to saturate through the fabric.
NOT THE OTHER WAY AROUND
This is one of the most common processing error that yields sub-standard laminates. By laying the fiberglass onto a layer of the prepared resin, fewer air bubbles are entrapped during the wetting-out stage. Air is pushed up and outwards instead of forcing the resin through the fabric which will entrap air bubbles. This technique will displace air pockets unhindered and uniformly disperse the impregnating resin throughout the fiberglass.
HAND LAY-UP TECHNIQUE
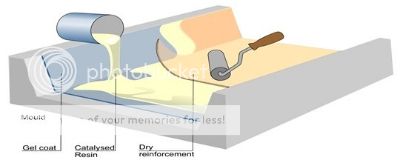
Eliminating air entrapment or void porosity in an epoxy/fiberglass lay-up process
VACUUM BAGGING PROCESS
For performance critical application used in aerospace vehicles, composite framing for automotive vehicles and marine vessels, a process called 'Vacuum Bagging' is employed to ensure the complete consolidation of every layer of fabric. 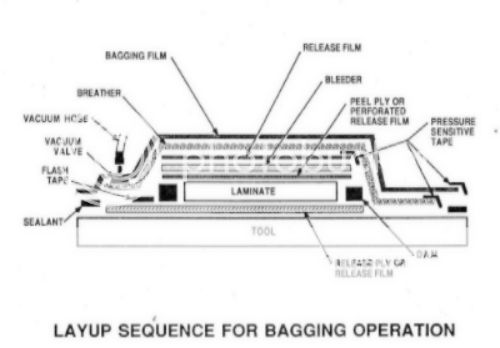
The entire tooling and lay-up are encased in an airtight envelope or bagging and a high-efficiency vacuum pump is used to draw out the air within the vacuum bag to create negative atmospheric pressure. Once a full vacuum (29.9 Inches of Mercury) is achieved, the negative pressure applies a compacting force of 14.4 pounds per square inch (maximum vacuum pressure at sea level) is applied to the vacuum bag transferring the force to the entire surface area of the laminate.
Vacuum pressure is maintained until the resin cures to a solid. For room temperature curing resin system, the vacuum pump is left in operation for a minimum of 18 hours. External heat can be applied to the entire lay-up, thus accelerating the cure of the resin system.
The vacuum force also removes any entrapped air bubble between the layers of fabric and eliminate what is called, porosity or air voids. Porosity within a laminate creates weak spots in the structure that can be the source of mechanical failure when force or load is applied to the laminate.
The standard atmosphere (symbol: atm) is a unit of pressure defined as 1 01325 Pa (1.01325 bar), equivalent to 760 mm Mercury or 29.92 inches Mercury or 14.696 pounds per square inch of pressure.
AUTOCLAVE CURING PROCESS
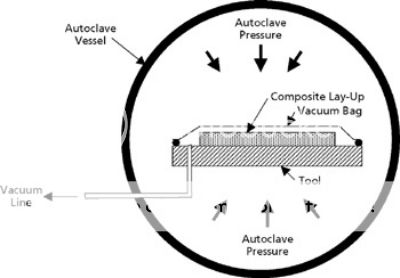
Autoclave curing processing is the most common method used in a large-scale production of composite products. The Aerospace Industry, which includes space exploration rockets and vehicles, deep space structures, and commercial and military airplane utilizes this composite fabrication process due to the critical nature of the application. The mechanical demands of the composite are often pushed to the upper limits and autoclaved process yields composites with the best weight to strength ratio. BASIC OPERATION OF THE AUTOCLAVE PROCESS
In the autoclave process, high pressure and heat are applied to the part through the autoclave atmosphere, with a vacuum bag used to apply additional pressure and protect the laminate from the autoclave gases. The cure cycle for a specific application is usually determined empirically and, as a result, several cure cycles may be developed for a single material system, to account for differences in laminate thickness or to optimize particular properties in the cured part. The typical autoclave cure cycle is a two-step process. First, vacuum and pressure are applied while the temperature is ramped up to an intermediate level and held there for a short period of time. The heat reduces the resin viscosity, allowing it to flow and making it easier for trapped air and volatiles to escape. The resin also begins wetting the fibers at this stage. In the second ramp up, the temperature is raised to the final cure temperature and held for a sufficient length of time to complete the cure reaction. During this step, the viscosity continues to drop, but preset temperature ramp rates and hold times then stabilize viscosity at a level that permits adequate consolidation and fiber wetting, while avoiding excessive flow and subsequent resin starvation. These control factors also slow the reaction rate, which prevents excessive heat generation from the exothermic polymerization process. Upon completion, the cured mechanical performance of the composite is often much stronger and lighter compared to a hand lay-up, or vacuum bagged composite laminate.
VACUUM INFUSION PROCESS
Pre-lay-up notes
- Lay out the fabric and pre-cut to size and set aside
- Avoid distorting the weave pattern as much as possible
- For fiberglass molding, ensure the mold is clean and adequate mold release is used
- View our video presentation above "MAX EPOXY RESIN MIXING TECHNIQUE"
- Mix the resin only when all needed materials and implements needed are ready and within reach
Mix the proper amount of resin needed and be accurate proportioning the resin and curing agent. Adding more curing agent than the recommended mix ratio will not promote a faster cure. Over saturation or starving the fiberglass or any composite fabric will yield poor mechanical performance. When mechanical load or pressure is applied to the composite laminate, the physical strength of the fabric should bear the stress and not the resin. If the laminate is over saturated with the resin it will most likely to fracture or shatter instead of rebounding and resist damage.
Don’t how much resin to use to go with the fiberglass?
A good rule of thumb is to maintain a minimum of 30 to 35% resin content by weight, this is the optimum ratio used in high-performance prepreg (or pre-impregnated fabrics) typically used in aerospace and high-performance structural application.
For general hand lay-ups, calculate using 60% fabric weight to 40% resin weight as a safety factor. This will ensure that the fabricated laminate will be below 40% resin content depending on the waste factor accrued during fabrication.
Place the entire pre-cut fiberglass to be used on a digital scale to determine the fabric to resin weight ratio. Measuring by weight will ensure accurate composite fabrication and repeatability, rather than using OSY data.
THE USE OF A WEIGHING SCALE IS HIGHLY RECOMMENDED
Purchase this scale with any of our product offering and the shipping cost of the scale is free.
https://www.ebay.com/itm/222630300203
A good rule of thumb is to maintain a minimum of 30 to 35% resin content by weight, this is the optimum ratio used in high-performance prepreg (or pre-impregnated fabrics) typically used in aerospace and high-performance structural application. For general hand lay-ups, calculate using 60% fabric weight to 40% resin weight as a safety factor. This will ensure that the fabricated laminate will be below 40% resin content depending on the waste factor accrued during fabrication.
Place the entire pre-cut fiberglass to be used on a digital scale to determine the fabric to resin weight ratio. Measuring by weight will ensure accurate composite fabrication and repeatability, rather than using OSY data.
Typical fabric weight regardless of the weave pattern
1 ounce per square yard is equal to 28.35 grams
1 square yard equals to 1296 square inches (36 inches x 36 inches)
FOR EXAMPLE
1 yard of 8-ounces per square yard (OSY) fabric weighs 226 grams
1 yard of 10-ounces per square yard (OSY) fabric weighs 283 grams
Ounces per square yard or OSY is also known as aerial weight, which is the most common unit of measurement for composite fabrics. To determine how much resin is needed to adequately impregnate the fiberglass, use the following equation:
(Total Weight of Fabric divided by 60%)X( 40%)= weight of mixed resin needed
OR
fw= fabric weight
rc= target resin content
rn=resin needed
MASTER EQUATION
(fw/60%)x(40%)=rn
FOR EXAMPLE
1 SQUARE YARD OF 8-OSY FIBERGLASS FABRIC WEIGHS 226 GRAMS
(226 grams of dry fiberglass / 60%) X 40% = 150.66 grams of resin needed
So for every square yard of 8-ounce fabric, it will need 150.66 grams of mixed resin.
Computing For Resin And Curing Agent Amount
150.66 grams of resin needed
MIX RATIO OF RESIN SYSTEM IS 2:1 OR
50 PHR (per hundred resin)
2 = 66.67% (2/3)
+
1 = 33.33%(1/3)
=
(2+1)=3 or (66.67%+33.33%)=100% or (2/3+1/3)= 3/3
150.66 x 66.67%= 100.45 grams of Part A RESIN
150.66 x 33.33%= 50.21 grams of Part B CURING AGENT
100.45 + 50.21 = 150.66 A/B MIXTURE
GENERAL LAY-UP PROCEDURE
Apply the mixed resin onto the surface and then lay the fabric and allow the resin to saturate through the fabric.
NOT THE OTHER WAY AROUND
This is one of the most common processing error that yields sub-standard laminates. By laying the fiberglass onto a layer of the prepared resin, fewer air bubbles are entrapped during the wetting-out stage. Air is pushed up and outwards instead of forcing the resin through the fabric which will entrap air bubbles. This technique will displace air pockets unhindered and uniformly disperse the impregnating resin throughout the fiberglass.
HAND LAY-UP TECHNIQUE
Eliminating air entrapment or void porosity in an epoxy/fiberglass lay-up process

Vacuum Infusion Process is also known in the composites industry as
Vacuum Assisted Resin Transfer Molding or VARTM.
Similar to the Vacuum Bagging Process where the negative pressure is used to apply consolidation force to the laminate while the resin cures, the resin is infused into the fabric lay-up by sucking the impregnating resin and thus forming the composite laminate.
The VARTM Process produces parts that require less secondary steps, such as trimming, polishing or grinding with excellent mechanical properties. However, vacuum infusion requires more additional or supplemental related equipment and expendable materials. So the pros and cons of each presented composite fabrication process should be carefully determined to suit the user's capabilities and needs.
Please view the following video demonstration which explains the process of Vacuum Infusion or VARTM process.
MAX 1618 A/B VACUUM ASSISTED RESIN TRANSFER MOLDING PROCESS
Step Four: Proper Curing Although we have formulated all of our MAX EPOXY RESIN SYSTEM product line to be resistant to amine-blush, it is recommended not to mix any resin systems in high humidity conditions, greater than 60%. Always make sure that the substrate or material the epoxy resin system is being applied to is well prepared as possible to ensure the best-cured performance.
Always review the published data and information for proper usage, application, and general safety information.
Our expert staff of engineers is always available for consultation and assistance.
Allow the lay-up to cure for a minimum of 24 to 36 hours before handling. Optimum cured properties can take up to 7 days depending on the ambient cure condition. The ideal temperature cure condition of most room temperature epoxy resin is 22 to 27 degrees Celsius at 20% relative humidity. Higher ambient curing temperatures will promote faster polymerization and development of cured mechanical properties. Improving mechanical performance via post heat cure A short heat post cure will further improve the mechanical performance of most epoxy resins. Allow the applied resin system to cure at room temperature until for 18 to 24 hours and if possible, expose heat cure it in an oven or other sources of radiant heat (220°F to 250°F) for45 minute to an hour. You can also expose it to direct sunlight but place a dark colored cover, such as a tarp or cardboard to protect it from ultraviolet exposure. In general room temperature cured epoxy resin has a maximum operating temperature of 160°F or lower. A short heat post cure will ensure that the mixed epoxy system is fully cured, especially for room temperature cure system that can take up to 7 days to achieve 100% cure Some darkening or yellowing of the epoxy resin may occur if overexposed to high temperature (>250 F).
AMINE BLUSH The affinity of an amine compound (curing agent) to moisture and carbon dioxide creates a carbonate compound and forms what is called amine blush. Amine blush is a wax-like layer that forms as most epoxies cure. If the epoxy system is cured in extreme humidity (>70%). It will be seen as a white and waxy layer that must be removed by physical sanding of the surface followed by an acetone wipe.
OTHER TYPES OF EPOXY RESIN CURE MECHANISM LATENT CURING SYSTEMS Latent epoxy resins are systems that are mixed together at room temperature and will begin polymerization but it will not achieve full cure unless it is exposed to a heat cure cycle. In general, these are high-performance systems that demonstrate exceptional performance under extreme conditions such as high mechanical performance under heat and cryogenic temperatures, chemical resistance or any environment that epoxy room temperature system perform marginally or poorly. Upon the mixing of the resin and curing agent polymerization will begin and will only achieve a partial cure. Some resins may appear cured or dry to the touch, this state is called 'B-Stage Cure', but upon application of force will either be gummy or brittle almost glass-like and will dissolve in most solvents. The semi-cured resin must be exposed to an elevated temperature for it to continue polymerization and achieve full cure.
HEAT ACTIVATED CURING SYSTEMS This type of epoxy system will not polymerize unless it is exposed to the activation temperature of the curing agent which can be as low as 200F and as high as 400F. In most instances, our MAX EPOXY SYSTEMS epoxy system can be stored at room temperature and remain liquid for up to six months and longer.
TESTING THE COMPOSITE
DETERMINATION OF THE FABRIC-RESIN RATIO ULTIMATE COMPRESSIVE STRENGTH
6500 Pounds To Failure / 0.498 Square Inch = 13,052 PSI
DON'T FORGET OUR EPOXY MIXING KIT

Always review the published data and information for proper usage, application, and general safety information.
Our expert staff of engineers is always available for consultation and assistance.

ULTIMATE COMPRESSIVE STRENGTH

6500 Pounds To Failure / 0.498 Square Inch = 13,052 PSI
DON'T FORGET OUR EPOXY MIXING KIT
Click The Link To Add To Order https://www.ebay.com/itm/222623932456

EVERYTHING YOU NEED TO MEASURE, MIX, DISPENSE OR APPLY
Proportioning the correct amount is equally as important to attain the intended cured properties of the resin system. The container in which the epoxy and curing agent is mixed is an important consideration when mixing an epoxy resin system. The container must withstand the tenacity of the chemical and must be free of contamination. Most epoxy curing agent has a degree of corrosivity, as a general practice, protective gloves should be worn when handling chemicals of the same nature.
MIXING KIT CONTENTS 1 Each Digital Scale -Durable, Accurate Up To 2000.0 Grams
4 Each 32-ounce (1 Quart) Clear HDPE Plastic Mix Cups
4 Each 16-ounce (1 Pint) Clear HDPE Plastic Mix Cups
One Size Fits All Powder-Free Latex Gloves
2 Each Graduated Syringes
Wooden Stir Sticks
Assorted Size Foam Brush
IMPORTANT NOTICE
Your purchase constitutes the acceptance of this disclaimer. Please review before purchasing this product.
The user should thoroughly test any proposed use of this product and independently conclude the satisfactory performance in the application. Likewise, if the manner in which this product is used requires government approval or clearance, the user must obtain said approval.
The information contained herein is based on data believed to be accurate at the time of publication. Data and parameters cited have been obtained through published information, PolymerProducts and Polymer Composites Inc. laboratories using materials under controlled conditions. Data of this type should not be used for a specification for fabrication and design. It is the user's responsibility to determine this Composites fitness for use.
There is no warranty of merchantability for fitness of use, nor any other express implied warranty. The user's exclusive remedy and the manufacturer's liability are limited to refund of the purchase price or replacement of the product within the agreed warranty period. PolymerProducts and its direct representative will not be liable for incidental or consequential damages of any kind. Determination of the suitability of any kind of information or product for the use contemplated by the user, the manner of that use and whether there is any infringement of patents is the sole liability of the user.
Click The Link To Add To Order https://www.ebay.com/itm/222623932456
EVERYTHING YOU NEED TO MEASURE, MIX, DISPENSE OR APPLY
1 Each Digital Scale -Durable, Accurate Up To 2000.0 Grams
4 Each 32-ounce (1 Quart) Clear HDPE Plastic Mix Cups
4 Each 16-ounce (1 Pint) Clear HDPE Plastic Mix Cups
One Size Fits All Powder-Free Latex Gloves
2 Each Graduated Syringes
Wooden Stir Sticks
Assorted Size Foam Brush
IMPORTANT NOTICE
Your purchase constitutes the acceptance of this disclaimer. Please review before purchasing this product.
The user should thoroughly test any proposed use of this product and independently conclude the satisfactory performance in the application. Likewise, if the manner in which this product is used requires government approval or clearance, the user must obtain said approval.
The information contained herein is based on data believed to be accurate at the time of publication. Data and parameters cited have been obtained through published information, PolymerProducts and Polymer Composites Inc. laboratories using materials under controlled conditions. Data of this type should not be used for a specification for fabrication and design. It is the user's responsibility to determine this Composites fitness for use.
There is no warranty of merchantability for fitness of use, nor any other express implied warranty. The user's exclusive remedy and the manufacturer's liability are limited to refund of the purchase price or replacement of the product within the agreed warranty period. PolymerProducts and its direct representative will not be liable for incidental or consequential damages of any kind. Determination of the suitability of any kind of information or product for the use contemplated by the user, the manner of that use and whether there is any infringement of patents is the sole liability of the user.