Clear Liquid Resin
PRODUCT DESCRIPTION
MAX CLR A/B is a two-component epoxy resin system that is produced in compliance with FDA regulations intended for direct food contact coatings and adhesive applications. MAX CLR A/B is thermoset polymer that cures crystal clear and demonstrates high chemical resistance to acid or base compounds.
It is resistant to dilute grain alcohol anf withstand with hot fluids (up to 187 °F) such as coffee, tea, and soups.
MAX CLR A/B resin system creates a sanitizable coating that demonstrates low extractable of its constituents during direct food contact.
Upon cure, the coating is a durable barrier that prevents absorption of fluids or organic compounds that allows bacterial colonization or microbial growth to occur.
All components used to formulate the MAX CLR resin system are listed in the Code of Federal Regulations,
Title 21, Part 175 for resinous coatings/adhesive subject to direct and indirect food contact.
IMPORTANT GUIDELINES FOR FOOD CONTACT APPLICATIONS
For food contact applications, MAX CLR A/B must be fully cured to ensure no chemical leaching occurs when foodstuffs' come in contact with the coating.
Any uncured MAX CLR caused by an improper application may be extracted and cause leaching and contaminate the food stuff.
Please review the following application instructions to ensure the MAX CLR A/B cures to an inert and durable coating suitable for direct food contact.
RESIN CRYSTALLIZATION FROM COLD WEATHER
The high purity nature of the resin formulation makes it prone to crystallizing when exposed to temperatures below 57°F.
During the colder season, the MAX CLR PART A resin component may crystallize during shipping.
It can also occur after the resin kit has been stored in an uncontrolled environment or after prolonged storage.
Crystallized resin appears as an opaque white mass on the bottom of the bottle. Resin Crystallization is a very common cause of tacky or rubbery cure results.

Useful Preparation For Best Results
Precondition both bottles to 75°F and measure the components accurately at a 2:1 mix ratio; 100 parts resin to 50 parts curing agent.
The use of a weighing scale is recommended over volumetric measuring.
Any off-ratio excess of either the resin or curing agent can cause poor cure results and cause excessive chemical leaching that can transfer to the food or beverage.
The substrate must be suitable and prepared for the intended purpose of the application.
Remove any contaminants that may interfere with the complete cure of the MAX CLR resin system.
Exclude the use of materials and components not suitable for food contact (lead-based pigments, harsh cleaners and unsanitary conditions).
PRACTICAL GUIDE ON HOW TO USE THIS RESIN SYSTEM
Review All Published Data Regarding This Product.
Proper Usage Data And Other Detailed Information Are Posted At This Page
Mix the Resin And Curing Agent Only After The Surface Is Prepared For Application.
STEP 1. SURFACE PREPARATION
The quality of adhesion of any coating or adhesive application is dependent on how well the surface is prepared.
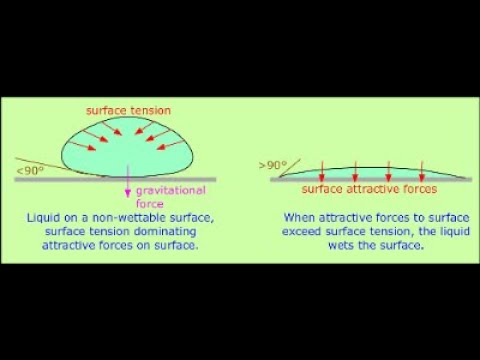
The resin system must be able to properly 'wet-out' the surface to form a continuous film.
Surfaces demonstrating poor wettability prevents the liquid resin from forming a cohesive bond.
Improper surface wetting yields poor adhesion and will delaminate during use.
A surface that demonstrates low surface tension, such as waxed surface, oily surface or slick plastics like Teflon,
prevents wet-out and cause poor adhesion.
Make sure to remove any loose or peeling old coating before application to avoid delamination.
If possible remove the old coating by mechanical sanding or power washing so the applied epoxy is in direct contact with the base substrate.
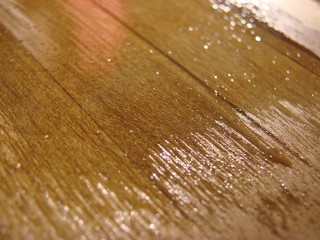
Applying a coating over oil-based stain should be avoided.
Poor Wetting Of The Resin (Crawling) Due To Oil-based Stain Applied On Wood

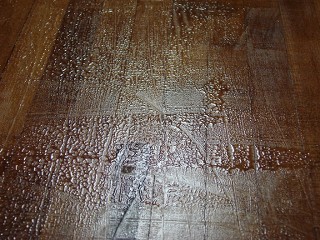
Before applying any coating, test the surface tension and determine if it is suitable for the coating application.
How To Test The Surface Tension To Determine Recoatability
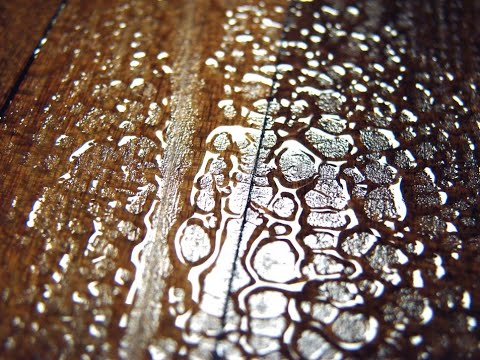
Why Epoxy Coatings Bead-up. Testing & Preparing Surface Before Applying Epoxy Coating Or Adhesive.
Video will open in a new window
Using the eBay App? Paste link into a browser window:
The Following Surface Preparation Procedures Are Recommended.
METALS AND CONCRETE Degrease Metals– Wipe surface with lint-free rag dampened with Methyl Ethyl Ketone (MEK) or acetone to remove all oil, dirt, and grease. Etch Metals – For optimum results, metal parts should be immersed in a chromic acid bath solution consisting of:
The solution is held at 160°F (71°C), and the parts left immersed for 5 to 7 minutes. Rinse – remove metal parts from etching bath and rinse with clean water. (distilled water is recommended). Etch Concrete- Use commercially sold concrete etching solution (hydrochloric acid based works best). Neutralized per instructions, rinse and allow to dry thoroughly. ALTERNATE PROCEDURE Degrease and dry – Degrease the surface as noted above, sand or sandblast the surface lightly but thoroughly. Rinse with acetone or Methyl Ethyl Ketone (MEK), and dry. | GLASS Degrease – With MEK as above, or with a strong boiling solution of a good grade household detergent. Etch – For optimum results, degreasing can be followed by the chromic acid bath outlined above. WOOD Sand – Bonding surfaces should be sanded lightly, but thoroughly to remove all external contamination. Clean – Carefully remove all dust, or particles of wood from sanded areas. A stiff and clean brush or compressed air can be used. PLASTIC Clean – Remove all dirt, oil, or other surfaces contaminated with detergent soap or degreasing solvent and water, followed by thorough rinsing and drying. A solvent that does not have a detrimental effect may also be used. Sand – Surfaces to be bonded should be sanded lightly, but thoroughly to remove surface sheen. Clean – Carefully remove all dust or particles of plastic from the sanded area. A clean brush, lint-free cloth, or compressed air may be used. |
STEP 2. CHECK THE PART A OR RESIN BOTTLE FOR CRYSTALLIZATION
During the winter months, the PART A or RESIN component may crystallize and cause poor cure performance.
MAX Epoxy Resins are formulated with high purity grade resin polymers which makes it prone to crystallization when exposed to temperatures below 57°F.
Crystallization can also occur after the resin has been stored over a period.
It will appear as a waxy white mass at the bottom of the bottle.
The PART A or RESIN component must be in its liquid form to thoroughly mix with the PART B or curing agent to achieve full cure.DO NOT USE UNLESS PROCESSED
View the following video for identification and processing.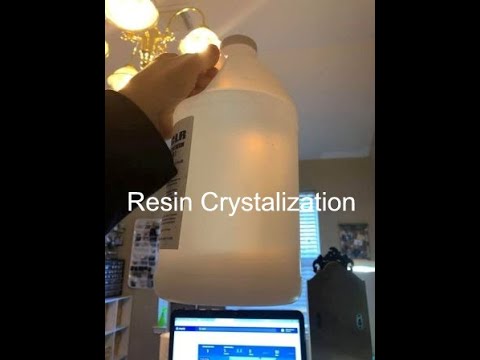
EPOXY RESIN CRYSTALLIZATION - Solidified Epoxy Resin Processing - YouTube
Video will open in a new window
Using the eBay App? Paste link into a browser window:STEP 3. DETERMINE THE AMOUNT THE BATCH SIZE NEEDED
Ensure the mixed resin is applied and used within the established working time.
Do not let the mixed resin to sit in mass greater than 10 minutes to avoid a run-away reaction
The heat generated during polymerization back feeds and cause a 'run-away' reaction to occur.
Uncontrolled polymerization can generate temperatures above 300°F when allowed to react in mass. Mix the proper amount of resin and curing agent and apply within the stated working time or pot life.
Use These Factors To Convert Gallon Needed Into Volumetric Or Weight Measurements.
Fluid Gallon To Volume Conversion1 Gallon = 231 Cubic Inches1 Gallon = 128 Ounces1 Gallon = 3.7854 Liters1 Gallon = 4 Quarts1 Gallon = 16 CupsFluid Gallon Mass Conversions1 Gallon Of Mixed Unfilled Epoxy Resin = 4195 Grams1 Gallon Of Mixed Unfilled Epoxy Resin = 9.23 PoundsMAX CLR A/B Available Kit Sizes
MAX CLR LOW VISCOSITY 24 OUNCE KIT
MAX CLR LOW VISCOSITY 48 OUNCE KIT
MAX CLR LOW VISCOSITY 96 OUNCE KIT
MAX CLR LOW VISCOSITY 1.5 GALLON KIT
STEP 4. MIXING THE RESIN AND CURING AGENT
The two components must be mixed thoroughly to eliminate problems such as tacky or uncured spots.
Use the "two container method" as demonstrated in this video demonstration, which ensures a homogeneous mixture of the resin and curing agent.Click Play To Watch Video Demonstration

How To Mix Epoxy Resin For Food Contact Coating. Avoid Tacky Spots, Minimize Air Bubble When Mixing - YouTube
Video will open in a new window
Using the eBay App? Paste link into a browser window:STEP 5. APPLICATION DEMONSTRATIONS
Condition the ambient temperature to 75°F for best results. Ensure that the work area is dust free and well ventilated. When applying the MAX CLR A/B resin onto wood or any porous substrate, take into account that the resin will be absorbed into the wood porosity.Upon application of the coating, the resin will wet-out the wood fibers and cause "grain-raining' to occur. Raised grains are small end fibers protruding from the coating causing surface blemishes and unsightly unevenness.Mix a batch of the MAX CLR A/B first to be used as as a sealer.Directly apply it onto the bare wood and allow to cure for 12 to 24 hours at 75°F.This application seals the surface porosity as well as prevent air bubbles from outgassing and minimize air bubbles.
Lightly sand the surface to remove 'grain-raising' with fine-grit sandpaper. Clean the surface with a lint-free rag dampened with acetone. Do not touch the cleaned area with bare hands to prevent fingerprints from contaminating the surface. The surface is ready for the top-coat application.The coating thickness is a big factor that dictates resin coverage. For protective coatings, a minimum coating thickness of 0.010-inch or 10 mils is recommended.Thicker coating thickness up to 0.500 mils or 1/2 inch can be applied, however consider the exothermic heat the resin produces when cured in a concentrated mass.The larger the mass the higher the exothermic temperature is generated. High exothermic heat may cause the wood to warp and contort.
MAX CLR is self-leveling and will continue to flow until it polymerization converts it to solid phase.
It can be applied by using a bristle or high density foam brush/roller or poured into place.
MAX CLR is self leveling; ensure the surface is level and secure any leaks by using tape to create a temporary patch and prevent leakage.
Application Demonstrations
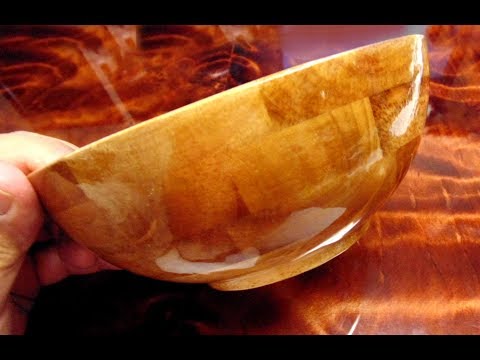
Roto-Coating Of MAX CLR On Lathe-Turned Wood Bowl Click Window To Watch Video Demonstration 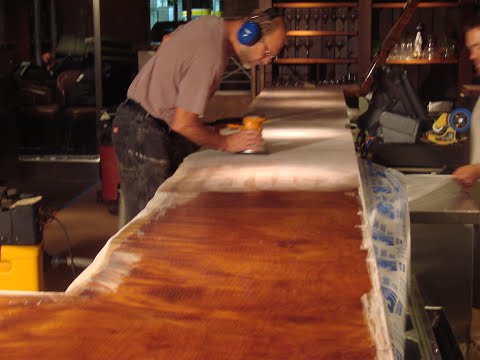
Video will open in a new window
Using the eBay App? Paste link into a browser window:Multiple Pour Or Layering For Thick Coat ApplicationClick Window To Watch Video DemonstrationSTEP 6. CURINGTo achieve the best cure results, the ambient condition should be between 75°F to 85°F and the relative humidity is below 80%.The colder the temperature the longer takes to fully cure. Use an infrared lamp to warm the ambient temperature. Infrared lamps also work well for warming large work areas.
Post Curing at 150°F for 2 hours will accelerate full curing.
Rinse the Surface with warm water and mild detergent before use.
Charcuterie Board Sealed With MAX CLR For Direct Food Contact
CUTTING AND POLISHINGAllow to fully cure for 48 hours before polishing or machining. MAX CLR can be cut, ground or CNC or lathe machined to shape.
Polishing Improves Surface Scratch Resistance.
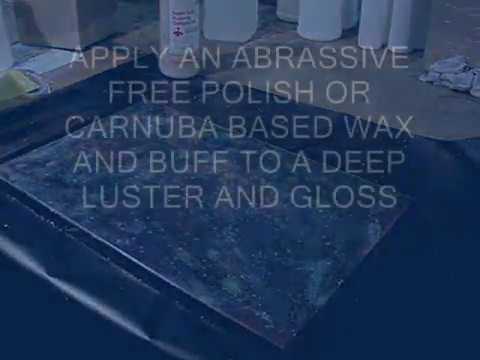
The transparency is also restored after machining by wet sanding and then polish with abrasive free wax or polish. Polishing the surface improves scratch resistance and marring
MAX CLR For Knife Scales And Handle Casting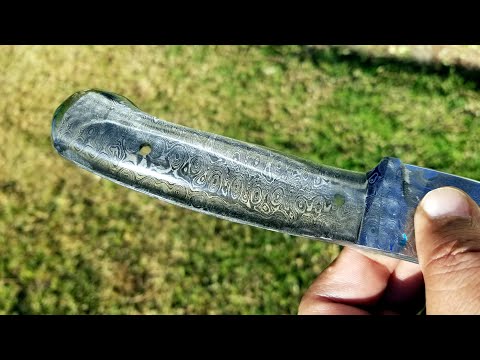
High Impact Clear Knife Handle Casting With MAX CLR A/B
Video will open in a new window
Click on the picture to view test video. The video will open in a new window.POLISHINGMAX CLR CUT AND POLISHED
Video will open in a new window
Click on the picture to view test video. The video will open in a new window. HOW TO POLISH EPOXY COATED TABLE TOP COATINGS
Video will open in a new window
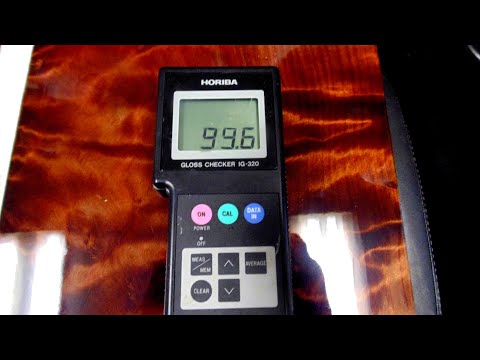
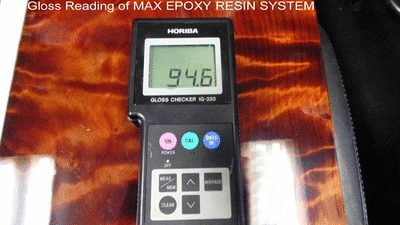
DEGLOSSING Once the MAX CLR fully cures, deglossing the surface to create a satin finish can be easily done using an abrasive pad. In this demonstration, a SCOTCHBRITE pad was used to de-gloss the surface. Note the dramatic decrease in gloss after a light polishing with the abrasive pad. Very-fine sandpaper (wet-sanding) also works well.
PHYSICAL AND MECHANICAL PROPERTIES
Viscosity
Density
Form and Color
800 – 1,200 cPS @ 25°C Mixed
1.10 g/cc
Clear Transparent Liquid
Mix Ratio
100 Parts to 50 Parts A By Weight or by Volume
2:1 (Part A to Part B)Working Time
45 Minutes @25°C (77°F 100-gram mass)
Peak Exotherm
70°C (158°F, 100-gram mass)
Handle Time
Full Cure Time
5.5 Hours
36 Hours minimum @ 25°C (75°F)
Hardness
72± 5 Shore
Tee-Peel Strength
5.7 Lbs per inch Width
Tensile Shear Strength
1,300 psi @ 25°C (77°F)
800 psi @ -80°C (-112°F)
550 psi @ 100°C (212°F)
Elongation
9.0% @ 25°C (77°F)
Compressive Strength
2,200 psi
Heat Distortion Temp
80°C (176°F)
IMPACT RESISTANCE OF MAX CLR RESIN SYSTEM MAX CLR IMPACT RESISTANCE MAX CLR IMPACT RESISTANCE TEST
Video will open in a new window
HOT WATER IMMERSION TEST WOOD COATED MUG MAX CLR A/B HOT WATER IMMERSION TEST
Video will open in a new window
Flame Treating Of Plastic To Improve Adhesion
Flame Treating Of Plastics For Improved Wetting And Adhesion
Video will open in a new window
Using the eBay App? Paste link into a browser window:Obtaining adequate bond strength when bonding plastic-to-plastic substrates or plastic to dissimilar substrates is often a challenge for epoxy bonding.
In general plastic surfaces demonstrates poor ‘wettability’ or the ability of a liquid to form a continuous film.
These types of substrates or are called LSE or Low Surface Energy substrates and in general, most thermoplastic surfaces fall into this category.
Teflon or its generic name PTFE and other polyethylene plastics HDPE, LDPE, UHMW demonstrate poor liquid wettability due to its low surface energy.
To create a viable bondable surface condition for these types of plastics,
it must be surface treated by creating a superficial oxidized surface to increase its dynamic surface tension.
Various types of physical treatment can be used to increase the surface energy of plastics, mostly through oxidation of the superficial layer.
Flame treatment is the most widely used and cost-effective pre-treatment for polyethylene (HDPE, LDPE, UHMW) and polyolefin-based plastics prior to polymer bonding or printing.
The process consists of exposing the surface to a suitable oxidizing flame for a period in the range 0.2 to 3.0 seconds.
This treatment brings about a change to the polymer surface that increases its surface energy allowing fluids to effectively wet-out the surface and permits a strong adhesive molecular and mechanical bond.
Adjust the propane torch so that a blue flame is achieved.Pass over the area to be treated several times until a slight haze is noticed on the surface of the substrate.
Using A Dyne Pen To View The Improve Surface Wetting Of the Untreated And Flame Treated UHMW plastic.Flame Treating the plastic substrate will make adhesion possible and create a strong bond.Flame Treated Surface Ideal For Bonding
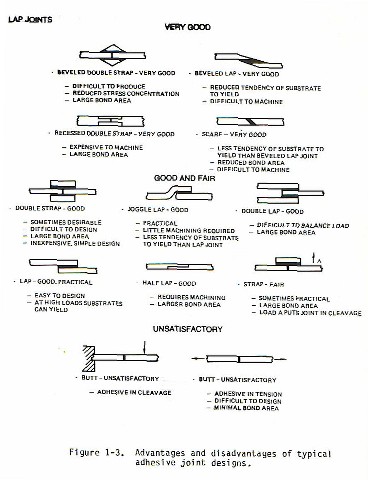
Joint Designs For Best Adhesion Performance Joint and Bonding And Design Suggestions Load Testing For Tensile Shear Strength of the Adhesion Types of stress load MAX CLR A/B Available Kit Sizes
MAX CLR LOW VISCOSITY 24 OUNCE KIT
MAX CLR LOW VISCOSITY 48 OUNCE KIT
MAX CLR LOW VISCOSITY 96 OUNCE KIT
MAX CLR LOW VISCOSITY 1.5 GALLON KIT
Please Check Out Other Available Resin Systems At Our eBay Store For our complete listing, please Visit our eBay store! DON'T FORGET OUR EPOXY MIXING KIT
Everything You Need To Measure, Mix, Dispense & Apply The Epoxy Resin
Click The Link To Add To Order
https://www.ebay.com/itm/222623932456
Proportioning the correct amount is equally as important to attain the intended cured properties of the resin system. The container in which the epoxy and curing agent is mixed is an important consideration when mixing an epoxy resin system. The container must withstand the tenacity of the chemical and must be free of contamination. Most epoxy curing agent has a degree of corrosivity, as a general practice, protective gloves should be worn when handling chemicals of the same nature.
MIXING KIT CONTENTS 1 Each Digital Scale -Durable, Accurate Up To 2000.0 Grams
4 Each 32-ounce (1 Quart) Clear HDPE Plastic Mix Cups
4 Each 16-ounce (1 Pint) Clear HDPE Plastic Mix Cups
One Size Fits All Powder-Free Latex Gloves
2 Each Graduated Syringes
Wooden Stir Sticks
Assorted Size Foam Brush
IMPORTANT NOTICE
Your purchase constitutes the acceptance of this disclaimer. Please review before purchasing this product.
The user should thoroughly test any proposed use of this product and independently conclude the satisfactory performance in the application. Likewise, if the manner in which this product is used requires government approval or clearance, the user must obtain said approval.
The information contained herein is based on data believed to be accurate at the time of publication. Data and parameters cited have been obtained through published information, PolymerProducts and Polymer Composites Inc. laboratories using materials under controlled conditions. Data of this type should not be used for a specification for fabrication and design. It is the user's responsibility to determine this Composites fitness for use.
There is no warranty of merchantability for fitness of use, nor any other express implied warranty. The user's exclusive remedy and the manufacturer's liability are limited to refund of the purchase price or replacement of the product within the agreed warranty period. PolymerProducts and its direct representative will not be liable for incidental or consequential damages of any kind. Determination of the suitability of any kind of information or product for the use contemplated by the user, the manner of that use and whether there is any infringement of patents is the sole liability of the user.