DIY Bluetooth 2 x 3W Speaker Kit Music Spectrum Analyzer LED Flashing Display
DIY Bluetooth Speaker Kit Music Spectrum Analyzer LED Flashing Display Sound Control 2*3W Mini Power Amplifier Remote Controller
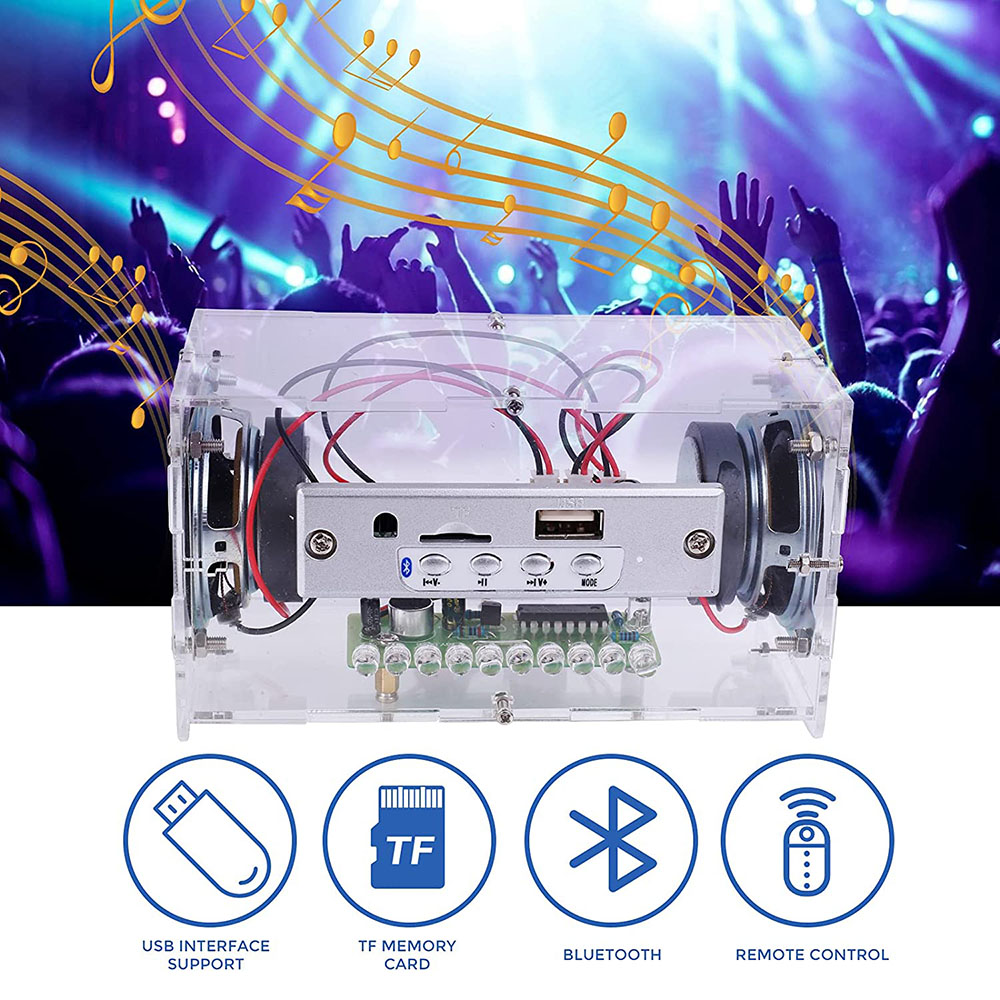
It is a RGB LED Spectrum Bluetooth Audio Speaker DIY Kit with remote control. It has 10pcs RGB LED music spectrum display. It can play music form Bluetooth, TF Card, U-disk with 4ohm 2in speakers. The voice is clear and loud.
Feature:
1>.Music spectrum display
2>.BLE5.0 Bluetooth audio play
3>.Support TF Card and U-disk music
4>.Remote controller
5>.Adjustable Next/Prev/VOL+/VOL-/Play/Pause
6>.Support power OFF memory function
7>.DIY manual soldering
8>.Simple and easy to operate
Parameter:
1>.Item name: RGB LED Spectrum Bluetooth Audio Speaker DIY Kit
2>.Work Voltage:DC 3.7V-5V
3>.Bluetooth Version:5.0
4>.Bluetooth Distance:15meter(Max)
5>.Amplifier Power:3W*2
6>.Music Source:Bluetooth/U-disk/TF Card
7>.Control Type:Bluetooth/Remote Controller/On Board Button
8>.LED Color:Yellow/Green/Red/Blue
9>.Work Temperature:-40℃~85℃
10>.Work Humidity:0%~95%RH
11>.Size(Installed):135*74*64mm
Component listing:

Remote Controller:

Note:
This is a DIY kit so that need finish install by user.
This work voltage is 3.7V-5V so please make sure the input voltage can not more than 5V.Otherwise, it will be damaged.
Application:
1>.Training welding skills
2>.Student school
3>.DIY production
4>.Project Design
5>.Electronic competition
6>.Gift giving
7>.Crafts collection
8>.Home decoration
9>.Souvenir collection
10>.Graduation design
11>.Holiday gifts
Installation Tips:
1>.User needs to prepare the soldering tool at first.
2>.Please be patient until the installation is complete.
3>.The package is DIY kit.It need finish install by user.
4>.The soldering iron can't touch the components for a long time(1.0 second), otherwise it will damage the components.
5>.Pay attention to the positive and negative of the components.
6>.Strictly prohibit short circuit.
7>.Install complex components preferentially.
8>.Make sure all components are in right direction and right place.
9>.Please wear anti-static gloves or anti-static wristbands when installing electronic components.
10>.User must install the LED according to the specified rules.Otherwise some LED will not light.
11>.It is strongly recommended to read the installation manual before starting installation!!!
Installation Steps(Please be patient install!!!):
1>.Step 1: Install 2pcs 20Kohm Metal Film Resistor at R1,R3. Identify the resistor value as shown in color.
2>.Step 2: Install 2pcs 470ohm Metal Film Resistor at R4,R5. Identify the resistor value as shown in color.
3>.Step 3: Install 1pcs 2Mohm Metal Film Resistor at R2. Identify the resistor value as shown in color.
4>.Step 4: Install 1pcs DIP-6 IC CD4017 at U1.There is a mark(notch) on one end of the IC and there is a mark(curved silk screen printing) on PCB where the IC can place on.These two marks are corresponding to each other and are used to specify the installation direction of the IC.
5>.Step 5: Identify the positive(anode) and negative(cathode) lead of LED.The leads of the LED must be installed correctly, otherwise the LED cannot be turned on.Here are four methods as following:
5.1>.According to the length of the LED lead to distinguish. The longer pin is positive(anode) lead. The shorter pin is negative(cathode) lead.
5.2>.Identify the negative(cathode) of the LED is to look into the plastic case where one can see that the negative(cathode) is much thicker/bigger inside the plastic case than the anode lead.
5.3>.Identify by edge of plastic case.The negative(cathode) lead of the LED should be the pin nearest the flat on the plastic case.
5.4>.Test by 3V battery or multimeter.The pin is positive(anode) lead which has connect to the positive of 3V if LED can light up after connect 3V power supply.(LED should not be powered directly from the 3V for a short time:less then 0.5second)
5.5>.It is positive(anode) where the white mark “+” pointing to on PCB.
6>.Step 6: Install 10pcs 5mm RGB LED at D1-D10. Pay attention to distinguish between positive and negative at Step5 and Bend the LED pins.
7>.Step 7: Install 1pcs TO-92 S9014 Transistor at Q1. Pay attention to the installation direction.Arc screen printing corresponds to arc case.
8>.Step 8: Install 1pcs 9*7mm MIC Microphone at MK1.Please distinguish between positive and negative. Note:The marked pin is negative pole.
9>.Step 9: Install 1pcs 1uF Electrolytic Capacitor at C3. There is a white ‘ + ’ on PCB silk screen printing where the positive(anode) can insert into.The longer lead is positive(anode).
10>.Step 10: Install 1pcs 5mm RGB LED at D11. Pay attention to distinguish between positive and negative at Step5.
11>.Step 11: Install 1pcs 100uF Electrolytic Capacitor at C2. There is a white ‘ + ’ on PCB silk screen printing where the positive(anode) can insert into.The longer lead is positive(anode)
12>.Step 12: Install the extra pins from LED at J1-J3.
13>.Step 13: Install 1pcs 15cm 2Pin PH2.0 Wire on ‘+’ and ‘ - ’. Red wire connect to ’+’ and black wire connect to ‘ - ’. Then cut white socket.These two wires are used to connect Bluetooth audio controller and LED board.Refer to the wiring location and note the PCB mark shown if the wire is in another color!
14>.Step 14: Tear off the protective film on acrylic surface.
15>.Step 15: Fix 2pcs M3*8 Copper Pillar and 2pcs M3*6mm Screw on acrylic panel that is the base for LED Board.
16>.Step 16: Fix RGB LED Board on Copper Pillar by 2pcs M3*6mm Screw.
17>.Step 17: Know Bluetooth audio controller: Interface function introduction.
18>.Step 18: Know Bluetooth audio controller: Wiring diagram.
19>.Step 19: Fix Bluetooth audio controller on acrylic panel by 2pcs M3*10mm Screw and 2pcs M3 Nut.
20>.Step 20: Connect from LED board to Bluetooth audio controller. Note:The wires need connect to pads. ‘ 5V ’ connect to ‘ + ’; ‘ GND ’ connect to ‘ - ’
21>.Step 21: Install 2pcs 15cm 2Pin PH2.0 Wire on 2pcs 4ohm 3W Speaker.The speakers does not need to distinguish between positive and negative poles.
22>.Step 22: Fix speaker on the other two are smaller acrylic panel by 8pcs M3*10mm Screw and 8pcs M3 Nut.
23>.Step 23: Fix 1pcs DC-022 Power Socket by the biggest nut on acrylic panel.
24>.Step 24: Fix 1pcs Black Switch on acrylic panel. Pay attention to the buckle on the switch, which can be fixed by itself.Pay attention to the installation direction.
25>.Step 25: Cut about 3cm red wire to connect DC-022 Power Socket and Black Switch.Pay attention to their pin selection and can not choose to connect other pins.
26>.Step 26: Connect 1pcs 15cm 2Pin PH2.0 Wire to DC-022 and Switch. The red wire connect to Black Switch and the black wire connect to DC-022 Power Socket. Refer to the wiring location shown if the wire is in another color.
27>.Step 27: Connect 1pcs power wire to red socket and 2pcs speaker wires to white sockets.
28>.Step 28: Assemble 6pcs acrylic panels by 12pcs M2*10mm Screw and 12pcs M2 Nut.Please be patient when installing the screws.
29>.Step 29: Connect to power supply and enjoy the effect.Note Please provide sufficient working current.It is recommended to use a 5V 2A power supply.User should exercise care and provide additional support to the acrylic with one hand while pressing the switch into place with the other hand when the power is plugged in.
Install shown steps:


- Type: Logic ICs
- Color: Transparent
- Model: Does not apply
- Shape: Rectangular
- Features: Bluetooth
- Material: Plastic
- Feature 1: DIY Bluetooth Speaker Kit
- Feature 2: Music Spectrum Analyzer
- Feature 3: LED Rythm Light Sound Control
- LED Color: Yellow/Green/Red/Blue
- RMS Power: 3W x 2
- Application: Speaker
- Audio Inputs: Bluetooth, TF card, U-disk
- Connectivity: Does not apply
- Control Type: Bluetooth/Remote Controller/On Board Button
- Model Number: DIY Bluetooth Speaker Kit
- Music Source: Bluetooth/U-disk/TF Card
- Custom Bundle: Yes
- is_customized: Yes
- Supply Voltage: DC 3.7V-5V
- Size(Installed): 135*74*64mm
- Compatible Brand: Universal
- Compatible Model: Universal
- Bluetooth Version: 5.0
- Dissipation Power: 3W*2
Dear Korean buyers
We need Customs Information to import to your country.
Please provide personal clearance id after you ordered.
If you don’t have it, please make id at Uni-Pass .
Dear Russian Federation buyers
We need Customs Information to import to your country.
Please provide personal clearance id after you ordered.
- Name
- Passport Number
- Data of Issue
- Authority
- Date of Birth
We will only ship to a confirmed Paypal address.
Upon confirmation of payment, your item will be processed and shipped out within 1-5 business days.
Tracking number will be emailed to you once the item has been processed and shipped.
Please contact us if you have not received your tracking number or confirmation of delivery after 5 business days.
Economy Shipping: Ship without tracking number
Standard & Expedited Shipping: Ship with tracking number
For international shipments, we cannot guarantee the accuracy of the delivery time as each country has its own custom clearance requirements.
Please contact your local custom broker for additional information/requirements.
Customer is responsible for additional custom fees, brokerage fees, duties and/or taxes.
These fees are not included and may be collected at the time of delivery.
These fees are non-refundable.
Local pick up or will-call are not offered.
All shipping and handling fees are non-refundable.
We do not ship to PO Box address and unverified addresses.
We do not ship to the following countries: Brazil, Moldives, Kazakhstan, South Africa, Croatia, Latvia, Burkina Faso, Bahrain, Azerbaijan, Israel, Czech, Kenya, Malaysia, Philippines, Indonesia.

We offer a 60 day return policy from checkout winning date.
An RMA number is required for all returns. Message us for return instructions. Items returned without a RMA number will not be processed.
Return shipping fees will be deducted from total amount refunded, in case of buyers reason.
We reserve the right to decline any returns if the above guidelines are not followed.
PAY SAFE: Credit, debit and gift cards, Apple Pay, Google Pay, PayPal, and PayPal Credit is accepted.

- Import duties, taxes and charges are not included in the item price or shipping charges. These charges are the buyer’s responsibility.
- Please check with your country’s customs office to determine what these additional costs will be prior to bidding/buying.
- These charges are normally collected by the delivering freight (shipping) company or when you pick the item up - do not confuse them for additional shipping charges.
- We do not mark merchandise values below value or mark items as “gifts” - US and International government regulations prohibit such behavior.
If you need assistance, please contact us.
We look forward to providing you excellent service!
