Boost/Reduce Voltage, Set Over/Under Protection Values and Monitor Status All-In-One Panel
Â
Secure this Buck-Boost variable voltage regulator inside a project for tamper resistance, or expose it for changeable voltage options. Use this buck converter's extra current capability to add a small amp board to a large power supply used to run a large amplifier board. This eliminates the need for an additional power supply.
Â
Â
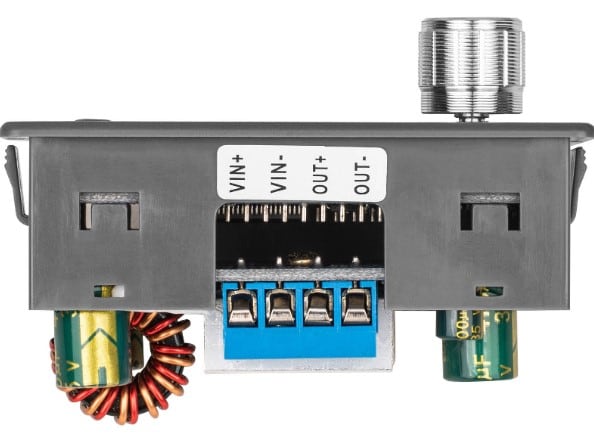
The Buck-Booster also works great as the main component in a digital variable power supply. You may have an old AC to DC power adapter from a laptop, monitor, or portable speaker that still works. Cut off the end that plugged into the laptop and hook it up to the VIN + and VIN - of the Buck converter. Make sure you know the + and - wires coming out of the AC power adapter. If you have a volt meter or know someone who has one you can verify the + and the -. Once you know the polarity is correct, plug in the AC adapter into an AC outlet. Set the digital Buck converter to the right voltage and hook up your DC device that's less than 30 VDC to the OUT+ and OUT-. Make it portable by adding one of our LBB battery boards to the voltage input. Read the instructions below for more information.
Â
Â
This is more than a Buck-Boost variable voltage regulator. It also monitors input voltage or board temperature if you donât always want to see voltage and power draw. It also has the ability to set over/under voltage, over current, overpower, overtemperature, and over capacity protection. It also has a built-in timer which shuts off the output voltage to your desired setting. All the settings have a default value and some turn off/on. Check the specifications below for the default values.
Â
Â
Specifications:
⢠Input voltage: 5~30 VDC
⢠Output voltage: 0.5~30 VDC
⢠Output current: Stable up to 3A without extra ventilation, 4A with extra ventilation or fan
⢠Output power: 35W without extra ventilation, 50W with extra ventilation or fan
⢠Voltage display minimum: 0.01V
⢠Current display set minimum: 0.010A
⢠Conversion efficiency: 88%
⢠Input undervoltage protection: 4.8-30V adjustable, default 4.8V
⢠Output overvoltage protection: 0.5-31V adjustable, default 31V
⢠Output overcurrent protection: 0-4.1A  adjustable, default 4.1V
⢠Output overpower protection: 0-50W adjustable, default 50W
⢠Output overtemperature protection: 176-230°F (80-110°C) adjustable, default 230°F (110°C)
⢠Timeout protection: 0-100 hours adjustable, off by default
⢠Capacity protection: 0-60 Ah adjustable, off by default
⢠Operating frequency: 180 KHz
⢠Mounting hole dimensions: 2.92" x 1.55" (74 x 39 mm)
⢠Total dimensions without the knob: 3-1/8" W x 1-5/8" H x 1-1/2" D (79 x 43 x 41)
Â
Quick Instructions Using the Default Settings
Â
Â
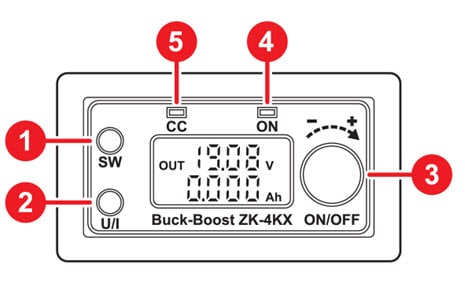
1. Apply power to the Buck converter using your power supply/adapter. Make sure the green LED (4) is not lit. If it is lit press the knob (3) to turn the Buck converter off. The wattage (volts x amperage) of your power supply must be higher than the device hooked up to the output.
2. Press the U/I button (2) once two adjust the voltage and twice to adjust the amperage/current. Twist the knob (3) to vary the setting in each line to match your devices specifications. To make the adjustments quicker press the knob (3) to switch digits. Press U/I again to end and it save the settings.
3. Once all the settings are correct press the knob (3) to turn on the Buck converter. If you need to fine tune the voltage output twist the knob to adjust. No quick adjustment is available.
4. To check the voltage input long press the SW button (1) to switch screens. To check the Buck board temperature long press SW button again. To go back to the voltage output screen long press SW again. These are your three main screens.
5. To change the default settings read the manual attached to the website.
Â
Â