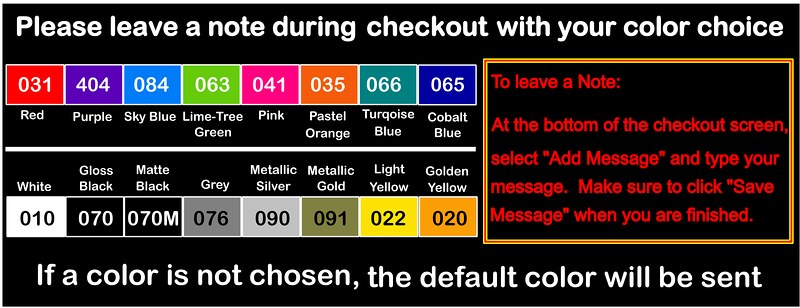
|
|
- Size: 8"
- All decals are No Background (The background will be the color of the area you place it)
- Custom sizes available - Message us for Quote

- Free Shipping includes Standard Mail with NO TRACKING
- Upgrade to Tracking with USPS Ground Advantage
- If any questions or issues, Please send us a message.

Application Instructions
- Clean the area of application with a damp clean cloth. Removing dirt, dust and grease will ensure better adhesion of the decal.
- To ensure that the decal is properly stuck to the transfer tape, before installing the decal, take a squeegee application tool, or 2 credit cards back to back and press firmly over the whole surface of the face of the decal while it is still laying flat on the table.
- Apply a long piece of masking tape along the top of the decal with approx half of the tape on the decal and half on the vehicle surface. This will make a large hinged 'flap'. The hinged flap will make installation much easier. For long thin designs, you can cut the decal in half (up and down between the lettering) once it has been taped to create two flaps for even easier installation.
- Raising the large hinged 'flap', and begin to peel the wax paper backing off the decal (exposing the sticky side for the decal). Be sure to only expose half of the decal. DO NOT ALLOW THE STICKY PART OF THE DECAL TO TOUCH THE VEHICLE SURFACE.
- With the wax paper backing peeled half way downward, begin to apply the sticky side of the decal to the vehicle surface with the squeegee or credit card.
- Once the entire sticky side of the decal is applied to the vehicle, go over the decal with the application squeegee, with increasingly harder strokes. Then begin peeling the transfer tape covering the decal.
- Finish removing the transfer tape covering, peeling from one side to the other. Any small bubbles can be removed using a small razor blade. Take the razor blade and poke a small hole in the vinyl at the source of the bubble. Then with the squeegee, push the remaining air out of the bubble. Most bubbles will dissipate within 3 weeks of installation due to sunlight.
| | | |