|
||||||||||||||||||||||||||||||||||||||||||||||||||||||||||||||||||||||||||
|
Installing the Quadra Ventless Wall Fireplace Safely is as easy as 1, 2, 3! |
||||||||||||||||||||||||||||||||||||||||||||||||||||||||||||||||||||||||||
Please Note: The following is not intended to be the complete instruction for installation. Complete instructions are found in the product's user manual and must be adhered to in its entirety. |
||||||||||||||||||||||||||||||||||||||||||||||||||||||||||||||||||||||||||
|
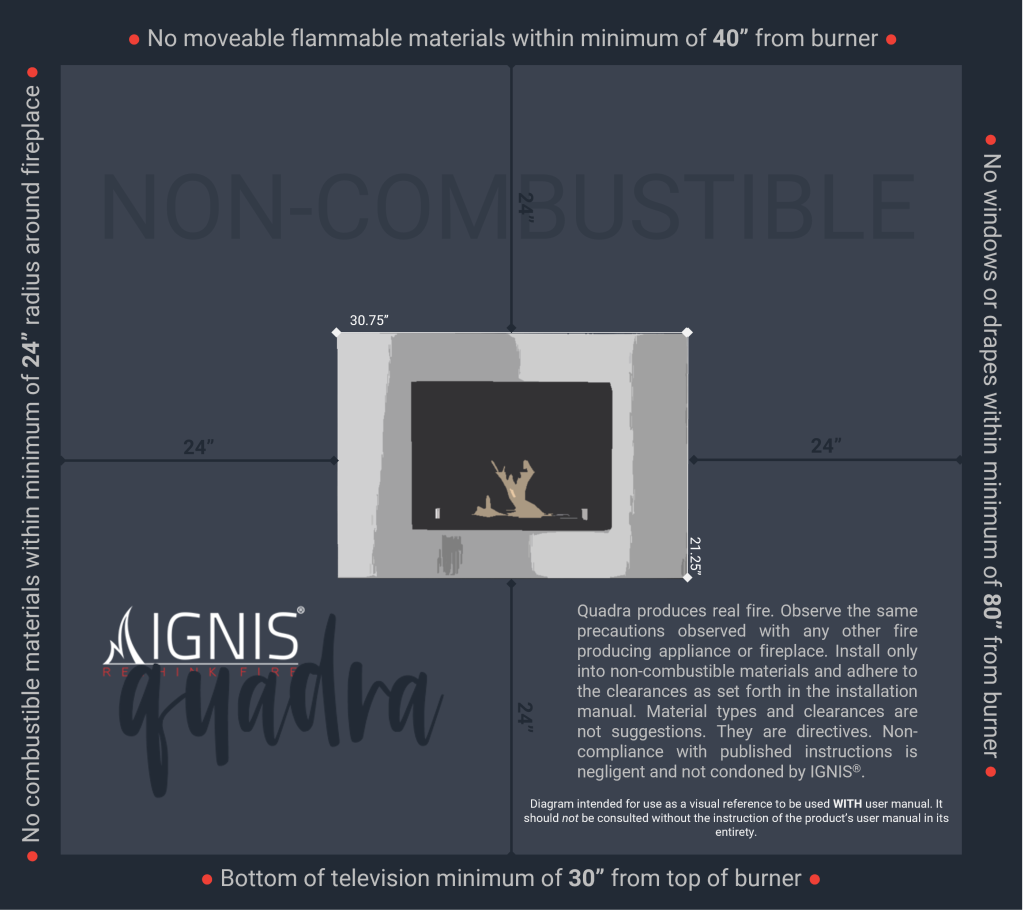
Step One. Frame. Framing is the skeleton of the fireplace surround you are building to house your recessed fireplace. Framing is also called “bumping out”, as most customers need to bring the wall forward to accommodate the depth of the fireplace. It is advised that the frame be built with metal studs. Fireplace designs vary, so this step will be relative to each client’s ambitions. The niche that will be "cutout" for Quadra, measures: 20" wide, 15" high, 4 1/4" deep. These dimensions allow a slight gap for airflow, but otherwise a flush mount. It is important to ensure the structure is level upon completion. Once the frame has been erected, we suggest that you review the conditions under which the fireplace is being installed one more time to be sure that nothing has been overlooked. So, prior to moving to the next step, the following conditions should be verified: Safety check. 1. There are not (or will not be) any flammable materials within 40” of the fireplace as you’ve positioned it. 2. There are no windows or drapes/curtains within 80” of the structure. 3. If your design calls for mounting a television over the fireplace, the bottom of the television will be at least 30” from where the flames will emerge. Only after these conditions are verified should you take the next installation step. Step Two. Fireproof. The skeleton is now faced with a non-combustible material. The most popular application is concrete backer board (also known as cement board). However, brick, concrete blocks, and stone are also non-combustible. Because the fireplace will get hot, it is vital that all building materials are covered in this non-combustible layer within a minimum area of 24” around the fireplace. When finished, there should be no studs or other material visible - only the non-combustible facing. Step Three. Fit/Finish. Before beginning this step, the facing/finish of your custom fireplace surround will determine the best course of action: • If you are finishing UP TO the fireplace frame, at this stage you will hang the fireplace’s wall bracket in the recessed opening that is mounted 4 1/4" from the top of the cutout niche. The fireplace body may be secured in place. DO NOT, however, equip the fireplace with the ethanol burner at this time. This will ensure the building, finishing, or other materials don’t enter the burner and impede the performance of the fireplace or create a safety issue. • If you are finishing up to the CUTOUT you’ve incised to accommodate the fireplace, you will finish the structure and follow the above once complete. Your fireplace surround may be faced with any non-combustible finish or high-temperature paint. Popular finishes include:granite, marble, ceramic tile, stone or stacked stone veneer, lightweight concrete, or brick - or any material that is non-combustible. Just to be sure we're on the same page, let us clarify some terms. We're always here to help if you have other questions, too!: Non-Combustible. Materials that do not burn or ignite when subjected to expected levels of fire or heat.
The distance between two objects;the amount of clear space. |
||||||||||||||||||||||||||||||||||||||||||||||||||||||||||||||||||||||||||
|
||||||||||||||||||||||||||||||||||||||||||||||||||||||||||||||||||||||||||


|