|
|
|

|

|

|

|

|

|

|
Compatible Models
Ford Escape 2005-2008
Ford Explorer 2006-2009
Ford Explorer Sport Trac 2007-2009
Ford Mustang 2005-2008
Ford Taurus 2004-2005
Mercury Mariner 2005-2008
Mercury Mountaineer 2006-2009
Mercury Sable 2004-2005
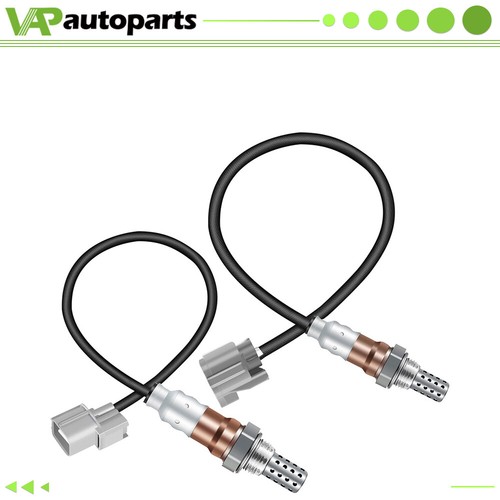
What Are Fuel Injectors?
Fuel injectors spray fuel into a car’s engine using electronic controlled valves, capable of opening and closing many times a second. They have an atomising nozzle that distributes the petrol or diesel evenly, for optimum combustion and efficiency. Injectors were introduced as a replacement for the old carburettor system, since they help engines run with greater fuel efficiency and also help to reduce emissions.
Product Details:
These High Impedance fuel injectors have been 100% tested and exactly
match the internal coil resistance and fuel flow rate of OEM fuel injectors.
The individual flow characteristics and fuel atomization of fuel injectors
above are almost same to or superior to the OEM and will help accelerate
response time , save gasoline and improve MPG.
· Brand New
· Condition: 100% BRAND NEW
· O-Rings Included: Yes, preinstalled
· Injector Design: Metal & composite plastic
· Fuel delivery type: Multi-hole, fog-type spray, excellent fuel atomization
Fuel injector symptoms for bad, faulty, dirty, clogged, or leaking injectors are :
- Starting issues
- Poor idle
- Failed emissions
- Poor Performance
- Engine does not reach full RPM
- Increased fuel consumption
- Rough engine performance
- Surging and bucking under various throttle loads
- Smoke from the tail pipe
- Engine Knock or Detonation which can lead to catastrophic engine failure
- Pollution
Leaking Injectors will cause:
- Increased Fuel Consumption
- Poor Idle
- Fuel odors inside and around the car
- Hard Starting
- Poor Emissions
- Oil thinning, which can lead to catastrophic engine failure
- Hydro lock, which can lead to catastrophic engine failure
Exte·Disconnect the electrical connector
Fuel Injector Replacement:
1.Remove fuel rail mounting bolts
2.Lift rail from the intake manifold
3.Remove fuel injector retainer clip
4.Work the injector from the fuel rail (fuel will be present)
5.Match the new injector to the old unit
6.Insert new injector using new O ring seals (lube with engine oil)
7.·Reinstall fuel injector rail and mounting bolts
8.Install electrical connector
9.Check for leaksrnal injector leaks is a fire hazard and cannot be fixed.
How to clean fuel injectors?
1.Using a Fuel Injector Cleaning Kit
Purchase a fuel injector cleaner kit with a PEA cleaning fluid.
Most fuel injector cleaning kits can be used for any type of vehicle, but you should read the package or ask a store clerk to make sure.
2.Review your vehicle's engine layout to locate the fuel injectors. Different types of engines have different layouts. Take a look at your vehicle's manual to determine where the fuel injectors are located. You can also look up your vehicle online to find this information.


3.Disconnect the fuel pump from the fuel injectors. Brace the fuel pump, which should be located on the side of the engine. Gently pull out the fuel injectors to detach them from the pump. Once they are removed, connect the fuel return line to the fuel pump so the gas inside it returns to the tank while you're cleaning the injectors.
4.Disconnect the pressure regulator vacuum line if you have one. Locate the fuel pressure regulator if your vehicle has one and look for the vacuum line attached to it. Brace the vacuum line just above where it connects to the regulator. Gently pull it out to disconnect it.


5.Connect the cleaning kit to the fuel port. Locate the fuel port, which should be attached to the fuel rail in your engine. Follow your cleaning kit's detailed directions on how to attach the hose and fitting to the port. This will vary between kits, but you should focus on making sure that the fitting is attached properly to both the hose and port.
6.Remove the cap from the fuel tank to prevent pressure buildup. The cleaner will remove debris and grime by using a burst of pressure to inject a cleaning solvent into the fuel injectors. Be sure to remove the fuel tank cap before starting the cleaning. This will keep excessive pressure from building up, which could cause combustion


7.Turn the vehicle to let the cleaning fluid into your injectors. Double check that your fuel pump is turned off. Start your engine and let it run. The motor will stop running on its own once the cleaning fluid is all used up.
It usually takes 5 to 10 minutes for the cleaner to cycle through the injectors and get used up.
8.Remove the cleaning kit and reattach your pump and injectors. Remove the hose and fittings from your fuel port. Reattach the fuel pump power supply and the pressure regulator vacuum hose. Put the fuel cap back into place


8.Turn the vehicle on again to make sure the fuel injectors work. Test your vehicle to see if you've reattached everything correctly by starting the engine. Listen for any abnormal noises, which may indicate a problem. Drive the vehicle a short distance to make sure it runs smoothly.[10]
If you followed the procedure correctly and notice abnormal noises, contact a professional auto mechanic
Notes:
Please be aware that the vehicle compatible chart on eBay is not 100% accurate, but the OE# provided in our listing is correct,
If you already have OE number of the parts you are lookin for, then you can just searching by OE #.
If in doubt, please send us your VIN, that's the BEST way to check if this is the RIGHT FITMENT.
| Item Specifics | |
|---|---|
| Brand | vap-autoparts |
| Manufacturer Warranty | 1Year |
| Manufacturer Part Number | IG15125601S |
| Type | Fuel Injector |
| Vintage Car Part | NO |
| Connector Color | As Shown in the Picture |
| Connector Type | Gasoline |
| Orifice Type | 4 hole |
| Connector Type:Male | |
| Universal Fitment | Yes |
| Injector Design | Metal & composite plastic |
| Bundle Listing | No |
| Fitment Type | Direct Replacement |
| OE/OEM Part Number | FJ461,4L8Z9F593AA |
| Placement on Vehicle | Front |
| Weight | 2.1LB |
| Fuel delivery type | Fog-type spray |
| OE Spec or Performance/Custom | OE Spec |
We usually ship within 1 business day of receiving your payment.
We do not ship to P.O. Boxes, APO/FPO or Military Mail Box.
We only ship to Paypal confirmed address, please make sure that the address is correct before you check out.
We accept to pay by Credit Card, Direct Debit, VISA, eCheck, or other methods, please kindly check Paypal for more information.
For multiple purchases, please add items to your Ebay shopping cart and pay once for entire order.
We offer a 30-day money-back guarantee, as long as the item has not been installed on a vehicle and in the same condition when purchased.
The process for returns:
1. Contact us via eBay with any concerns or issues with the product you received.
2. Begin a Return Request on your eBay account.
3. You will be sent a return label via eBay
We maintain high standards of excellence (five stars review)and strive for 100% customer satisfaction!As a seller Positive Feedback is very important to us, as well as ourcustomers. We hope that you contact us immediately BEFORE you give us neutral or negative feedback, so that we can satisfactorily address your concerns.
Cancer and Reproductive Harm - www.P65Warnings.ca.gov
Store Cat. New List Item
Hot Item
|
For 8 PCS Fuel Injectors Ford Mustang Escape Mercury Mariner 2005 2006 2007 2008
Compatible Models Ford Escape 2005-2008
What Are Fuel Injectors? Fuel injectors spray fuel into a car’s engine using electronic controlled valves, capable of opening and closing many times a second. They have an atomising nozzle that distributes the petrol or diesel evenly, for optimum combustion and efficiency. Injectors were introduced as a replacement for the old carburettor system, since they help engines run with greater fuel efficiency and also help to reduce emissions.
Product Details: These High Impedance fuel injectors have been 100% tested and exactly match the internal coil resistance and fuel flow rate of OEM fuel injectors. The individual flow characteristics and fuel atomization of fuel injectors above are almost same to or superior to the OEM and will help accelerate response time , save gasoline and improve MPG. · Brand New · Condition: 100% BRAND NEW · O-Rings Included: Yes, preinstalled · Injector Design: Metal & composite plastic · Fuel delivery type: Multi-hole, fog-type spray, excellent fuel atomization
Fuel injector symptoms for bad, faulty, dirty, clogged, or leaking injectors are :
Leaking Injectors will cause:
Exte·Disconnect the electrical connector
Fuel Injector Replacement: 1.Remove fuel rail mounting bolts 2.Lift rail from the intake manifold 3.Remove fuel injector retainer clip 4.Work the injector from the fuel rail (fuel will be present) 5.Match the new injector to the old unit 6.Insert new injector using new O ring seals (lube with engine oil) 7.·Reinstall fuel injector rail and mounting bolts 8.Install electrical connector 9.Check for leaksrnal injector leaks is a fire hazard and cannot be fixed.
How to clean fuel injectors? 1.Using a Fuel Injector Cleaning Kit Purchase a fuel injector cleaner kit with a PEA cleaning fluid. Most fuel injector cleaning kits can be used for any type of vehicle, but you should read the package or ask a store clerk to make sure. 2.Review your vehicle's engine layout to locate the fuel injectors. Different types of engines have different layouts. Take a look at your vehicle's manual to determine where the fuel injectors are located. You can also look up your vehicle online to find this information.
3.Disconnect the fuel pump from the fuel injectors. Brace the fuel pump, which should be located on the side of the engine. Gently pull out the fuel injectors to detach them from the pump. Once they are removed, connect the fuel return line to the fuel pump so the gas inside it returns to the tank while you're cleaning the injectors. 4.Disconnect the pressure regulator vacuum line if you have one. Locate the fuel pressure regulator if your vehicle has one and look for the vacuum line attached to it. Brace the vacuum line just above where it connects to the regulator. Gently pull it out to disconnect it.
5.Connect the cleaning kit to the fuel port. Locate the fuel port, which should be attached to the fuel rail in your engine. Follow your cleaning kit's detailed directions on how to attach the hose and fitting to the port. This will vary between kits, but you should focus on making sure that the fitting is attached properly to both the hose and port. 6.Remove the cap from the fuel tank to prevent pressure buildup. The cleaner will remove debris and grime by using a burst of pressure to inject a cleaning solvent into the fuel injectors. Be sure to remove the fuel tank cap before starting the cleaning. This will keep excessive pressure from building up, which could cause combustion
7.Turn the vehicle to let the cleaning fluid into your injectors. Double check that your fuel pump is turned off. Start your engine and let it run. The motor will stop running on its own once the cleaning fluid is all used up. It usually takes 5 to 10 minutes for the cleaner to cycle through the injectors and get used up. 8.Remove the cleaning kit and reattach your pump and injectors. Remove the hose and fittings from your fuel port. Reattach the fuel pump power supply and the pressure regulator vacuum hose. Put the fuel cap back into place
8.Turn the vehicle on again to make sure the fuel injectors work. Test your vehicle to see if you've reattached everything correctly by starting the engine. Listen for any abnormal noises, which may indicate a problem. Drive the vehicle a short distance to make sure it runs smoothly.[10] If you followed the procedure correctly and notice abnormal noises, contact a professional auto mechanic
Notes: Please be aware that the vehicle compatible chart on eBay is not 100% accurate, but the OE# provided in our listing is correct, If you already have OE number of the parts you are lookin for, then you can just searching by OE #. If in doubt, please send us your VIN, that's the BEST way to check if this is the RIGHT FITMENT.
Shipping
We usually ship within 1 business day of receiving your payment. We do not ship to P.O. Boxes, APO/FPO or Military Mail Box. We only ship to Paypal confirmed address, please make sure that the address is correct before you check out. ▪ If you have not received your shipment within 30 days from payment , please contact us. We will track the shipment and get back to you as soon as possible with a reply. Our goal is customer satisfaction!▪ Orders processed within 24-48 hours of payment verification.
▪ We only ship to confirmed PAYPAL addresses. Your PAYPAL address must match your Shipping address.
▪ The images shown are not the actual item and are for your reference only.
▪ Service transit time is provided by the carrier and excludes weekends and holidays. Transit times may vary, particularly during the holiday season.
▪ If you have not received your shipment within 30 days from payment , please contact us. We will track the shipment and get back to you as soon as possible with a reply. Our goal is customer satisfaction!▪ Orders processed within 24-48 hours of payment verification.
▪ We only ship to confirmed PAYPAL addresses. Your PAYPAL address must match your Shipping address.
▪ The images shown are not the actual item and are for your reference only.
▪ Service transit time is provided by the carrier and excludes weekends and holidays. Transit times may vary, particularly during the holiday season.
▪ If you have not received your shipment within 30 days from payment , please contact us. We will track the shipment and get back to you as soon as possible with a reply. Our goal is customer satisfaction! Payment
We accept to pay by Credit Card, Direct Debit, VISA, eCheck, or other methods, please kindly check Paypal for more information. For multiple purchases, please add items to your Ebay shopping cart and pay once for entire order. Return
We offer a 30-day money-back guarantee, as long as the item has not been installed on a vehicle and in the same condition when purchased. The process for returns: 1. Contact us via eBay with any concerns or issues with the product you received. 2. Begin a Return Request on your eBay account. 3. You will be sent a return label via eBay Feedback
We maintain high standards of excellence (five stars review)and strive for 100% customer satisfaction!As a seller Positive Feedback is very important to us, as well as ourcustomers. We hope that you contact us immediately BEFORE you give us neutral or negative feedback, so that we can satisfactorily address your concerns. Warning
Cancer and Reproductive Harm - www.P65Warnings.ca.gov Copyright of VAP-AutoParts. All rights reserved. |