|
|
|

|

|

|

|

|

|

|

|

|

|

|

|

|

|

|

|

|

|

|

|

|

|
Compatibility:
2012-2015 Ram 1500 5.7L
2012-2015 Ram 2500 5.7L
2014-2015 Ram 2500 6.4L
2012-2015 Ram 3500 5.7L
2014-2015 Ram 3500 6.4L
Benefits:
1.Dual Insulated Protective Cover Prevents premature zirconium sensor wear
2.Laser welded sensor body to keep out contaminants
3.Internal Ceramic Insulation for optimal sensor performance.
4.Sealed wire leads prevent moisture interference with electronic signal
Q&A:
Q1:Why the oxygen sensor important for your vhiche?
The oxygen sensor in your car resides in your exhaust manifold and is used to detect components of your exhaust (including oxygen!) that helps your car monitor its performance. Your oxygen sensor’s readings are transmitted to your engine, in real time, and helps your car determine its fuel-to-air ratio in order to maximize its performance.
Failing oxygen sensors were the most common repair performed by North American automotive mechanics for the 5th year in a row, with cars older than 10 years constituting most repairs. Understanding when you should repair your oxygen sensor is important if you drive an older car. Most automotive manufacturers recommend replacing the oxygen sensor in your car every 100,000 km to 150,000 km.
Q2:how to check the oxygen sensor is bad?
1. Check Engine Light Is On
Normally, if your oxygen sensor is malfunctioning, your check engine light will turn on. Instead of ignoring your check engine light, get an inspection from a licensed mechanic as soon as possible. If you drive an older car (10+ years, or above 150,000 km) it is very likely that your check engine light is signalling a faulty oxygen sensor.
2. Increased exhaust emissions
Your oxygen sensor determines the optimal air-to-fuel ratio for your engine by monitoring your emissions in real-time. If your oxygen sensor begins to malfunction, then your engine may be operating at sub-optimal air-to-fuel ratios, which can cause an increase in your exhaust emissions.
3. Bad performance
Your car may misfire or experience hesitation and stalling. Most cars default to the factory air-to-fuel ratio if the oxygen sensor fails, which can cause problems because of non-standard temperature, moisture, or air composition. If your oxygen sensor is failing, then its readings will be inaccurate, again, resulting in a sub-optimal fuel-to-air composition.
Q3:how to install the oxygen sensor?
1. Tools and Materials
Clean rags
A large adjustable wrench or set of crescent wrenches
2 good-sized blocks of wood
A flashlight
A car jack
Jack stands to support the car
A new oxygen sensor
Latex or nitrile gloves (optional)
It might also be useful to have a guide on hand for your specific vehicle, or check out the process in an online forum specific to your make and model.
2.Prepare Your Work Area
First, park the vehicle on a level surface and set the brake. Put the wood blocks behind and in front of one of the rear tires. This is to ensure that the vehicle doesn't move. If you've recently driven the car there's a good chance that the exhaust system will be extremely hot. Let it cool for awhile before touching it. Raise each side of the car using the jack until the tire is no longer touching the ground. Lower the car onto the stand, being careful to use one of the frame contact points identified in your owner's manual. Other places on the vehicle are not designed to support weight and will be damaged if you use them to lift or support the car. Once the car is situated on the stand make sure that it is being supported in a stable manner.
3.Locate and Remove the Sensor(s)
While some vehicles are equipped with only one oxygen sensor, other cars use two. On engines using only one sensor, it is typically located on or very near the exhaust manifold (the part of the exhaust that attaches to your car's motor). On vehicles with two sensors, the second sensor will be located downstream from the car's catalytic converter. Simply follow the car's exhaust system from the manifold back towards the muffler to locate the sensor. Remove and replace the sensors one at a time, taking care to make sure you're installing the correct sensor in each location. Take a look and the new oxygen sensor so that you have a good idea of exactly what it looks like. The sensor wire should unplug using a simple clip. Once the wire is removed, use a crescent wrench to loosen the bolt attaching the sensor to the exhaust system and remove it. Replace the sensor and reconnect it, taking care to make sure the wire's clip clicks into place. Take care to route the wire in its original location so that the wire is away from the hot exhaust pipe.
4.Finish Up
Once the sensors are replaced, reverse the process of step one to complete the job.
| Item Specifics | |
|---|---|
| Manufacturer Part Number | IG836168C |
| Type | Oxygen Sensor |
| Brand | Ignition-coil |
| Manufacturer Warranty | 1 Year |
| Number of Pieces | 2 |
| Fitment Type | Direct Replacement |
| Pin | 4 |
| Wire | 4 |
| Location | Upstream Downstream |
| Placement on Vehicle | Upstream Downstream |
| Sensor Type | Heated |
| Technology | Narrow-band |
| Attachment Method | Screw-On |
| Universal Or Specific Fit | Specific |
| Universal Or Specific Fit | Specific |
| Type | Sensor |
| Features | Direct Fit |
We usually ship within 1 business day of receiving your payment.
We do not ship to P.O. Boxes, APO/FPO or Military Mail Box.
We only ship to Paypal confirmed address, please make sure that the address is correct before you check out.
We accept to pay by Credit Card, Direct Debit, VISA, eCheck, or other methods, please kindly check Paypal for more information.
For multiple purchases, please add items to your Ebay shopping cart and pay once for entire order.
We offer a 30-day money-back guarantee, as long as the item has not been installed on a vehicle and in the same condition when purchased.
The process for returns:
1. Contact us via eBay with any concerns or issues with the product you received.
2. Begin a Return Request on your eBay account.
3. You will be sent a return label via eBay
We maintain high standards of excellence (five stars review)and strive for 100% customer satisfaction!As a seller Positive Feedback is very important to us, as well as ourcustomers. We hope that you contact us immediately BEFORE you give us neutral or negative feedback, so that we can satisfactorily address your concerns.
Cancer and Reproductive Harm - www.P65Warnings.ca.gov
Store Cat. New List Item
Hot Item
|
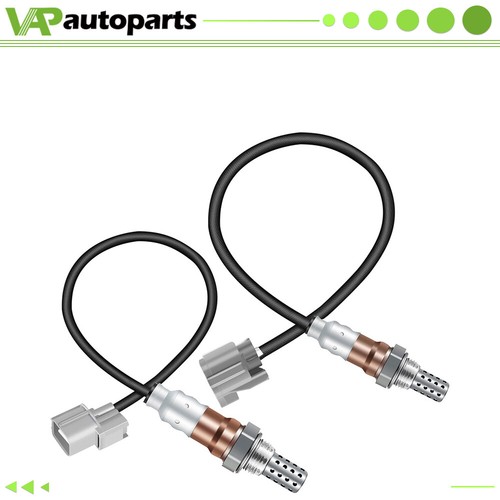
For 12-2015 Ram 1500 2500 3500 5.7L O2 02 Oxygen Sensor Heated 2pcs Upper Lower
Compatibility: 2012-2015 Ram 1500 5.7L 2012-2015 Ram 2500 5.7L 2014-2015 Ram 2500 6.4L 2012-2015 Ram 3500 5.7L 2014-2015 Ram 3500 6.4L
Benefits:
1.Dual Insulated Protective Cover Prevents premature zirconium sensor wear 2.Laser welded sensor body to keep out contaminants 3.Internal Ceramic Insulation for optimal sensor performance. 4.Sealed wire leads prevent moisture interference with electronic signal
Q&A:
Q1:Why the oxygen sensor important for your vhiche?
The oxygen sensor in your car resides in your exhaust manifold and is used to detect components of your exhaust (including oxygen!) that helps your car monitor its performance. Your oxygen sensor’s readings are transmitted to your engine, in real time, and helps your car determine its fuel-to-air ratio in order to maximize its performance. Failing oxygen sensors were the most common repair performed by North American automotive mechanics for the 5th year in a row, with cars older than 10 years constituting most repairs. Understanding when you should repair your oxygen sensor is important if you drive an older car. Most automotive manufacturers recommend replacing the oxygen sensor in your car every 100,000 km to 150,000 km.
Q2:how to check the oxygen sensor is bad?
1. Check Engine Light Is On Normally, if your oxygen sensor is malfunctioning, your check engine light will turn on. Instead of ignoring your check engine light, get an inspection from a licensed mechanic as soon as possible. If you drive an older car (10+ years, or above 150,000 km) it is very likely that your check engine light is signalling a faulty oxygen sensor.
2. Increased exhaust emissions Your oxygen sensor determines the optimal air-to-fuel ratio for your engine by monitoring your emissions in real-time. If your oxygen sensor begins to malfunction, then your engine may be operating at sub-optimal air-to-fuel ratios, which can cause an increase in your exhaust emissions.
3. Bad performance Your car may misfire or experience hesitation and stalling. Most cars default to the factory air-to-fuel ratio if the oxygen sensor fails, which can cause problems because of non-standard temperature, moisture, or air composition. If your oxygen sensor is failing, then its readings will be inaccurate, again, resulting in a sub-optimal fuel-to-air composition.
Q3:how to install the oxygen sensor?
1. Tools and Materials Clean rags A large adjustable wrench or set of crescent wrenches 2 good-sized blocks of wood A flashlight A car jack Jack stands to support the car A new oxygen sensor Latex or nitrile gloves (optional) It might also be useful to have a guide on hand for your specific vehicle, or check out the process in an online forum specific to your make and model.
2.Prepare Your Work Area First, park the vehicle on a level surface and set the brake. Put the wood blocks behind and in front of one of the rear tires. This is to ensure that the vehicle doesn't move. If you've recently driven the car there's a good chance that the exhaust system will be extremely hot. Let it cool for awhile before touching it. Raise each side of the car using the jack until the tire is no longer touching the ground. Lower the car onto the stand, being careful to use one of the frame contact points identified in your owner's manual. Other places on the vehicle are not designed to support weight and will be damaged if you use them to lift or support the car. Once the car is situated on the stand make sure that it is being supported in a stable manner.
3.Locate and Remove the Sensor(s) While some vehicles are equipped with only one oxygen sensor, other cars use two. On engines using only one sensor, it is typically located on or very near the exhaust manifold (the part of the exhaust that attaches to your car's motor). On vehicles with two sensors, the second sensor will be located downstream from the car's catalytic converter. Simply follow the car's exhaust system from the manifold back towards the muffler to locate the sensor. Remove and replace the sensors one at a time, taking care to make sure you're installing the correct sensor in each location. Take a look and the new oxygen sensor so that you have a good idea of exactly what it looks like. The sensor wire should unplug using a simple clip. Once the wire is removed, use a crescent wrench to loosen the bolt attaching the sensor to the exhaust system and remove it. Replace the sensor and reconnect it, taking care to make sure the wire's clip clicks into place. Take care to route the wire in its original location so that the wire is away from the hot exhaust pipe.
4.Finish Up Once the sensors are replaced, reverse the process of step one to complete the job.
Shipping
We usually ship within 1 business day of receiving your payment. We do not ship to P.O. Boxes, APO/FPO or Military Mail Box. We only ship to Paypal confirmed address, please make sure that the address is correct before you check out. ▪ If you have not received your shipment within 30 days from payment , please contact us. We will track the shipment and get back to you as soon as possible with a reply. Our goal is customer satisfaction!▪ Orders processed within 24-48 hours of payment verification.
▪ We only ship to confirmed PAYPAL addresses. Your PAYPAL address must match your Shipping address.
▪ The images shown are not the actual item and are for your reference only.
▪ Service transit time is provided by the carrier and excludes weekends and holidays. Transit times may vary, particularly during the holiday season.
▪ If you have not received your shipment within 30 days from payment , please contact us. We will track the shipment and get back to you as soon as possible with a reply. Our goal is customer satisfaction!▪ Orders processed within 24-48 hours of payment verification.
▪ We only ship to confirmed PAYPAL addresses. Your PAYPAL address must match your Shipping address.
▪ The images shown are not the actual item and are for your reference only.
▪ Service transit time is provided by the carrier and excludes weekends and holidays. Transit times may vary, particularly during the holiday season.
▪ If you have not received your shipment within 30 days from payment , please contact us. We will track the shipment and get back to you as soon as possible with a reply. Our goal is customer satisfaction! Payment
We accept to pay by Credit Card, Direct Debit, VISA, eCheck, or other methods, please kindly check Paypal for more information. For multiple purchases, please add items to your Ebay shopping cart and pay once for entire order. Return
We offer a 30-day money-back guarantee, as long as the item has not been installed on a vehicle and in the same condition when purchased. The process for returns: 1. Contact us via eBay with any concerns or issues with the product you received. 2. Begin a Return Request on your eBay account. 3. You will be sent a return label via eBay Feedback
We maintain high standards of excellence (five stars review)and strive for 100% customer satisfaction!As a seller Positive Feedback is very important to us, as well as ourcustomers. We hope that you contact us immediately BEFORE you give us neutral or negative feedback, so that we can satisfactorily address your concerns. Warning
Cancer and Reproductive Harm - www.P65Warnings.ca.gov Copyright of VAP-AutoParts. All rights reserved. |