|
|
|

|

|

|

|

|

|

|

|

|

|

|

|

|

|

|

|

|

|

|

|

|

|

Please check fitment notes & description for accurate information.
1997 Acura CL 2.2L Upstream
1998-1999 Acura CL 2.3L Upstream
1997-1999 Acura CL 3.0L Upstream
1992-1993 Acura Integra 1.7L Upstream
1992-2001 Acura Integra 1.8L Upstream
2004-2006 Acura MDX 3.5L Downstream Front
1995-1999 Acura NSX 3.0L Downstream Front
1997-1999 Acura NSX 3.2L Downstream Front
2004-2006 Acura TL 3.2L Downstream Front
1992-1994 Acura Vigor 2.5L Upstream
1990-1997 Honda Accord 2.2L Upstream
1995 Honda Accord 2.7L Upstream
1998-2002 Honda Accord 3.0L Upstream
2003-2007 Honda Accord 3.0L Downstream Front
1992-1995 Honda Civic 1.5L Upstream
1992-1997 Honda Civic 1.6L Upstream
1998-2000 Honda Civic 1.6L Upstream or Downstream
1993-1995 Honda Civic del Sol 1.5L Upstream
1993-1997 Honda Civic del Sol 1.6L Upstream
1997-2001 Honda CR-V 2.0L Upstream
1995-1997 Honda Odyssey 2.2L Upstream
1998 Honda Odyssey 2.3L Upstream
1999-2004 Honda Odyssey 3.5L Upstream
2005-2010 Honda Odyssey 3.5L Downstream Front
2006-2008 Honda Pilot 3.5L Downstream Front
1990-1991 Honda Prelude 2.1L Upstream
1993-1996 Honda Prelude 2.2L Upstream
1992-1996 Honda Prelude 2.3L Upstream
2006-2008 Honda Ridgeline 3.5L Downstream Front
1996-1997 Isuzu Oasis 2.2L Upstream
1998-1999 Isuzu Oasis 2.3L Upstream
Oxygen Sensor's Location:


How do I know the O2 sensor is good or not?
-
Check engine light on
-
A reduction in fuel economy.
-
Your catalytic converter fails unexpectedly
-
Exhaust emissions reach undesirable levels.
How to install the oxygen sensor?
Step 1 - Some sensors are equipped with a heat shield that must be removed before the sensor removal, this is performed by removing any mounting bolts.
Step 2 - By using a regular socket it minimizes potential damage to the sensor body and the threads, this technique helps avoid stripping the old sensor upon removal.
Step 3 - Then, locate and disconnect the wiring connector, this step should be done before removing the sensor if the wiring is still attached.
Step 4 - Its important that the wiring harness connectors are exactly the same, each sensor is unique to it's position and is located in the system by its connector configuration. (Note: some replacement sensors have a universal electrical connector that must be configured to the wiring of the old sensor.)
Step 5 - Use a small wire brush to help clean the threaded port to ensure a proper seal of the new sensor. Gently install the new oxygen sensor by hand while keeping the wiring and connector free from bends.
Step 6 - Gently tighten the sensor while keeping wiring free from damage, these sensors need to be fairly snug to avoid leakage.
Step 7 - Once the sensor is tightened, reinstall any heat shields or bracing that had to be removed.
Step 8 - After the heat shield has been reinstalled, mount the connector to it's holder and reattach the connector back onto the wiring harness. If the car has diagnostic trouble codes, they will need to be cleared.


Must Know Before Buying:
The following information is for instructional and guidance reference only. We try and make them as accurate as we can.
If Check Engine Light is on or an OBDII Trouble/Fault code occurs after installation, check the sensor with a voltmeter as below.
If the sensor is good, further diagnosis is required. There're many different codes for specific functional failures, which are NOT necessarily relevant to the sensor. Find out what the Code means before leaving any feedbacks.
Items that have been installed, altered or contaminated are non-returnable.
1. ONLY a defective sensor after tested by a voltmeter is applied to manufacturer warranty.
2. 20% restocking fee is required if buyer bought wrong items due to not paying attention to fitment information and ask for return.
The Price, Quality & Functionality of the O2 Sensor is fully covered under our warranty & return policy. However, refund for any labor cost, expense in a dealer shop or damage due to wrong installation is NOT covered.

- We stand behind every product we sell.
- All of our brand new items come with a 60-Days money-back guarantee.
- We define the item as defective only if it doesn't function as described.
- It is the buyer's responsibility to understand the item description before bidding.
- We will replace the defective items, provided that they are in stock within the warranty period posted with the listing and the buyer return the original item and pay for the S&H cost for the replacement.
- We will refund the purchase price if the replacement is not available or buyer prefers a refund and send the original item back at his/her own cost.
- Shipping & handling cost are not refundable.
- Man-made damage by abuse or wrong operation is not covered by this warranty.
- No product liability insurance is assumed.

- PayPal preferred.
- Payments are expected within 7 days after the last winning auction is closed; Otherwise Unpaid Item Dispute will be filed with eBay.

- Product will be shipped within 2 business days after full payment is received and verified. Delivery Time is about 3-7 business days to most of countries.
- All domestic orders will be shipped via USPS, UPS or FedEx from our US warehouse and usually arrives to your door in about 3-5 business days.
- We ship the package to your shipping address in eBay instead of the one in PayPal. Please tell us your shipping address if it is different from the one in eBay.
- The tracking number will be given for the customer to check the shipping status online (registered or faster service only).
- We are not responsible for any wrong or undeliverable addresses. Please verify and update your shipping address on eBay during checkout.

- International Buyers a€“ Please Note:
- a) Import duties, taxes and charges are not included in the item price or shipping charges. These charges are the buyer's responsibility.
- b) Please check with your country's customs office to determine what these additional costs will be prior to bidding.
- Serious Buyer Only! Please place bid or "Buy it now" only if you agree the price and terms of the product and no argument after the auction.

- We strive to source genuine products from the suppliers. However, if you feel any of our products violate your Trademark, Patent Right or any other Intellectual Property Rights, please contact us. We will remove any offending listing immediately while awaiting further discussion.
Picture
Hot Item
Shop Category New List Item
|
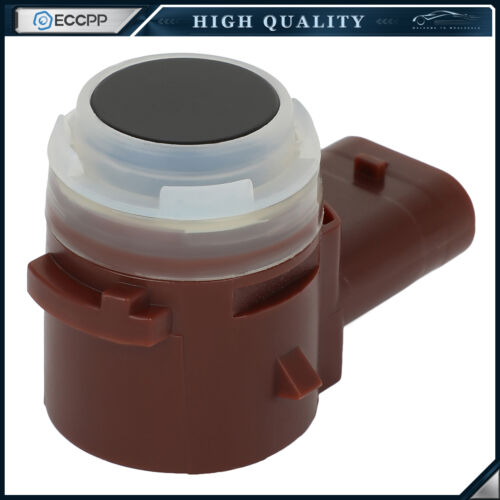
Downstream for 2005-10 Odyssey 3.5L 03-07 Accord 3.0L O2 02 Oxygen Sensor
Please check fitment notes & description for accurate information.
1997 Acura CL 2.2L Upstream 1998-2002 Honda Accord 3.0L Upstream 1998-2000 Honda Civic 1.6L Upstream or Downstream 2005-2010 Honda Odyssey 3.5L Downstream Front
Oxygen Sensor's Location:
How do I know the O2 sensor is good or not?
How to install the oxygen sensor? Step 1 - Some sensors are equipped with a heat shield that must be removed before the sensor removal, this is performed by removing any mounting bolts.
Step 2 - By using a regular socket it minimizes potential damage to the sensor body and the threads, this technique helps avoid stripping the old sensor upon removal.
Step 3 - Then, locate and disconnect the wiring connector, this step should be done before removing the sensor if the wiring is still attached.
Step 4 - Its important that the wiring harness connectors are exactly the same, each sensor is unique to it's position and is located in the system by its connector configuration. (Note: some replacement sensors have a universal electrical connector that must be configured to the wiring of the old sensor.)
Step 5 - Use a small wire brush to help clean the threaded port to ensure a proper seal of the new sensor. Gently install the new oxygen sensor by hand while keeping the wiring and connector free from bends.
Step 6 - Gently tighten the sensor while keeping wiring free from damage, these sensors need to be fairly snug to avoid leakage.
Step 7 - Once the sensor is tightened, reinstall any heat shields or bracing that had to be removed.
Step 8 - After the heat shield has been reinstalled, mount the connector to it's holder and reattach the connector back onto the wiring harness. If the car has diagnostic trouble codes, they will need to be cleared.
Must Know Before Buying:
The following information is for instructional and guidance reference only. We try and make them as accurate as we can.
If Check Engine Light is on or an OBDII Trouble/Fault code occurs after installation, check the sensor with a voltmeter as below.
Items that have been installed, altered or contaminated are non-returnable.
1. ONLY a defective sensor after tested by a voltmeter is applied to manufacturer warranty.
The Price, Quality & Functionality of the O2 Sensor is fully covered under our warranty & return policy. However, refund for any labor cost, expense in a dealer shop or damage due to wrong installation is NOT covered.
WARNING: Cancer and Reproductive Harm - www.P65Warnings.ca.gov.
Copyright of eccppautoparts. All rights reserved. |