|
|
|

|

|

|

|

|

|

|

|

|

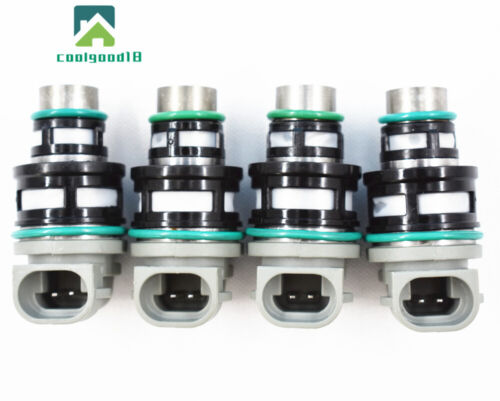
Please check fitment notes & description for accurate information.
1999-2003 Lexus RX300 3.0L
2001-2003 Toyota Highlander 3.0L
Oxygen Sensor's Location:


How do I know the O2 sensor is good or not?
-
Check engine light on
-
A reduction in fuel economy.
-
Your catalytic converter fails unexpectedly
-
Exhaust emissions reach undesirable levels.
How to install the oxygen sensor?
Step 1 - Some sensors are equipped with a heat shield that must be removed before the sensor removal, this is performed by removing any mounting bolts.
Step 2 - By using a regular socket it minimizes potential damage to the sensor body and the threads, this technique helps avoid stripping the old sensor upon removal.
Step 3 - Then, locate and disconnect the wiring connector, this step should be done before removing the sensor if the wiring is still attached.
Step 4 - Its important that the wiring harness connectors are exactly the same, each sensor is unique to it's position and is located in the system by its connector configuration. (Note: some replacement sensors have a universal electrical connector that must be configured to the wiring of the old sensor.)
Step 5 - Use a small wire brush to help clean the threaded port to ensure a proper seal of the new sensor. Gently install the new oxygen sensor by hand while keeping the wiring and connector free from bends.
Step 6 - Gently tighten the sensor while keeping wiring free from damage, these sensors need to be fairly snug to avoid leakage.
Step 7 - Once the sensor is tightened, reinstall any heat shields or bracing that had to be removed.
Step 8 - After the heat shield has been reinstalled, mount the connector to it's holder and reattach the connector back onto the wiring harness. If the car has diagnostic trouble codes, they will need to be cleared.


Must Know Before Buying:
The following information is for instructional and guidance reference only. We try and make them as accurate as we can.
If Check Engine Light is on or an OBDII Trouble/Fault code occurs after installation, check the sensor with a voltmeter as below.
If the sensor is good, further diagnosis is required. There're many different codes for specific functional failures, which are NOT necessarily relevant to the sensor. Find out what the Code means before leaving any feedbacks.
Items that have been installed, altered or contaminated are non-returnable.
1. ONLY a defective sensor after tested by a voltmeter is applied to manufacturer warranty.
2. 20% restocking fee is required if buyer bought wrong items due to not paying attention to fitment information and ask for return.
The Price, Quality & Functionality of the O2 Sensor is fully covered under our warranty & return policy. However, refund for any labor cost, expense in a dealer shop or damage due to wrong installation is NOT covered.
| Item Specifics | |
|---|---|
| Brand | coolgood18 |
| Manufacturer Part Number | HP54720 |
| Type | Oxygen Sensor |
| Number of Pieces | 2 |
| Fitment Type | Direct Replacement |
| Warranty | 90 Day |
| Interchange Part Number | 8946748011, ES20202, 13338,234-9023, 234-4215, |
| Other Part Number | 234-9009, 24567, B8254SZ066TU1Q4X, |
| Position | Upstream, Downstream, Sensor 1, Sensor 2 |

■ There are always uncertainties during shipping, if your item does not show up over the period we estimate to arrive, please feel free to contact us.
■ Our warehouses are located in California. We will arrange the shipping according to your location and the inventory situation of warehouse.
■ Items are mailed by USPS or Fedex.
■ All items are shipped out within 72 hours after payment is received.
■ We work on weekday and Saturday forenoon, excluding weekend & holidays. Pls note that items purchased on weekends and Bank Holidays are dispatched the next working day.
■ Ship to Ebay shipping address. (Please make sure your Ebay shipping address is correct before finalizing order and submitting payment.
■ We only ship to the shipping address submitted with the payment!) .We will not be responsible for item loss due to wrong or unknown address.
■ After receiving the item, cancel the purchase within 30 days
■ Return policy details:
If you are not satisfied with the item,we can accept return. Refund accepted: If item is broken when it arrives or,if there is any problem within 30 days; a refund is acceptable. Please leave us 5 perfect stars if you are satisfied with our service. If you are disatisfied,contact us first and we will resolve problems as much as we can do for you.
■ We work on weekdays and Saturday forenoon, excluding weekend & holidays.
■ Please feel free to contact us if you have any questions about our items. If your item fails to work or something goes wrong within the warranty period, pls contact us via eBay message first and we will spare no effort to solve the problem for you, till the problem was solved.
■ If you want to returm the item, Please contact us via eBay message first and finish the returning process.

- ■ Your feedback is our encouragement.
- ■ Please DO NOT leave us a Neutral/ Negative feedback, or open a case before contacting our customer service by "ebay message", it is NOT a solution which is suggested by the ebay US regulation.
- ■ Due to different people have the individual understanding on the description of the lists, product quality, and ect., we advise you to CONTACT US and share your opinions.
- ■ May I remind you here:
- You have our warranty to exchange or refund the products bought from our shop, we would like to take the responsibilities on it, and we are sure you will satisfy our solutions as other customers at the end.
- ■ However, if you leave the unreasonable feedback, or open a case without contacting us for the solutions, we will definitely feedback it to ebay customer service for saving our reputations.
- ■ The word of Mouth is very important to us, and your kindness and understand are appreciared.

Shop Category Hot Item
New List Item
|
2pcs for 99-03 Lexus RX300 3.0L Upstream Downstream Air Fuel Ratio Oxygen Sensor
Please check fitment notes & description for accurate information.
1999-2003 Lexus RX300 3.0L
Oxygen Sensor's Location:
How do I know the O2 sensor is good or not?
How to install the oxygen sensor? Step 1 - Some sensors are equipped with a heat shield that must be removed before the sensor removal, this is performed by removing any mounting bolts.
Step 2 - By using a regular socket it minimizes potential damage to the sensor body and the threads, this technique helps avoid stripping the old sensor upon removal.
Step 3 - Then, locate and disconnect the wiring connector, this step should be done before removing the sensor if the wiring is still attached.
Step 4 - Its important that the wiring harness connectors are exactly the same, each sensor is unique to it's position and is located in the system by its connector configuration. (Note: some replacement sensors have a universal electrical connector that must be configured to the wiring of the old sensor.)
Step 5 - Use a small wire brush to help clean the threaded port to ensure a proper seal of the new sensor. Gently install the new oxygen sensor by hand while keeping the wiring and connector free from bends.
Step 6 - Gently tighten the sensor while keeping wiring free from damage, these sensors need to be fairly snug to avoid leakage.
Step 7 - Once the sensor is tightened, reinstall any heat shields or bracing that had to be removed.
Step 8 - After the heat shield has been reinstalled, mount the connector to it's holder and reattach the connector back onto the wiring harness. If the car has diagnostic trouble codes, they will need to be cleared.
Must Know Before Buying:
The following information is for instructional and guidance reference only. We try and make them as accurate as we can.
If Check Engine Light is on or an OBDII Trouble/Fault code occurs after installation, check the sensor with a voltmeter as below.
Items that have been installed, altered or contaminated are non-returnable.
1. ONLY a defective sensor after tested by a voltmeter is applied to manufacturer warranty.
The Price, Quality & Functionality of the O2 Sensor is fully covered under our warranty & return policy. However, refund for any labor cost, expense in a dealer shop or damage due to wrong installation is NOT covered. Payment
Shipping
■ There are always uncertainties during shipping, if your item does not show up over the period we estimate to arrive, please feel free to contact us. Returns
■ After receiving the item, cancel the purchase within 30 days Customer Services
■ We work on weekdays and Saturday forenoon, excluding weekend & holidays.
Feedback
All rights reserved. |
|||||||||||||||||||||||||||||||||||||||||||||||||||||||