Store category
You may also like


Product Description
Features:
This listing is for HID bulbs not including ballasts.
As a
professional HID seller, we offer all types of HID
kits, from 4300K to 12000K, from H1 to 9007, single
beam or bi-xenon, for your selection.
Single Beam:
880=881=H27, 5202, 9005=HB3=H10, 9006=HB4,H8=H9=H11,
H1, H3, H7
Bi-Xenon or Dual Beam (H/L):
9004=9007,H4=9003, H13
D1S/D2S
H8/H9/H11 can be generic;
H10/9005/HB3 can be generic;
9006/HB4 can be generic;
9004/9007/HB1/HB5 can be generic;
9005/HB3/H10can be generic;
880/881/H27 can be generic;
9003/H4 can be generic;
Specification:
Voltage Input: 12-24V
Working Current (Norm): 3.2A
Service Life: 5,500 Hours or 229 Days Non-Stop
Max Input Current: 4.8 A
Power Output (Norm): 35W/55W
Case Temperature: -40 °C - +105 °C
Max Start Voltage: 23kV
Compatibility: car, motorcycle, electric motor car
Package Content:
2
Pcs Xenon HID Bulbs
All Necessary Wiring and Connectors*
Why Choose Our Digital HID Xenon bulbs?
Our kits are 100% HID CONVERSION KIT and manufactured under strict quality standards. Our factory is ISO-9001 certified. The ballast and the burner in this kit have passed the most strongest OEM specific test.
100% Plug and Play design
Our product comes with a 3 year warranty and easy
installation. We stand behind our hid kits with
support and service like other company.
We offer a wide range of options including 11 bulb
sizes, 7 different colors and 2 types of ballasts.
Not only do we sell the conversion kits, but all the
accessories needed for proper installation on most
vehicles.
Xenon HID Kit Quality
Control Passed:
6 hours continuous working aging test.
Connection circuit protection test.
Short circuit protection test.
Lack of voltage protection test.
Over voltage protection test.
Flash light concussion test.
Quakeproof capability test.
Cold, warm boot test.
Polarity protection test.
EMC anti-jamming test.


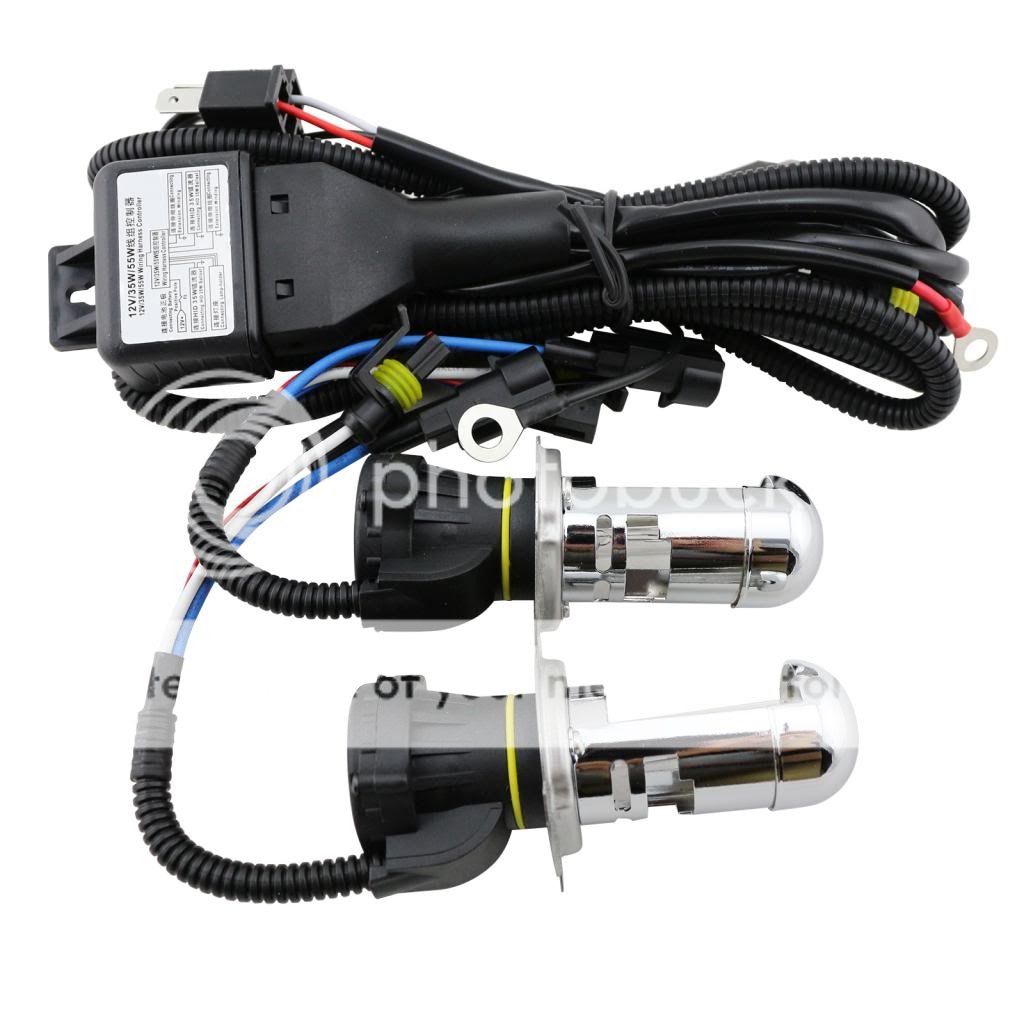
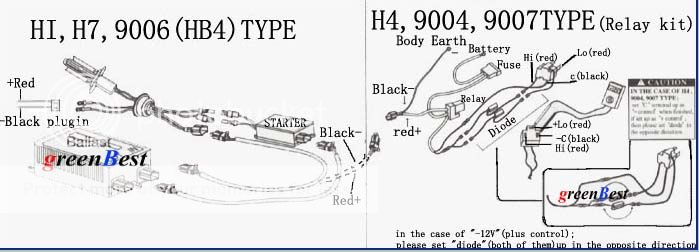
Hi/Lo Beam for H4/9003,9004/7,H13
This will depend on the type of vehicle you drive. For most vehicle, the headlights have 2 bulbs each:
one for low beams and one for high beams. In this case, you will need one regular HID kit for the low beams.
If you also want your high-beams to be HID lights, you will need a second regular HID kit.
On some other vehicles, the headlights have one bulb each. This bulb performs the function of both the high beam and low beam. In this case, if you want to keep the high beam and low beam functions, you will need to install a special HI/LO kit. The HI/LO HID kits have special bulbs that perform both high and low beam functions.


HID Temperature and Color
The color of light is measured and expressed in degrees Kelvin (K). The color spectrum ranges from a red to purple. HID headlamps do not have this wide of a range though there are different bulbs that skew toward either extreme. Most are more focused on the center of that range.
Color
Temperatures Available:
4300k,5000k,6000k,8000k,10000k,12000k
Yellow 3000K
coating BEST for car, most Brightness for car in the
raining and fog days!!!!
Warm White 4300K
White 6000K BEST for car, most Brightness for
car!!!! 5000K also this model.
Crystal Blue 8000K
Blue 10000K
Deep Blue 12000K
We recommend
6000k for best quality.6000K is most strong light
and most popular temp color.
high temp color do not means more bright, it means
color different only.
Temp color
too high will shorten the bulb life.
WE HAVE MANY STOCK ON EACH BULB EACH TEMP COLOR!!!!
NO NEED TO ASK "HAVE STOCK or NO HAVE???".
We guarantee
each HID KIT SET we sell is good quality and can be
light on!!!!


Installation Guide
Step 1: Open hood and locate the factory light bulb you are trying to convert. If fog lights, you may need to pull out your factory fog light housing to access the back. On some vehicles you can access factory bulbs from the engine bay or from the wheel wells with your wheels fully turned on direction. Please consult your owners manual or dealer on how to access your factory light bulbs. In 90% your bulbs are easily removed without too much trouble. Once your factory light bulb is removed, you can prepare for the HID bulb insertion.

Step 2: Remove the plastic capsule preinstalled on the HID bulb and
insert into your headlight socket. HID bulbs should fit similar to
your factory light bulb, but the tolerances may be slightly
different on certain vehicle models. Bulb installation will vary
from twisting to clamping from the back depending on the bulb type.
Be very gentle with the HID glass portion. Do not touch the glass
with your fingers. If it does end up getting dirty, simply wipe with
clean cloth gently.
Notice: Some vehicle
models may require adapters for the bulb to fit into the socket.
These include H7 bulbs. Some parts off of your original headlight
may be be required depending on car model. Example, 9007 light bulbs
will require the reinstallation of the plastic bulb holder adapter.
Step 3a: Once the HID
bulb is fixed into place locate the factory connector where the
original halogen bulb was connected to. You will now connect the
supplied wire (may be a plug or 2 metal tips) that you must insert
into your factory connector as shown below. When we say factory
connector, this is the connector your original bulb was feed power
with.

If you purchased a Bi-xenon kit, or a kit with relay, your
installation will be a little different than above. See steps 3b or
3c.
Step 3b: If your kit
included a relay you will not use the provided extra wires shown in
Step 3a. that connect ballast to factory headlight plug. Instead the
ballast get connected to the relay as shown below. The relay then
will connect to your factory headlight plug. Some relays will have
two plugs one for each side, while others only one headlight plug.
Remember a relay simply gets a signal from your headlight plug, then
allows power to flow directly from your battery.

Step 3c: If your kit purchased is a bi-xenon kit also known as hi/low (low beam + high beam HID with movement). This only applies to kits with bulb types 9004 9007 H4 H13 9008. Notice on these kits there will be only 1 headlight plug connector. One of your headlight connectors may not be used.

Step 4: Before mounting ballast permanently please test the system.
Low beam, high beam and fog light function if it applies to your
install. It is best to turn the vehicle on to test the system as
some vehicles do not give full voltage when vehicle is running only
from battery.
Step 5: Mount the
ballasts on any existing bolt or flat surface away from excessive
heat. We do not recommend mounting on top of the radiator or in
front or behind it. Ballasts are electronic devices which excessive
heat can ruin. Make certain the wires with your kit cannot get
tangled into the belt line or are resting on very hot components of
the engine.


PayPal Only.
We ship to your Paypal registered address only.
Item will be shipped out within 24 hours once we have received your
payment via PayPal with confirmed shipping address only
Warm Tips: Import duties, value added taxes
and any other charges are not included, as an eligible importer, you are
responsible for any reasonable tax or importation fees.
Items will be shipped within 24 hours on
payment received.
All items are shipped from China or Hong Kong using Post Airmail, Please allow
25-30 days for your order to arrive due to International shipping.
If you do not receive your item after 35 days. please contact us
immediately for further assistance. We will be responsible for any damages or
losses incurred in the shipping process.
Import duties, value added taxes and any other charges are
NOT included in the item price or shipping costs. As an eligible
importer, you are responsible for any reasonable tax or any other importation
fees.
A customer-centered shopping
experience has always been our goal and we want you to be completely satisfied
with every item that you purchase online from us.
If you are not satisfied with an item that you have purchased from us, you may
return the item within 30 days of the order date for a full refund of the
purchase price, minus the shipping & handling fees. Any "Free Shipping" item
returned will have the outbound freight charge deducted from the total return.
Buyers will pay for return shipping charges.
Shipping, handling and insurance fees are NOT refundable.
Please read our terms and conditions above carefully.
Bidder or Buyer must agree all terms and conditions before placing a bid or
purchasing.
We are a professional exporter in LED Light, Electronic
Products, Digital Products etc, in Hong Kong. Our company is a large-scale
Trading Company as well as manufacturer who is integrating the production, sale
and after service. Our factory is founded in 2008, outfitted with advanced
production equipment, adopted to modern production technology, our products are
exported throughout the world. Because of first-class quality, our products are
welcomed wonderfully.
"Customer comes first" is our service goal, "Keep promise and honor
contract" is our business principle. "Faster, higher and further" is
our target. Going with these three, we are never satisfied with current results,
never stop processional steps, but continue to self-perfect, develop and bring
forth new ideas. With these work spirits, our company has made incredible
breakthroughs these years.
In the modern competitive import and export Trading markets, we are so confident
to meet any challenges. We have prepared well, Welcome to your friendly
business.
If you have any question, please feel free to email us
,and we will reply you ASAP. If no response within 24 hours, please check the
spam of mail box or kindly re-send it to us.
We greatly appreciate your Five Stars & POSITIVE feedback.

