Ready-Made Ready to Tile Square Niche / Shampoo Recess
-----
We stock the largest size selection in the US
Best Ready to tile niches in the market
made of 2 Lbs high-density polystyrene compress Styrofoam
-----
Approximately pre-finished dimension
Overall Size = 16" x 16" x 4"
Front net 12.5" x 12.5" , net depth = 3 1/2"
-----
Composed of a high-density polystyrene with a liquid-applied waterproof coating they provide a waterproof substrate preparation for showers, bathrooms, and any water intensive environment.
Ready-Made Ready to Tile Niches... Anywhere you want to store, display... bath, kitchen, hall or exterior wall. Ready-Made Ready to Tile Niches are amazingly versatile. Easy to install and ready to tile in minutes, not hours.
Ready-Made Ready to Tile Niches feature in-wall construction. This unique design allows you to tile with the same tile as the surrounding walls.
Ready-Made Ready to Tile Niches are a one-piece construction, and waterproof. Guaranteed to never rot, degrade, or leak. Their insulative factor does not promote condensation in the wall cavity.
Easy, Waterproof, Worry Free. The difference is CLEAR.
The "Anywhere" Solution
-----
Installation
Installation One Substrate Layer
Installation to existing 2 x 4 walls with wall board
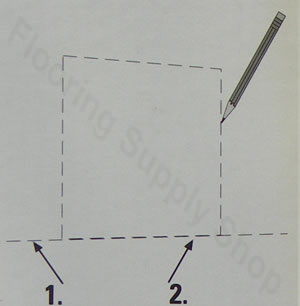
• Determine desired height of niche and draw level line on substrate layer.
• Place niche with the bottom flange of the box centered on the level line.
• Trace exterior flanges.
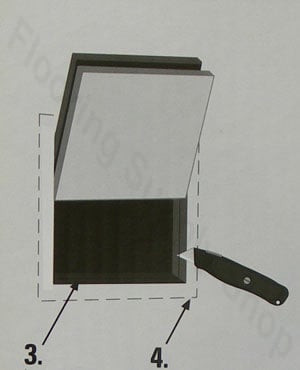
• Cut along line and remove substrate layer. If accessible, install 2 X 4 horizontal cross bracing to support niche.
• Use polyurethane adhesive/sealant to adhere niche to studs.
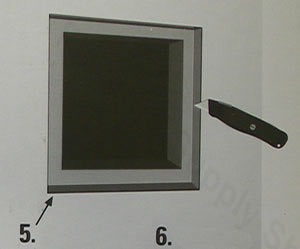
• Seal joints between niche and backer board using polyurethane adhesive/sealant. Alternatively apply fiberglass mesh and a liquid waterproof membrane.
Installation: New Construction
Installing into 2” x 4” stud wall• Determine desired height of niche and mark 2 x 4 accordingly.
• Install horizontal cross bracing to support niche.
• Use polyurethane adhesive/sealant to adhere niche to studs.
• Next, install 1/2" backer board on all walls and flush to niche 1/2" flanges.
• Seal joints between niche and backer board using polyurethane adhesive/sealant. Alternatively apply fiberglass mesh and a liquid waterproof membrane.
-----
Our store open to the public / Buy here pick up at our store
If you're not sure what to order you can contact us at 877 880 8453 or email us
30 Days money back guarantee
Visit our store for more sizes of Floor Mat products https://stores.ebay.com/FlooringSupplyShop