4" x 8" Cool LED Solar Brick Paver Lights by ShopTJBIntroducing the first solar landscape brick paver light that is like no other. Unlike most other solar brick lights (glass & aluminum), they are built to last and are easily serviceable from the top. They’ll even stand up to foot and car traffic. These lights are made exclusively for ShopTJB (we designed and own the molds) and are stronger, longer lasting and warrantied longer than any copy of this design available the market! The 4" x 8" Solar Light featuring the "TJB Solar Module" for years of worry free operation. Installs into Driveways, Walkways, Patios, Pool Decks, Gravel, Dirt, Turf or wherever ground accent lighting is desired
Note: NiMH stands for Nickel-Metal Hydride, the materials used in our battery. Unlike NiCad batteries, NiMH batteries do not use heavy metals that may have toxic effects. In addition, they can store up to 50% more power than NiCad batteries and do not suffer from memory effects. That is why our lights stay on longer! Operating Instructions for the 4” x 8” Solar Brick Landscape Light Each box contains one (1) 4” x 8” solar brick landscape light. The light is comprised of a lens, solar module, and a base. The solar light module contains 12 ultrabright LEDs and three solar panels on the top. On the underside of the solar light module is the battery compartment and the light switch. When you receive your Solar Brick Landscape Light, it comes with the light switched in the “OFF” position. (You can turn the switch on by removing the lens cover and pressing the Power Switch once until you hear a “click”. Your Solar Brick Landscape Light can be installed permanently in concrete, imbedded within your brick pavers, or place them in dirt or stone. Use them to line the driveway, sidewalk, patio, pool deck or placed wherever decorative landscape lighting is desired. Make sure to install them where they have full access to the sun most of the day. Your Solar Brick Landscape Light should illuminate for up to 10+ hours in the spring and summer months and somewhat less in the fall and winter. Your Solar Brick Landscape Light will automatically turn on at night when the sun goes down and shut off when the sun comes up or when the battery has been fully discharged. During the daylight hours, the solar panels convert the sun’s energy into electricity and charges the 1.2 Volt 1,000 mAH NI-MH AA battery. Your rechargeable NI-MH AA battery should last for up to 5 or more years. When it comes time to replace the battery, simply contact us and purchase a replacement 1000mAh NI-MH battery or source it locally. NOTE: Please keep in mind that these lights are shipped with the light switch in the off position to preserve the rechargeable NI-MH AA battery. Kindly, remove the lens and solar light module to access the light switch on the underside of the module. Click the switch once to turn the light on. (Complete instructions are contained inside the box.) How To Replace the Battery Remove the lens cover by unscrewing the ten screws with the included allen wrench. Remove the lens and rubber gasket and set them aside. Then grasp the solar light module by the two tabs protruding from the sides and pull up to remove the unit. Turn the solar light module upside down and unscrew the six small screws covering the battery compartment. Then replace the battery with a new "AA" NI-MH. Reverse the procedure to seal everything back up. Tighten the screws firmly; be sure not to over tighten and strip the screws. You can use the same procedure to replace the solar light module if the module becomes inoperable for any reason. HOW DOES IT WORK? If you have a yard and have ever thought about lighting it at night, then you have probably heard about solar yard lights. As long as a location gets direct sunlight, you can put a light there and have light at night for several hours. These lights are extremely interesting because they are almost like mini-satellites. They generate and store their own power during the day and then release it at night. This is just like a satellite that stores solar energy while it is on the sunny side of the planet and then uses that energy when it's on the dark side. A solar yard light uses standard solar cells in a very straightforward application. A single solar cell produces a maximum of 0.45 volts and a varying amount of current depending on the size of the cell and the amount of light striking the surface. In a typical yard light, therefore, you need 6 cells wired in series. In this yard light, the six photo cells will produce 2.5 volts and a maximum of about 350 milliamps in full, bright sunlight of recharging power. The solar cells are wired directly to the battery through a diode (which prevents the battery's current from flowing back through the solar cell at night). The battery is a high powered AA NI-MH battery. A battery like this produces about 1.2 volts and can store a maximum of approximately 1,000 milliamp-hours. During the day, the battery charges, reaching maximum charge except on shorter winter days or days when there is heavy overcast. At night, the solar cells stop producing power. The photoresistor turns on the LED. The controller board accepts power from the solar cell and battery, as well as input from the photo resistor. It has a three-transistor circuit that turns on the LED when the photoresistor indicates darkness. LEDs draw about 45 milliamps with the AA battery producing about 1.23 volts (0.055 watts). It produces about half of the light that a candle would. The NI-MH AA battery, when fully charged, can operate the LED for about 6-8 hrs. on this 4" x 8" light. Half of a candle's light is not very much, and if you have ever purchased one of these yard lights you know that it really is not enough to provide illumination. You use them more for marking a trail or pathway -- they are bright enough to see, but not really bright enough to illuminate the ground to any great degree. They help define borders, pathways, & stairways. Use them in walkways, patios, driveways, pool decks, stairways & along garden paths. Due to the lower output, bugs are not as attracted to them as they are to other outdoor lighting. In late Spring, Summer and early Autumn the Solar Paver lights will fully charge on most days giving them enough charge to light for up to 12 hours. In winter the Solar Paver lights will charge up enough to light for up to 6 hours on all but the most unfavorable of winter weather days unless covered by snow.
How waterproof are they?Waterproofing is rated by the IP (International Protection) system which consists of the letters IP followed by two digits. The first digit after IP ranks a product's protection against solid objects. The second digit after the IP rates a product's ability to protect against liquids. Why do the lights not stay on the same amount of time? If you have a light that is not staying on as long as the other lights, a simple test is to open up the fixture and remove the solar light module. Then place the module in a direct sunlight area that is lit for most of the day. Observe the light that night. Do the LED’s stay lighted longer than before? If yes, lack of sunlight is the problem. If no, then there may be an issue with the battery. (See Testing Battery) Over-hanging shrub and tree branches, long grass, dirt/debris on the lens or structures that provide shade for the area also block the amount of sun to power the solar panels resulting in less output to the battery. If leaves or dirt accumulate on the lenses, this will cut back on the power available to recharge the battery. Finally, rechargeable batteries have a certain amount of charge/discharge cycles before they no long will hold a charge. Ni-Cad batteries are the least expensive and have 300-500 cycles before needing replacement. Ni-MH batteries (used by Solar Brick Paver Lights) cost more but can last 10 times as long as Ni-Cad rechargeable batteries. Why do the lights Flicker? LED lights will flicker if they are just about to run out of power or if the photocell is receiving extra light that causes the photocell to cycle on-off-on-off-on-etc. This extra light can come from outdoor lights on houses or buildings, very bright LED streetlights, and security lighting. If this flickering happens on a regular basis around the same time, then the problem is most likely environmental. As they are solar powered. When the environment brightness is getting at the critical point of charging voltage and discharging voltage, environment brightness is not stable and will cause voltage on solar panel not stable, may lead to repeatedly charging and discharging, thus LED’s flickering or repeatedly on and off. Because the solar panel is very sensitive to surrounding brightness. When the surrounding area is all dark or all bright that passed the charging and discharging critical point, solar brick light will work well again. That is normal in solar products. Why is there water under the lens? Because the fixture properly sealed, sometimes there will be condensation under the lens if the weather is conducive to this. This is normal and will not affect the solar module. When the LED’s are on, they generate a little heat that will dry up the condensate water. The main issue we have had with the lights is installers who overtighten the (6) hex screws and warp the lens. This allows water to get into the light fixture and eventually into the electronics. We do have an additional water seal on the battery access panel to prevent water from getting into the module. There are videos on our site and written instructions that inform the end user about over tightening. This voids the warranty, but replacement modules are available . Watch the video on the website on how to install the lens cover correctly or contact us directly and we can explain how to do it correctly. Basically, just snug the lens screws. Do not crank them super tight or the lens will warp allowing water to get inside of the black base. If necessary, you can drill hole(s) in the bottom of the base to allow water to drain out of the base. This works best in applications where there is a bedding course of sand between the top of the stone base and the bottom of the pavers. Do not make these holes if the fixture is in an area where water puddles. Holes in this situation will allow water to enter up from the bottom and destroy the electronic module. How do I get a screw out of the lens that is too tight/stripped?
How do I fill sand around the fixture? Most installations, the customer just places the light and does not sand. Remember these are sold all over North America. Usually it is only paver installers that want to put polymeric sand around the light fixture. We tell these installers to use an expanding foam (IE: Great Stuff, or black waterfall foam) that is available at any local hardware store. Spray a small bead along both sides and then place the fixture down into the foam. Hold the fixture in place (otherwise it will rise up with the foam) for a minute or two allowing for the foam to expand and fill the voids between the fins. Once dry, polymeric sand can be added to fill any remaining gap. By using the foam method, you eliminate the fixture from frost heaving, floating in heavy rains, & deter theft. NOTE: If too much foam is sprayed into the hole and oozes up between the fixture and the surrounding pavers, do not panic! Wait until the foam dries then you can easily break it off flush or just below flush level with the fixture.
Why does the light have an on/off switch? The fixture was designed with an on/off switch for installation contractors because the unit comes with a fully charged battery so it will work the first night they are installed. This was an extra cost on our end but contractors did not want to have their customer not have the lights work the same night they were installed. If the lights work right away, the customer is more likely to pay their invoice that night and leave better reviews for the contractor. If we did not put the switch in, then the battery would fully drain out inside the box and would have to be recharged in the sun for a day before they would work properly. How do I install the light if my pavers are not 4" x 8"?
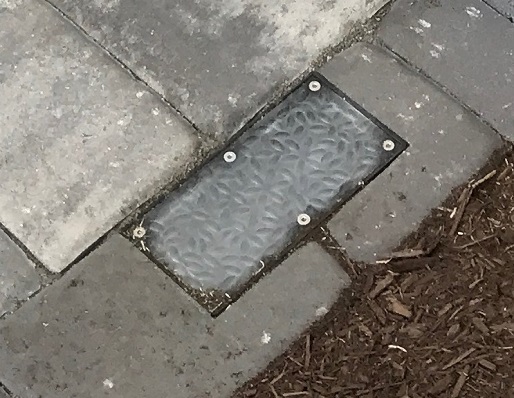
Not a problem! Just use a concrete saw to cut out a 4" x 8" space in your installation. Sometimes this can be an "L" shape out of a 6" x 9" paver, or 4" x 4" square in (2) adjoining pavers. See the customer supplied photos below to see how others have made this work in their installations. We designed these lights to be able to be used in a wide array of applications from interlocking pavers around walkways, patios, & driveways; Clay bricks; Poured concrete; Bluestone; Gravel, & Turf installations. You just have to be a little creative sometimes in figuring out a solution that will work. If you have a unique installation that you would like to share, please send us some photos and we will post it for others to be inspired!
HOW TO TEST TO SEE IF THE BATTERY OR MODULE IS DEFECTIVE A great feature of these lights is that the black base of the light fixture stays in the installation. Have a new fully charged regular or alkaline AA battery for testing purposes handy. Remove the lens cover off one of the non-working lights. Then remove the LED module by lifting up on the two tabs. Check to see if there is any water in the black base. A quick check of the battery compartment will let you know if water was an issue. If there was water previously, the small screws on the battery access panel would be rusted or still wet. Using a small Philips screwdriver, remove the screws on the battery access panel on the bottom of the LED Module. Check the inside of the battery compartment. If water got in, it will be rusty inside with possible corrosion buildup. This can prevent power from getting to and from the AA rechargeable Ni-MH battery. If necessary, clean any rust or corrosion from the battery contacts with a sharp knife or emery board (nail file). Install the new AA test battery. Hold the module in a dark area to activate the photocell. A. If no, push the on/off button on the bottom of the Module. If still no light, the module is bad. (The main issue we have had with the lights is installers who overtighten the (6) hex screws and warp the lens. This allows water to get into the light fixture and eventually into the electronics. We do have an additional water seal on the battery access panel to prevent water from getting into the module.) There are videos on our website and written instructions in each new light box that inform the end user about over tightening. This voids the warranty, but solar module replacements are available if ever needed. B. The LED lights did come on, then remove the AA test battery. Spray some WD-40 on the contacts and reinstall original Ni-MH rechargeable battery. Put the module in the sun for several hours to charge the original battery. Re-test the module in a dark area to see if the battery took a charge. 1. If the LED lights come on, then reassemble fixture and enjoy the light. 2. If no, then try a different rechargeable AA battery and retest. a. If the second battery now works, then the original battery is defective. Replace with a new Ni-MH Rechargeable Battery (available locally as Eveready, Duracell, Energizer, Panasonic, or Radio Shack brand). b. If the new battery does not light the LED’s then the solar panel is defective and needs to be replaced.
WARRANTY RETURN PROCEEDURE Once you have determined what the exact problem is with your light fixture and require a replacement part, let us know which part you need. If it is within the 1-year warranty period, we will send out the replacement part to you. (Note: Modules may require a return and a RA #). |