


W1 Single Ear Clamps
The Single, 1 ear or ‘O’ clip is
an inexpensive, easy assembly clip which has many applications in addition to
its normal role of sealing hoses against loss of liquid, air or gases.
The use of one ear clips is an economical solution for many simple hose assemblies carrying air or fluids.
They are ideal for use with simple hose assemblies which do not require high clamping force.
The practical design of ear clips means that they are easy, fast, and safe to mount. They are also tamper-proof once mounted.
The edges are rounded to avoid damage to the hose.
Products Details:
Material:
W1 Mild steel Chrome Free, zinc plated.
Sizes: 7mm-18mm
All burrs/sharp edges removed
to prevent damage to application.
Security, i.e. tamperproof,
cost-efficient.
Speed & ease of assembly,
aesthetically pleasing/compact & lightweight.
Sealing pressure consistency,
just as effective on metal to metal connections.
Quantities:
Sold in packs
of
Additions:
Side & End Closing:
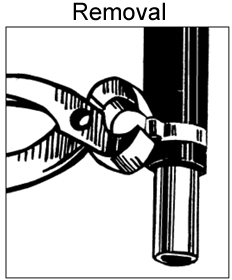
A side and end closing pincer is a tool used to crimp single or double ear O-clips to ensure a proper seal. It is ideal for use when access to the ear is difficult.
Link To Box Sets And Different Styles:
Higher grade of steel for tougher jobs
Box set:
Box sets are an excellent way to save money when purchasing bulk clips. Additionally, you can opt for pliers to facilitate the closing of clamps.
Also have both materials available in box set form
How To Install:
First, measure the diameter of the hose and the fitting that you want to connect, and choose a single ear clamp that matches the size. The clamp should fit snugly over the hose, but not too tight or too loose.
Next, slide the clamp over the end of the hose, and position it near the edge. Make sure the ear of the clamp is facing up and accessible.
Then, insert the hose over the fitting, and push it until it is far enough on, so it will not slip off when you crimp it. You may need to twist or wiggle the hose to make it fit properly.
Finally, use the tool to on the ear of the clamp and crimp it. The tool should not cut through the ear, and it will stretch it over the fitting, creating a secure seal. Do not apply too much pressure or crimp the ear twice, as this may damage the clamp or the hose.
How To Decide on The Size:
Always measure the outside (O.D) of the hose, not the internal diameter (I.D), then match the outside diameter of the hose to the inside diameter of the clamp. If the hose is 17mm outside diameter, use a 16-18mm clamp.