
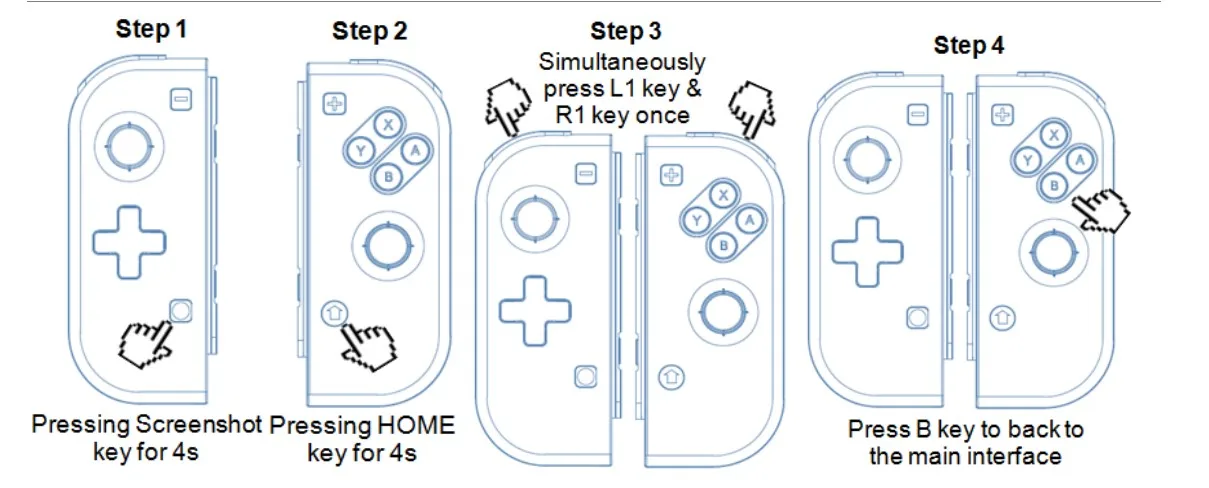
Controller features 1)This pair of controllers is compatible with Switch console and only supports wireless connection. 2) It can be used as an entirecontroller also can be used as two independent controllers. 3) One-key connecting method forease of handling. 4) Wireless connection, lower interference and stable connecting signal. 5) Built-in with 300mAh polymer lithium battery,it can be continuously used for around 4h after fully charged. 6) It supports motion sensing function via built-in Gyro in each controller. 7) It supports vibration function via built-in motor in each controller. 8) Multiplayer games can be played by connecting more wireless controllers simultaneously toa Switch console. 9) Ergonomic design and light weight construction make it comfortable even for long hours of continuous gaming. 10) It can be upgradedby update software through USB cable connecting to PC. Key brief description 1) HOME key: Power controller on or execute commands from Switch console. 2) D-Pad: Up, down, left and right. It can be easily operated on eight directions; it acts as a set of function control keys when using a Left Controller as an independent controller. 3) Function control keys: A, B, X, Y. Perfect key design, sensitive and quick for finger operation. 4) Left stick and Right stick: Neoteric 3D stick can be operated precisely on 360° all-round. 5) Functional keys: L1, R1, L2, R2. Trigger and shoulder keys perform quick response function. 6) Screenshot key: Take screenshot and store; it acts “HOME” key when using a Left Controller as an independent controller. 7) Reset key: Short press this key in reset hole to power controller off to disconnect controller from console. 8) Unlock key: Left unlock key and right unlock key. Press and hold the both unlock keys simultaneously to release Switch console. Connecting instruction 1) Connecting to a Switch console for the first time Power a Switch console on, on the main interface of the console, click (by using your finger) “Controllers” → “Change Grip/order” to come to this pairing pattern interface “Press L + R on the controller”, ignore “L + R”, then operate controller according to the following steps as below: Note: Please pair and connect each controller at this pairing pattern interface of a Switch console. A. Connecting a pair of controllers (A Left Controller plus a Right Controller) as an Entire Controller Step 1: Press “screenshot” key and hold for 4s to power a Left Controller on, four LEDs start blinking slowly then blinking quickly to enter searching status after 4s, when one (or more) of the LEDs is solid bright, it means that the controller is paired with the console successfully. Step 2: Press “HOME” key and hold for 4s to power a Right Controller on, four LEDs start blinking slowly then blinking quickly to enter searching status after 4s, when one (or more) of the LEDs is solid bright, it means that the controller is paired with the console successfully. Step 3: After the both controllers are paired with the console successfully, press “L1” key plus “R1” key simultaneously once, the corresponding LED(s) will be solid bright in each of the both controllers, it means that an Entire Controller (a Left Controller + a Right Controller) is connected to the console successfully and ready to be used. Step 4: Press “B” key to back to the main interface of the console.
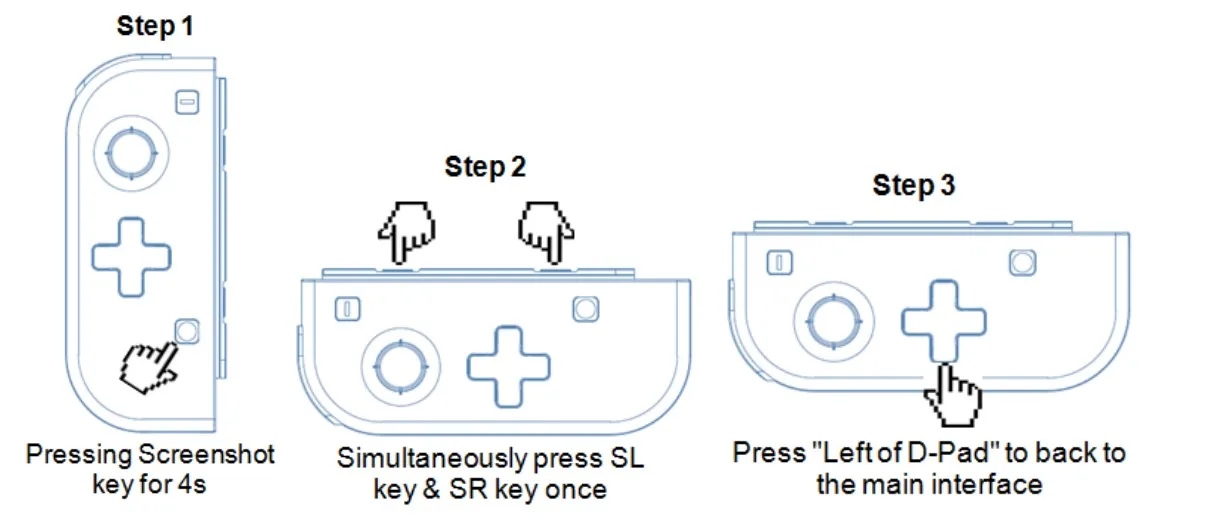
B. Connecting a Left Controller as an independent controller Step 1: Press “screenshot” key and hold for 4s to power a Left Controller on, four LEDs start blinking slowly then blinking quickly to enter searching status after 4s, when one (or more) of the LEDs is solid bright, it means that the controller is paired with the console successfully. Step 2: Press “SL” key plus “SR” key simultaneously once, the corresponding LED(s) will be solid bright in the Left Controller, it means that the Left Controller as an independent controller is connected to the console successfully and ready to be used. Step 3: Press “left of D-Pad” key to back to the main interface of the console.
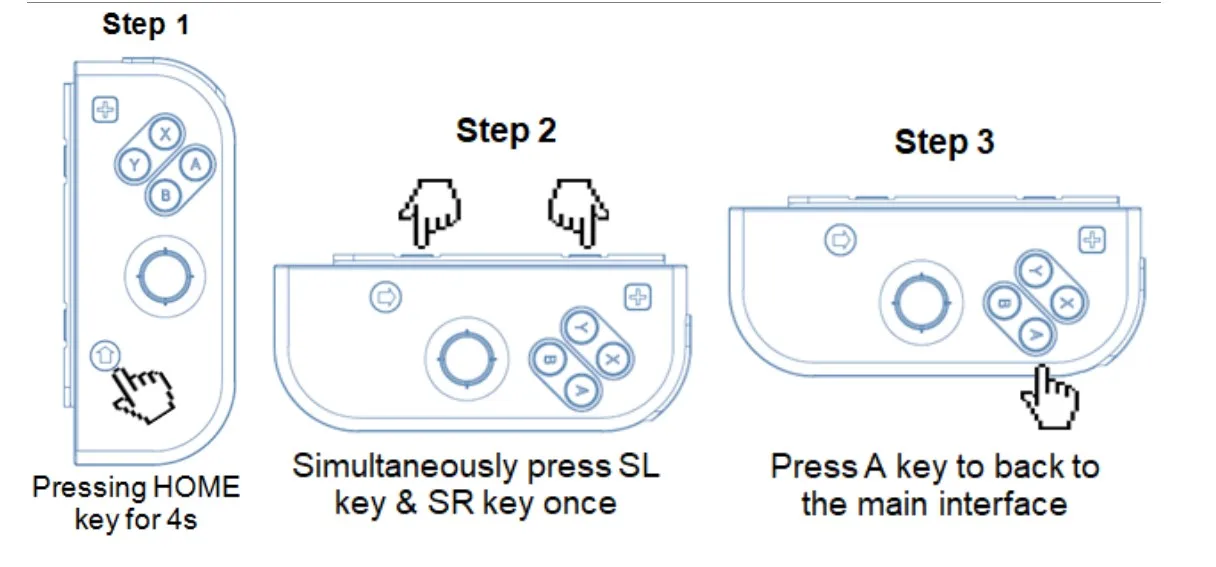
C. Connecting a Right Controller as an independent controller Step 1: Press “HOME” key and hold for 4s to power a Right Controller on, four LEDs start blinking slowly then blinking quickly to enter searching status after 4s, when one (or more) of the LEDs is solid bright, it means that the controller is paired with the console successfully; Step 2: Press “SL” key plus “SR” key simultaneously once, the corresponding LED(s) will be solid bright in the Right Controller, it means that the Right Controller as an independent controller is connected to the console successfully and ready to be used. Step 3: Press “A” key to back to the main interface of the console.
2) Connecting to a paired Switch console A. An Entire Controller (a Left Controller + a Right Controller): Short press “HOME” key for 1s to power an Entire Controller on, the controller will be connected to the console automatically again. B. An independent Left Controller: Short press “Screenshot” key for 1s to power a Left Controller on, the controller will be connected to the console automatically again. C. An independent Right Controller: Short press “HOME” key for 1s to power a Right Controller on, the controller will be connected to the console automatically again. 3) Connecting controller back to Switch console 1) If a controller is in sleeping mode, short press “HOME” key or “Screenshot” key to wake it up, it will be connected to the console again automatically. 2) If a Switch console is in sleeping mode, first press the power button of the console to wake the console up then short press “HOME” or “Screenshot” key of the controller to connect the controller back to the console (If a Switch console is in sleeping mode, the console can’t be woken up by directly pressing any key of the controller.). Note: This pair of controllers is neither with NFC function nor with camera function. Built-in motors are none HD motors, vibration experiences might be different in some games. Games which need camera function and HD motor vibration function can’t be played normally, such as Baby, Ball Count, Eating Contest etc. LED indication instruction 1) Four LEDs blinking quickly and circularly: This controller is searching for wireless devices to be paired. 2) LED(s) solid bright: This controller is connecting to console normally via wireless. 3) LED(s) blinking quickly: This controller battery voltage is lower than 3.6V; if the voltage is lower than 3.4V, the controller will be shut off automatically and can’t be powered on. 4) Four LEDs blinking slowly: This controller is being charged via connecting to a charger, four LEDs will be off after fully charged. Controller parameter reference ItemReference value Operating voltageDC 3.7V-4.2V Operating current20-30mA Static current10-80uA Vibrating current80-150mA USB input voltage/currentDC 5V/500mA Available distance≤8m Battery voltage/capacity3.7V/300mAh Controller power-on timeAround 4h (fully charged) Charging timeAround 2h Static timeAround 25 days Net weightA pair of controllers: 80g (102g including a charging cable and a user guide) DimensionA single controller: 44*28*102.6mm Packing listA pair of controllers, a charging cable and a user guide Remark: The above parameters are for references only, they are subject to the actual product. Precautions 1) Please don’t store this product in damp or high temperature places; 2) Do not knock, beat, pierce or try to disintegrate this product so as not to damage it unnecessarily; 3) Don’t discard it with garbage as this product is with a lithium battery built-in; 4) Don’t use this product near fire or heat sources; 5) Unauthorized or non-professional personnel are not allowed to disassemble this product, otherwise it won’t be in the scope of after-sales warranty.
2.Please make sure you have a valid/confirmed PayPal account prior bidding. All PayPal Payments must be Confirmed (Shipping and billing addresses must match).
3.Import duties, taxes and charges are not included in the item price or shipping charges. These charges are the buyer's responsibility.
4.Please check with your country's customs office to determine what these additional costs will be prior to bidding/buying.
5.These charges are normally collected by the delivering freight (shipping) company or when you pick the item up – do not confuse them for additional shipping charges.
2. If you are satisfied with our products and our service,please tell your friend and leave us positive feedback;if you are not satisfied with our products or service,please DO tell us.
3. After receiving the item,you could contact us within 30 days.Refund will be given as money back or item.
2.Returns accepted within 30 days of delivery date and item must be in original new condition, not worn or altered in any way with attached tags & wrap. Otherwise deal is final.
3.Return shipping must be paid by buyer.

