


Calorique Heating Film Underfloor Heating Kit 100 cm 90-150-220 W/m² Thermostat
Calorique® Heating Film, 0,5 - 20,0 m²
Underfloor Heating-Kit 100 cm,
90 / 150 / 220 W/m² with Thermostat
Below you will find several possibilities how to use Calorique® - carbon heating film:
- Underfloor heating for flooring such as laminate, carpet, linoleum, parquet, wood plank and tile;
- Room and residential heating;
- Ceiling heating;
- Balcony and loggia heating;
- Winter garden heating;
- Anti-fog system for the mirror in the bathroom;
- Roots- and ir heating systems in greenhouses
- Heating of various surfaces.
The technicians of Calorique use the latest technological developments in the special printing process to use defined iQFlexHeat to produce for specific radiant heating applications. The result is highly conductive, flexible and durable iQFlexHeat radiant heating elements. The product is certified in the EU and is produced environmentally friendly in the United States.
iQFlexHeat electric radiant heating elements convert 99 % of current energy ultra-fast and efficient directly into heat.
Effectiveness:
The radiant heating creates an illusion that the ambient temperature is slightly higher (3 - 4° C) than in reality. This can make people feel just as comfortable at somewhat lower temperatures. The reduction in temperature by 1° C brings 5 - 6 % energy savings!
In addition, iQFlexHeat warms the furniture and the objects, and not the air. This is especially important for rooms with higher ceilings, otherwise the warm air is dammed up in the upper levels. The radiant heat can save up to 40 % of the heating energy!
The advantages compared to cable thermal mats
- Radiant heat is present
- Parallel connection of elements, which in the case of a mechanical damage precludes only the affected areas, as opposed to cable thermal mats, where in case of a damage the whole system is broken.
- No corrosion
- Even heat distribution. There is a possibility to install the heating elements behind the walls or ceiling;
- Since the foil is only 0.3 mm thick, it can be quickly installed anywhere in a new construction or during a renovation of old buildings under already existing floor coverings without requiring an extra concrete layer work.
- The film can be installed on vertical surfaces and with individual interior elements. iQFlexHeat is especially beneficial in places where it has to be not just warm, but where having a special soothing warm is very important for example in a child- or bedroom.
What we deliver
We deliver Calorique ® heating Kit with or without thermostat, with heating foil 50 cm width, 3 m electrical Insulation, cable and terminals for power connections (as shown in the chart below), user manual. For other kitz an the heating film 80 cm or 100 cm wide, please choose what you like in our Calorique-ebay store!


iQFlexHeat at Calorique is a patented, low-cost infrared heating element that symbolizes maximum efficiency, durability, and flexibility for safe use within a wide range of products.
For the floor heating with Calorique® - film there are no particular assembly work required and the installation is very simple to perform. Heating film is 0.3 mm thick, and can be adapted to any design. The carrier film is not inflammable.
Other useful informations, as well as videos and the manual can be found on our website: www.calorique.info as well as www.calorique.com
Packing list:
| Product Name | Stripe Length lm | Clips , Pcs. | Insulation Pads 50 x 38 mm Stck. | Stranded Cable Strength, mm² | Single Core Cable Length, m blue + black | Weight kg |
|---|---|---|---|---|---|---|
| Comfort Set 0,5 m² | 0,5 | 2 | 6 | 1,5 | 1,0+1,0 | 1 |
| Comfort Set 1,0 m² | 1,0 | 2 | 6 | 1,5 | 2,0+2,0 | 1,2 |
| Comfort Set 2,0 m² | 2,0 | 2 | 6 | 1,5 | 2,0+2,0 | 1,4 |
| Comfort Set 3,0 m² | 3,0 | 2 | 6 | 1,5 | 3,0+3,0 | 1,6 |
| Comfort Set 4,0 m² | 4,0 | 4 | 12 | 1,5 | 4,0+4,0 | 1,8 |
| Comfort Set 5,0 m² | 5,0 | 4 | 12 | 1,5 | 4,0+4,0 | 2,0 |
| Comfort Set 6,0 m² | 6,0 | 4 | 12 | 1,5 | 5,0+5,0 | 2,3 |
| Comfort Set 7,0 m² | 7,0 | 4 | 12 | 1,5 | 5,0+5,0 | 2,6 |
| Comfort Set 8,0 m² | 8,0 | 4 | 12 | 1,5 | 6,0+6,0 | 3,0 |
| Comfort Set 9,0 m² | 9,0 | 6 | 18 | 1,5 | 6,0+6,0 | 3,3 |
| Comfort Set 10,0 m² | 10,0 | 6 | 18 | 1,5 | 6,0+6,0 | 3,7 |
| Comfort Set 15,0 m² | 15,0 | 6 | 18 | 1,5 | 7,0+7,0 | 5,5 |
| Comfort Set 20,0 m² | 20,0 | 24 | 30 | 1,5 | 9,0+9,0 | 7,5 |
Thermostat
All thermostats are ideally suited for our electric underfloor heating and designed for a maximum load of 3500W (16A) / 230V / AC.
All thermostats from our range (with the exception of BTC70) are equipped with 2 temperature sensors: the room air sensor is built into the housing, the external 2.5 m or 3 m long floor sensor is included. The basic model BTC70 only has one external floor sensor.
All thermostats (with the exception of E2006 and E2026) are flush-mounted models and fit into a standard flush-mounted box 68x68 mm.
A manufacturer's guarantee of 2 years applies to all thermostats.
-
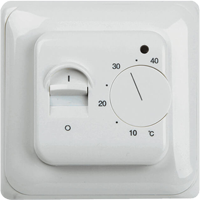
BTC-70
Manueller-ThemperaturreglerEase of use and the very affordable purchase price are
the main advantages of this thermostat. The thermostat
maintains the desired floor temperature and significantly
reduces heating costs.- ✅ Ohne Programme (Manueller Regler m. Drehknopf)
- ✅ LED-Anzeige
- ✅ Einstellbereich: 5°- 40°C
- ✅ Boden (Hysterese): 0,5°C
- ✅ Betriebstemperatur: -5°C bis +50°C
-
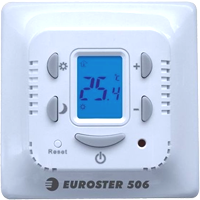
Thermostat E506
mit LCD Display und zwei FühlerIntelligent control selection. Air and floor sensors to control
the heating device in three operating modes: air temperature, floor
temperature, air temperature controlled / floor temperature limited- ✅ LCD-Display
- ✅ Tag / Nacht - Modus
- ✅ Regelbereich: +5 bis +35°C (Luft), +5 bis +45°C (Boden)
- ✅ Betriebstemperatur: +5 bis 45°C
- ✅ Hysterese: Luft ab 0,2°C; Boden ab 0,6°C
-

Thermostat E91/E1316P
LCD Touchscreen programmierbarUser-friendly touchscreen, intuitive to use, programmable
according to the day of the week and the desired time.
Two temperature sensors: built-in room temperature and
external floor temperature sensor.- ✅ Programmierbar
- ✅ LCD-Touchscreendisplay
- ✅ Einstellbereich:5-50°C (kann angepasst werden von 5-35°C)
- ✅ Schaltdifferenz: 0,5 - 10°C anpassbar
- ✅ Umgebungstemperatur: 5-50 °C
-
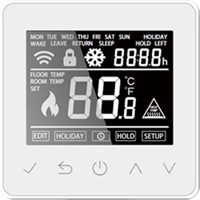
Thermostat ET-61W/E3202
Programmierbares mit WLANProgrammable thermostat with WLAN, individually controllable while
on the go using a free app. Intelligent functions: display of floor
and room air temperature, weekday program, holiday function,
temperature limitation, frost protection function.- ✅ Programmierbar
- ✅ WLAN - Steuerung
- ✅ Frostschutzfunktion
- ✅ Frostschutztemperaturbereich: 5 bis -15°C
- ✅ Bodentemperaturbegrenzung: 20 bis 45°C
-
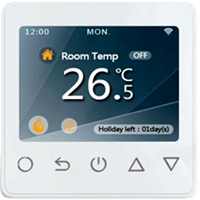
Programmierbarer Regler ET-81W/E3000
mit WLAN und FarbdisplayProgrammable thermostat with WLAN, individually controllable while
on the go using a free app. Intelligent functions: display of floor
and room air temperature, weekday program, holiday function,
temperature limitation, frost protection function.- ✅ Programmierbar
- ✅ mit WLAN und Farbdisplay
- ✅ Frostschutzfunktion
- ✅ Frostschutztemperaturbereich: 5 bis -15°C
- ✅ Bodentemperaturbegrenzung: 20 bis 45°C
Diesee Thermostate können Sie gerne bei uns auch separat erwerben. Detaillierte Beschreibung und weitere Fotos finden Sie hier:
Assembly Instructions:
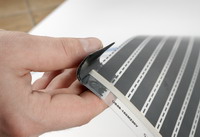
Determine the shape of the heating surface When measuring for underfloor heating with Calorique® heating foil, it is essential to ensure that there are no furniture, household appliances or other objects without feet on the heated surface! The strips of Calorique® heating foil must never even be partially covered by skirting boards, superstructures and other decorative parts! The complete coverage of heating foil strips can lead to overheating. The foil strips should ideally be laid along the room to avoid frequent cuts and pipe connections. Lines that may be laid above the floor must be laid at a distance of at least 50 mm from the heating foil and the connections. To do this, this area must be filled with thermal insulation material. The distance between foil strips and heat sources must be at least 200 mm. With other heat sources z. B. heat pipes, additional radiators, chimney, chimney, oven, etc. meant. Preparing the Calorique® - heating foil strips® The heating foil is cut with scissors along the given dash line. It is strictly forbidden to cut the film in other areas! Fasten the connector clamps to the prepared foil strips as shown in the illustration.


You can fasten the clamps with flat-nose pliers, a hammer or a special tool. Then check the contact strength. Insulate the guardrails from the other side of the strip with the insulating tape provided from the Calorique® set.

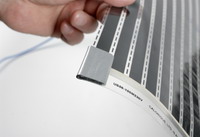
Prepare the electrical cables with a cross-section of at least 1.0 mm from the Calorique® set for connection to the mounting clamps or heating foil as shown in the illustration.

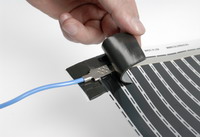
Fasten the stripped wire end to the connector terminals with flat-nose pliers. Insulate the electrical connection with the self-adhesive insulating tape from the Calorique® set.
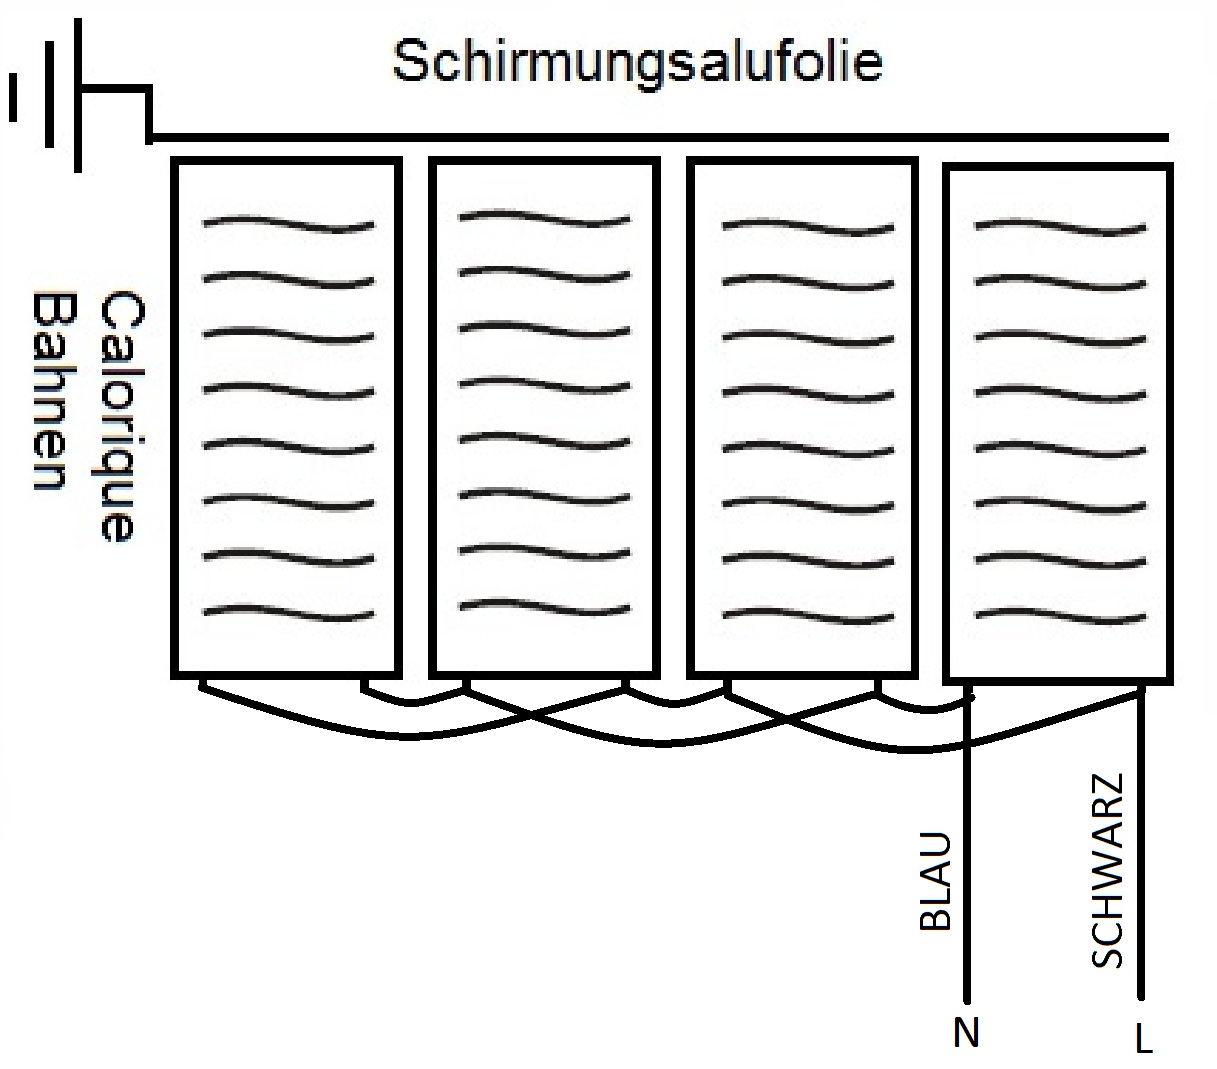
Individual heating strips are connected in parallel. For areas of 10 m2 or more, the phase and the zero connections on the adjacent strips must always change sides in order to rule out induction on the shielding film. The maximum strip length is given in the table "Technical data". specified. The maximum total output of heating foil strips connected to a thermostat must not exceed 3200 W! However, if the total consumption is higher than 3200 W, it is advisable to install an additional circuit with its own fuse. The heating strips can then also be connected to the thermostat via a magnetic switch. Laying If moisture is possible, cover the sub-floor, which must be free of unevenness or sharp elements, with polyethylene film. Use the adhesive tape to fix it. The edges of the foil must each overlap by 20 cm. Cover all areas as thermal insulation for the underfloor heating completely 3 mm thick with the foam foil and fix it with the adhesive tape.


Place the Calorique® heating foil on top of the thermal insulation layer with the guide rails facing up. If the heating elements are correctly positioned, all labels should be legible. Attach the heating foil with adhesive tape, furniture or a clip gun so that it does not slip during further work. DANGER! Only attach the heating foil to the edges through the transparent strip. The fastening must not be closer than 6.4 mm from the silver guardrails. For electrical connections, cutouts are made in the thermal insulation layer for surface compensation.


The visual inspection Visually inspect the heating system after installation, as well as the insulation and contact fastenings. During a visual inspection, the film strips should be checked for possible traces of damage that could occur during installation. If a part of the strip has been damaged, the entire strip must be replaced. Electrical test The electrical test must be carried out via a connection cable in order to check the correctness of the electrical connections. The permissible resistance value for 240 V can be calculated with the following
Formula to be determined:
Upper resistance sizes = 63360 / built-in watts
Lower resistance values = 54720 / built-in watts
Resize the reading based on the explanation below.
Ok, everything is fine: no further action is necessary.
Higher than the upper resistance values:
Open circuit. Clean up all connections and repair whatever is required.
Zero(0): Short circuit:
Check all connection cables for possible damage. Foil strips with damaged busbars must be completely replaced.
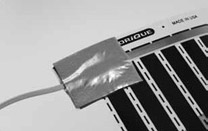
After repairs of any kind, the electrical test should be carried out again. All of this work must be carried out very carefully to avoid possible damage to the heating elements. Temperature cooler Cut a suitable hole in the insulation layer and attach the temperature sensor at a distance of 1 - 1.5 cm from the heated part of the heating foil. (See fig.)


Connect the heating elements to the thermoregulator and turn it on. After a few minutes, the film should become comfortably warm. Cover the heating surface with polyethylene vapor barrier film, approx. 140 - 300 g / m² tightly (200 µ or more) using the tape. The edges of the vapor barrier film must overlap by 20 cm. Lay the floor covering The floor covering or an intermediate layer of chipboard etc. is laid over the aluminum foil. Laminate, parquet, wooden board Place the laminate, parquet, wooden board directly on the heating foil in accordance with the manufacturer's instructions. Enjoy a comfortable warm floor. Carpet, linoleum, tiles Place an intermediate layer of plywood, chipboard, etc. on the heating strips. this intermediate layer should be fixed in the ground with screws and should level out the final layer. The screws may only be attached to the heating foil by means of transparent edge strips. The minimum distance between the screws and conductive elements, including the silver busbars, is 6.4 mm. The floor material is then laid on the intermediate layer according to the manufacturer's instructions.


The warming floor with integrated floor heating is now ready. If the furniture is not intended to be placed on the heated surface, it is also possible to place carpet or linoleum directly on the heating foil - without an intermediate layer.
Payment methods
You can pay quickly and securely by PayPal or in the classic way by payment in advance, cash on delivery or credit card.
We also offer the br>Payment on account. Pay conveniently within 14 days after receiving the ordered goods.

Delivery
We ship the packages immediately after receipt of payment with shipment tracking via DHL, DPD or UPS.
Shipping is free throughout Germany regardless of the order value.

The shipping costs outside of Germany are stored accordingly on eBay.
Of course, we also welcome pick-ups.
Calorique Heizungen
Agathastr. 80
52355 Düren
Mon - Fri 08:00 - 16:00
Telephone: +49 (0) 2421 / 974 90 93
Fax: +49 (0) 2421 / 307 57 46
Email: info@calorique.info
Product recommendation
 Infrared Heating Foil
 Product recommendation
 Aluminum foil self-adhesive
550 mm / 1,0 lm.
Product recommendation
 CALORIQUE SLL-Self-regulating heating cable with high-quality jacket
16-40 W/m
