About this item
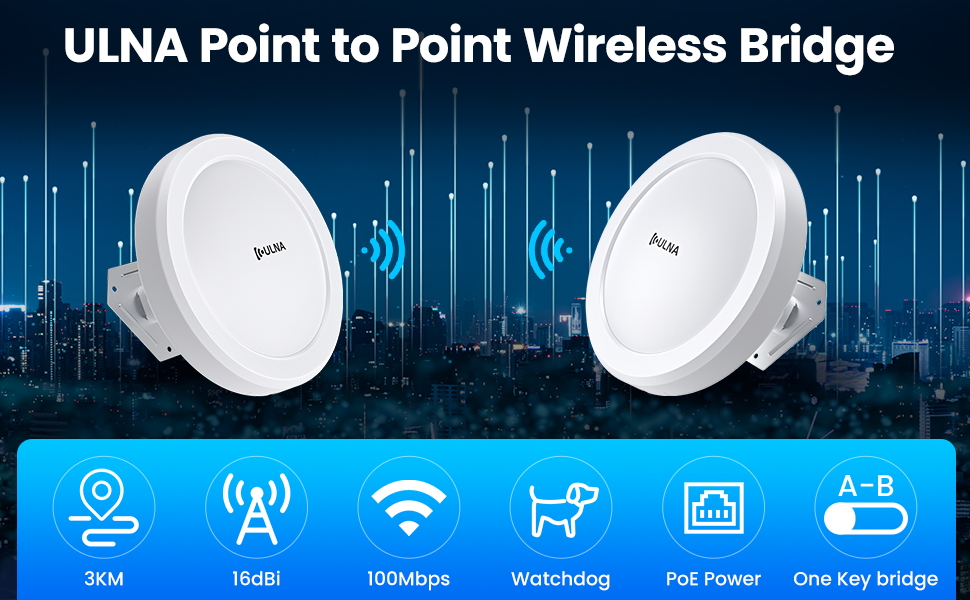
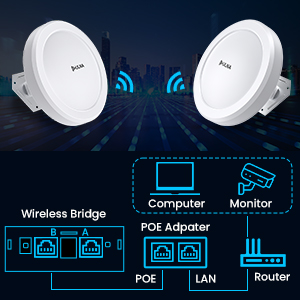
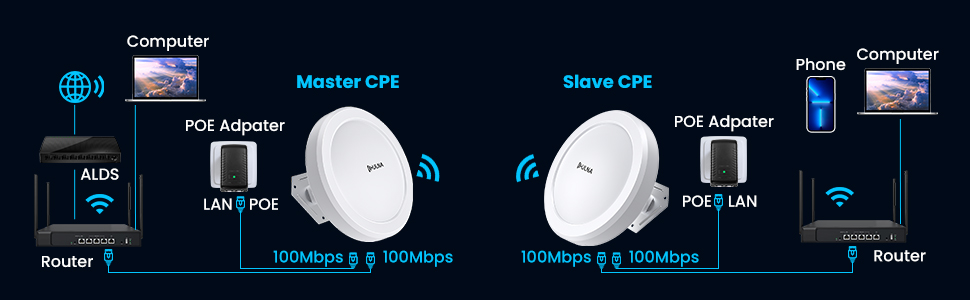
- 100Mpbs Bridge: Wireless bridge kit has 2 100Mbps RJ45 ports, and the wired network speeds are up to 100 Mbps. The transmission rate between the two wifi bridges is up to 300Mbps, and transmission/receiver automatic networking, supports point-to-point, point-to-multipoint, and transmission/receiver flexible switching. WDS networking mode, video network dual compatible
- 3KM Transmission Distance: High gain 14 dBi integrated directional antennas built into the device extend networks up to 3 KM. The actual application transmission distance should be less than 3KM (barrier-free). A few trees will not block the transmission speed of a point-to-point internet outdoor CPE
- Building to Building Extend the Network: You can extend your home's network to your garage, barn, store, warehouse, farm, etc. with the wireless bridge. No trenching and wiring is required for wireless connection, saving time and effort, wildly use in daily life. Helping you save money
- Plug and Play: CPE412 is powered by a 24V Poe adapter(included) and supports dial pairing without entering the GUI. The bridges are pre-configured, just connect the Poe power supply to achieve automatic pairing of the two bridges. It not only can help extend your home's network to the second building but also can be used for monitoring
-
Customer Service: Wireless bridge Poe is suitable for users who need to extend their network from home to the outbuilding within 3KM. If you have any problem, feel free to contact us, ULNA will do our best to help you solve the problem to your satisfaction
Product Description
Long Range WiFi Wireless Bridge Supports 5KM for PTP/PTMP
ULNA CPE412 is a 100Mbps wireless bridges. It uses wireless communication technology to transmit network data using air as a medium, one as a receiver and the other as a transmitter for long-distance point-to-point or point-to-multipoint interconnection. The working data link layer realizes the interconnection of local area networks. 5.8G long distance transmission with 14DBi high gain antenna, up to 3KM. The transmission speed between 2 long range wifi bridge max is 300Mbps
|
|
|
|
|---|---|---|
Switch Master-Slave BridgeSwitch button to"A" indicates the bridge as the master bridge (transmitter), switch button to"B" indicates the bridge as the slave bridge (receiver), a pair of bridges is already preset with A and B, no need to set them again. Note that in the point-to-multipoint application, one of the bridges is used as A and the other bridges are used as B. Then set them both to the same channel number to complete the point-to-multipoint pairing |
Rotate 360°Outdoor wifi bridge kit equipped with a universal wheel, it can rotate 360 to any angl. Easy to adjust antenna orientation for maximum signal strength |
Installation TipsThe master bridge and slave bridge are installed face to face, the antenna is not omnidirectional, it has a 60 degree transmission angle, no magneto-electric interference in the middle, a straight line installation without obstructions will get the best performance. |


|
|
|
|
|---|---|---|
Elevator Monitoring ApplicationUsing a wireless ethernet bridge to transmit monitoring signals in elevator monitoring can effectively avoid cable damage and obtain stable monitoring images. The wireless bridge is easy to install, supports point-to-point and point-to-multipoint, and can be disassembled and moved to other places for use |
Watchdog FunctionBridge with watchdog function. When the wireless outdoor CPE Kit communication fails, the corresponding unit will automatically detect and restart, restore network communication by itself |
Package Included2 * CPE412 Wireless Bridge 2 * POE Adapter (24V) 2 * Cat 5e Network Cable 2 * Metal Hoop 1 * Mounting Screw Set 1 * User Manual |


|
|
|
|
|---|---|---|
Pole Mounting1. Put the included rubber into the bracket. tabs on the bracket. 2. Plug the dynamic stick into the bracket. 3. Screw the sealing nut and assembled parts, as well as tighten it. 4. Put the nock washer on the dynamic stick. 5, Assemble the mounting parts to the EnStation. б.Thread the open end of the pole strap through the two tabs on the bracket. 7. Lock and tighten pole strap to secure bracket to the pole |
Wall Mounting1. Put the included rubber into the baracker. 2. Plug the dynamic stick into the bracket 3. Screw the sealing nut and assembled parts, as well as tighten it 4. Put the nock washer on the dynamic stick. 5. Assemble the mounting parts to the EnStation 6. Determine the mounting location. Mark and drill two 7. Put wall anchors into the holes and insert screw into the wall anchor. 8. Screw and secrue the bracket in the place |
Features14dBi antenna 5.8G channel 27dBm wireless speed Transmission distance up to 3 km Support PC side to modify IP settings Dialing to set the transmitter and receiver WDS networking mode, video network dual compatibility Dynamic MIMO power saving mode (DMPS) and automatic power saving transmission (APSD) |


PTP/PTMP Wireless Bridge

Application Case1:
This was easy install do to I already had a set of bridges but I needed A faster speed of bridges to get my internet and cameras on a better data transfer. This was just what I needed. Setup was easy change the POE injector from old bridge with the new ones and power the new bridges up. Made sure the master was A and slave bridge was b and made the channel for both C and I was up and running. I getting 95mbs from file servers in my shop to my file server in my home through the bridges. This is a cheaper option then network cables in the ground my distance is 3500ft between my shop to home. Very satisfied with these bridges.