Description
150mm uPVC Window Cill Joint Trims
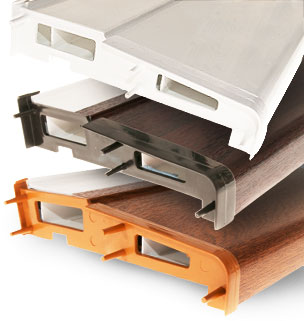
Neat, protective finish to window cill joints
Durable uPVC cover strips for inline, 90° and 135° external joints of 150mm window cill profile.
Available in 3 popular colours to match existing window cill - White, Dark Brown (Mahogany and Rosewood) and Caramel (Oak and Light Oak).
Features & Benefits
- Moulded lugs - easier to locate and secure in sill
- Easy to fit - can fit quickly and easily to new or existing cills
- Long-lasting - durable with resistance to UV
- Versatile - fits many types of window profile
 Inline JointThese connectors are used to join two cills that run in a straight line. 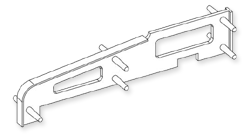 These are sometimes referred to as 180? joints and straight joints. |  90° JointJoin cills of square cornered bays and Georgian conservatories. 
|  135° Joint5 segment bays and Victorian window cills joined with these. 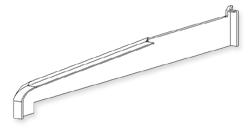 Designed for 135° corners but can be used to cover 120? to 150° corners. |
These cill joints are sold in a choice of 3 colours, either individually or in packs of 10 - choose in the options above.
Fitting and Usage
Retro-fit joints to existing Cill
When fitting to a window cill that is still in place, it might be necasary to remove the silicone or grout if it exists in the joints. Inline joints will need lugs trimming to fit to existing cill.
- If the cill has been cut with a hand saw, smooth and square the edges with fine grade sand paper
- Clean the joint and cill with Solvent Cleaner and a clean dry cloth
- Apply medium viscosity Superglue to the joint
- Apply super glue accelerator to the cill
- Then quickly put the 2 parts together concentrating on getting the front flush with the front of the cill then hold in place for 5-10 seconds
- Silicone the back edge to seal where the joint meets the wall/window frame
Recommendations
Use a sharp blade or equivalent to remove the tapered securing lugs on the in-line joints, to retrofit the straight cill in-line joint trims on an existing window cill.
Use superglue and accelerator to ensure a long lasting, clean and secure fit.
Fit Joints to New Window Cills
- Offer up the joint to the cill to see if the lugs match up - if they don't it might be necassary to trim to ones that don't match up with the profile.
- Inline joints may need lugs trimming to fit to existing cill.
- If the cill has been cut with a hand saw, smooth and square the edges with fine grade sand paper
- Clean the joint and cill with Solvent Cleaner and a clean dry cloth
- Apply medium viscosity Superglue to the joint
- Apply super glue accelerator to the cill
- Then quickly put the 2 parts together concentrating on getting the front flush with the front of the cill then hold in place for 5-10 seconds
- Silicone the back edge to seal where the joint meets the wall/window frame