

Store Categories

Product View
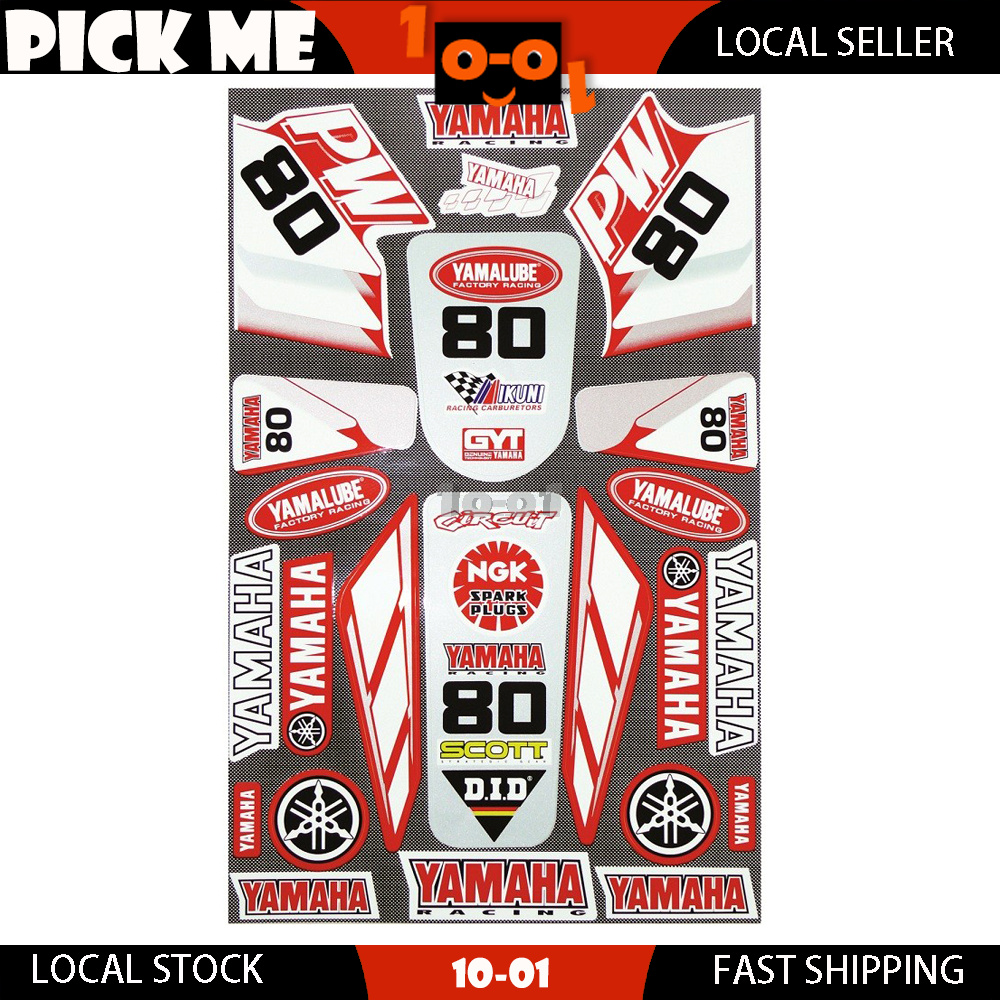
Detail
FITMENT:
-
Yamaha PW80 PEE WEE 1994-2018
DESCRIPTION:
- Condition: 100% Brand New
- Color: As picture shows
- Glossy finish
- Accurate sticker shapes
- Pre cut stickers as seen in photo
- Full set - including tank stickers and fender stickers
- Die-cut to allow for easy removal from the sheet and the most
FEATURES
- No Cutting Required - Simply Peel Off and Apply
- Aftermarket Sticker Kit
- Generic sticker kit to suit all Yamaha PW80
- Wait at least 24 hours before riding to make sure proper bonding is achieved
PACKAGE LIST:
- 1 x Sticker kit, as per photo
NOTE:
- Despite every effort to provide accurate images of each product's colour, actual colours may vary slightly, due to different device screen settings, the lighting in the installation location, slight differences in product finishes over time and other factors. We will not accept responsibility for any colour differences that are not factory faults.
- Parts compatibility given is a guide only. We are not liabel for misapplication. Please check compare with your old part for fitment to your bike or check with your mechanic before purchasing.
- International customers: please be aware that your country's customs may charge you an import duty or tax on this item upon delivery. Please refer to your relevant authorities for more information.
- hair dryer or heat gun
- degreasing agent or alcohol-water mixture
STEP 1:
CLEAN YOUR BIKE and HANDS: For best results, you will need to start with a clean bike and hands. Grease, silicone spray and dirt will all cause you problems so a clean bike and hands are essential.
STEP 2:
EMPTY YOUR TANK: Fuel vapor will destroy the stickers so empty your tank and let it air out for 24hrs before applying stickers.
STEP 3:
SURFACE PREPARATION: Remove old graphics. Start at one edge and heat up the old stickers with the hair dryer or heat gun. They don’t need to be hot just warm so that the glue comes off easily with the sticker.
STEP4:
APPLYING GRAPHICS: Confirm the placement of your decals carefully. When ready peel backing off and place your decal onto the plastic. Working in small sections, use your thumb to apply pressure to the graphic being careful not to get any wrinkles or bubbles. You have to work from the center out. If you get bubbles, carefully peel the section up and try again. Use a safety pin to pop any small air bubbles. Then smooth out the bubble section moving towards the edges of the graphic.
-
Postage
1.Auspost Standard delivery (3-12 days tracking is not available, we are not liable for any missing if you select this post service)
2.Auspost regular parcel+signiture (3-12 days with tracking number)
3.Auspost Express (1-3 days with tracking number)
4.If delay or missing during delivery, please contact us, we will do our best to help you out.
- International Buyers - Please Note:
1.Import duties, taxes and charges are not included in the item price or shipping charges. These charges are the buyer's responsibility.
2.Please check with your country's customs office to determine what these additional costs will be prior to bidding/buying.
You orders will be sent after payment clear.
- Payment is due within 7days
- Paypal(oversea buyers please pay by paypal only)
- Bank transfer or deposite
- Bank cheque (ship upon receipt)
- Money order (ship upon receipt)
- No pick-up or Cash On Delivery.
- Will received our payment details after your purchase
Our 30 Day Return Policy
- In case you purchased an item by mistake or changed your mind, it might not be too late for you to get a refund. Just go over the below details to check if you’re eligible for a refund.
- If you wish to return an item, you should inform us within 30 days of receiving the item. At this time, all relevant returns information will be provided.
- The item must be returned in its original re-saleable condition with all the tags and packaging (ready to be put back on the shelf) at the buyers cost.
- To make sure the item is received in its original and re-saleable condition, it must be securely packed.
- When received, the item(s) are NOT opened, used, worn or damaged, and is in perfect condition.
- AVOID sticking or writing anything on the item itself or on its packaging. Please use only the outer postage packaging to write or place postage stickers.
- A 20% postage fee shall be deducted from the refund amount in case the item was sent with a free postage.
- A revised refund amount may be needed if the item has undergone damage in transit, or does not return as noted above.
- A revised amount will be refunded to the same account which was used to purchase the item.
- In case, you want to return item(s), contact us via ebay (Weekdays: 9am to 6pm, Saturdays: 9am to 3pm) and our support team will help you.
Your 5 star positive feedback is highly appreciated.
If you are considering giving a neutral or negative or a low DSR (4 or below), do write to us and give us an opportunity to address your concerns first. We are always stand-by to help for any questions or concerns
Copyright © 2019 1o-o1 PICKME

Contact Us
If you have any questions or suggestions, Please use the ebay
message system to contact us, we love hearing from customers.
On 23/03/2023 at 16:48:14 AEDT, seller added the following information: