KAGERO SUPER DRAWINGS 3D WW2
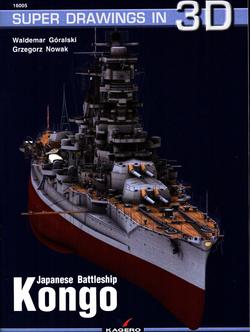
JAPANESE BATTLESHIP IJN KONGO ARMAMENT OPERATIONS DETAILS DRAWINGS CAMOUFLAGE
MARKINGS
SOFTBOUND BOOK IN ENGLISH by WALDEMAR GORALSKI &
GRZEGORZ NOWAK
----------------------------------------------------------------------------------------------------------
Additional Information from Internet Encyclopedia
Kong� ("Indestructible Diamond", named for
Mount Kong�) was a warship of the Imperial Japanese Navy during World War I and
World War II. She was the first battlecruiser of the Kong� class, among the
most heavily armed ships in any navy when built. Her designer was the British
naval engineer George Thurston, and she was laid down in 1911 at
Barrow-in-Furness in Britain by Vickers Shipbuilding Company. Kong� was the
last Japanese capital ship constructed outside Japan. She was formally
commissioned in 1913, and patrolled off the Chinese coast during World War I.
Kong� underwent two major reconstructions. Beginning in
1929, the Imperial Japanese Navy rebuilt her as a battleship, strengthening her
armor and improving her speed and power capabilities. In 1935, her
superstructure was completely rebuilt, her speed was increased, and she was
equipped with launch catapults for floatplanes. Now fast enough to accompany
Japan's growing carrier fleet, Kong� was reclassified as a fast battleship.
During the Second Sino-Japanese War, Kong� operated off the coast of mainland
China before being redeployed to the Third Battleship Division in 1941. In
1942, she sailed as part of the Southern Force in preparation for the Battle of
Singapore.
Kong� fought in a large number of major naval actions of
the Pacific War during World War II. She covered the Japanese Army's amphibious
landings in British Malaya (part of present-day Malaysia) and the Dutch East
Indies (now Indonesia) in 1942, before engaging American forces at the Battle
of Midway and during the Guadalcanal Campaign. Throughout 1943, Kong� primarily
remained at Truk Lagoon in the Caroline Islands, Kure Naval Base (near
Hiroshima), Sasebo Naval Base (near Nagasaki), and Lingga Roads, and deployed
several times in response to American aircraft carrier air raids on Japanese
island bases scattered across the Pacific. Kong� participated in the Battle of
the Philippine Sea and the Battle of Leyte Gulf in 1944 (22�23 October),
engaging and sinking American vessels in the latter. Kong� was torpedoed and
sunk by the submarine USS Sealion while transiting the Formosa Strait on 21
November 1944. She was the only Japanese battleship sunk by submarine in the
Second World War.
Kong� was the first of the Imperial Japanese Navy's
Kong�-class battlecruisers, which were almost as large, costly and well-armed
as battleships, but which traded off armored protection for higher speeds.
These were designed by the British naval engineer George Thurston[6] and were
ordered in 1910 in the Japanese Emergency Naval Expansion Bill after the
commissioning of HMS Invincible in 1908.[7] These four battlecruisers of the
Kong� class were designed to match the naval capabilities of the battlecruisers
of the other major naval powers at the time, and they have been called the
battlecruiser versions of the British (formerly Turkish) battleship HMS
Erin.[1][8] Their heavy armament of 14-inch naval guns and their armor
protection (which took up about 23.3% of their approximately 30,000-ton
displacements in 1913) were greatly superior to those of any other Japanese
capital ship afloat at the time.[1][8]
The keel of Kong� was laid down at Barrow-in-Furness by
Vickers Shipbuilding and Engineering on 17 January 1911. Under Japan's contract
with Vickers, the first vessel of the class was constructed in the United
Kingdom, with the remainder built in Japan.[1] Kong� was launched on 18 May
1912, and then transferred to the dockyards of Portsmouth, England, where her
fitting-out began in mid-1912.[8] All parts used in her construction were
manufactured in the U.K.[1] Kong� was completed on 16 April 1913.
Kong�'s main battery consisted of eight 14-inch (36 cm)
heavy-caliber main naval guns in four twin turrets (two forward and two
aft).[6] The turrets were noted by the U.S. Office of Naval Intelligence to be
"similar to the British 15-inch turrets",[9] with improvements made
in flash-tightness. Each of her main guns could fire high explosive or armor-piercing
shells 38,770 yards (19.14 nmi; 35.45 km) at a firing rate of about two shells
per minute.[10] In keeping with the Japanese doctrine of deploying more
powerful vessels before their opponents, Kong� and her sister ships were the
first vessels in the world equipped with 14-inch (36 cm) guns.[11] Her main
guns carried ammunition for 90 shots, and they had an approximate barrel
lifetime of 250 to 280 shots.[9] In 1941, separate dyes were introduced for the
armor-piercing shells of the four Kong�-class battleships to assist with
targeting, with Kong�'s armor-piercing shells using red dye.[9]
The secondary battery of Kong� originally consisted of
sixteen 6-inch (15 cm) 50 caliber guns in single casemates located amidships
("50 calibre" means that the lengths of the guns were 50 times their
bore, or 300 inches),[8] eight 3-inch (7.6 cm) guns, and eight submerged
21-inch (53 cm) torpedo tubes.[6] Her six-inch naval guns could fire five to
six rounds per minute, with a barrel lifetime of about 500 rounds.[2] The
6-inch/50 calibre gun was capable of firing both antiaircraft and antiship
shells, though the positioning of these guns on Kong� made antiaircraft firing
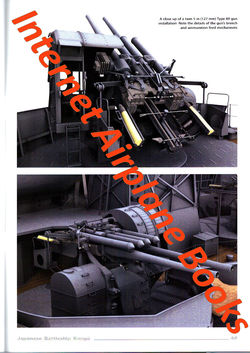
mostly impractical.[8] During her second reconstruction, the older three-inch
guns were removed and then replaced with eight 5-inch (13 cm) 5-inch/40 calibre
dual-purpose guns. These guns could fire from eight to 14 rounds per minute,
with a barrel lifetime of about 800 to 1,500 rounds.[12] Of Kong�'s guns, the
5-inch guns had the widest variety of shell types: antiaircraft, antiship, and
illumination shells.[12] Kong� was also armed with a large number of 1-inch
(2.5 cm) antiaircraft machine guns. By October 1944, Kong�'s secondary armament
was reconfigured to eight 6-inch (15 cm) guns, eight 5-inch (13 cm) guns, and
122 Type 96 antiaircraft rapid-fire cannons.
Kong� and Haruna departed from the Hashirajima fleet
anchorage on 29 November 1941 to begin the War in the Pacific as part of the
Southern (Malay) Force's Main Body, under the overall command of Vice-Admiral
Nobutake Kond�.[23] On 4 December 1941, the Main Body arrived off the coast of
southern Thailand and northern Malaya in preparation for the invasion of
Thailand and the Malayan Peninsula four days later.[24] When Britain's
"Force Z"�consisting of the battleship Prince of Wales and the
battlecruiser Repulse�was quickly defeated by Japan's land-based aircraft from
southern Vietnam, Kong�'s battlegroup withdrew from Malayan waters. This
battlegroup subsequently sortied from Indochina for three days in mid-December
to protect a reinforcement convoy traveling to Malaya, and again on 18 December
to cover the Japanese Army's landing at Lingayen Gulf, Luzon, in the
Philippines. The Main Body departed Cam Ranh Bay in French Indochina on 23
December bound for Taiwan, arriving two days later.[7] In January 1942, Kong�
and the heavy cruisers Takao and Atago provided distant cover for air attacks
on Ambon Island.[7]
On 21 February, Kong� was joined by Haruna, four fast
aircraft carriers, five heavy cruisers and numerous support ships in
preparation for "Operation J", Japan's invasion of the Dutch East
Indies. On 25 February, the Third Battleship Division provided cover for air
attacks on the Island of Java.[8] Kong� bombarded Christmas Island off the western
coast of Australia on 7 March 1942, and then she returned to Staring-baai for
15 days of standby alert.[7] In April 1942, Kong� joined five fleet carriers in
attacks on Colombo and Trincomalee on Ceylon.[25] Following the destruction of
the British heavy cruisers HMS Dorsetshire and HMS Cornwall on 5 April 1942,
this naval task force moved southwest to locate the remainder of the British
Eastern Fleet, then under the command of Admiral James Somerville.[26] On 9
April, one of Haruna's reconnaissance seaplanes spotted the aircraft carrier
HMS Hermes south of Trincomalee. On the same day, Japanese air attacks sank the
carrier,[26] and Kong� was attacked but missed by nine British medium bombers.
Having crippled the offensive capability of Britain's Eastern Fleet, the Third
Battleship Division returned to Japan. Kong� reached Sasebo on 22 April. From
23 April to 2 May, Kong� was drydocked for reconfiguration of her antiaircraft
armament.[7]
On 27 May 1942, Kong� sortied with Hiei and the heavy
cruisers Atago, Ch�kai, My�k�, and Haguro as part of Admiral Nobutake Kond�'s
invasion force during the Battle of Midway.[7][23] Following the disastrous
loss of four of the Combined Fleet's fast carriers on 4 June 1942, Kond�'s
force withdrew to Japan.[27] On 14 July she was assigned as the flagship of the
restructured Third Battleship Division. In August, Kong� was drydocked at Kure
to receive surface-detection radar and additional range finders.[4] In
September, Kong� embarked with Hiei, Haruna, Kirishima, three carriers, and
numerous smaller warships in response to the U.S. Marine Corps's amphibious
landing on Guadalcanal in the Solomon Islands. On 20 September, this task force
was ordered to return to the Truk Naval Base in the Central Pacific north of
the equator.[28]
In the aftermath of the Battle of Cape Esperance, the
Japanese Army opted to reinforce its troops on Guadalcanal. To protect their
transport convoy from enemy air attack, Admiral Isoroku Yamamoto sent Haruna
and Kong�, escorted by one light cruiser and nine destroyers, to bombard the
American air base at Henderson Field. Because of their high speeds, these two
battleships could bombard the airfield and then withdraw before being subjected
to air attack from either land-based warplanes or American aircraft
carriers.[29] On the night of 13 � 14 October, these two battleships shelled
the area of Henderson Field from a distance of about 16,000 yards (15,000 m),
firing 973 14-inch high-explosive shells. In the most successful Japanese
battleship action of the war,[23] the bombardment heavily damaged both runways,
destroyed almost all of the U.S. Marines' aviation fuel, destroyed or damaged
48 of the Marines' 90 warplanes, and killed 41 Marines.[30] A large Japanese
troop and supply convoy reached Guadalcanal on the next day.[29]
During the Battle of the Santa Cruz Islands on 26 October
1942, Kong� was attacked by four Grumman TBF Avenger torpedo bombers, but she
received no hits. In mid-November, this battleship and other warships provided
distant cover for the unsuccessful mission by the I.J.N. to bombard Henderson
Field again and to deliver more Army reinforcements to Guadalcanal. On 15
November 1942, following the Japanese defeat and the sinking of Hiei and
Kirishima during the Naval Battle of Guadalcanal, the Third Battleship Division
returned to Truk, where it remained for the rest of 1942.
Throughout 1943, Kong� engaged no enemy targets. In late
January 1943, she participated in "Operation Ke" as part of a
diversionary and distant covering force to support I.J.N. destroyers that were
evacuating Army troops from Guadalcanal.[31] From 15 February through 20
February 1943, the Third Battleship Division was transferred from Truk to the
Kure Naval Base. On 27 February, Kong� was drydocked to receive upgrades to her
antiaircraft armament, with the additions of two triple 25 mm gun mounts and
the removal of two of her 6-inch turrets, while additional concrete protection
was added near her steering gear.[4] On 17 May 1943, in response to the U.S.
Army's invasion of Attu Island, Kong� sortied alongside Musashi, the Third
Battleship Division, two fleet carriers, two cruisers, and nine destroyers.
Three days later, the American submarine USS Sawfish spotted this naval task
force, but she was unable to attack it. On 22 May 1943, the task force arrived
in Yokosuka, where it was joined by an additional three fleet carriers and two
light cruisers. This force was disbanded when Attu fell to the U.S. Army before
the necessary preparations for a counterattack had been finished.[7]
On 17 October 1943, Kong� again left Truk as part of a
larger task force consisting of five battleships, three fleet carriers, eight
heavy cruisers, three light cruisers, and numerous destroyers. These sortied in
response to U.S. Navy air raids on Wake Island. No contact between the two
forces was made, and the Japanese task force returned to Truk on 26 October
1943. She soon left Truk for home waters, and on 16 December 1943, Kong�
arrived at Sasebo for refits and training in the Inland Sea.
In January 1944, Kong� was dry-docked for a reconfiguration
of her anti-aircraft suite. Four 6-inch guns and a pair of twin 25 mm mounts
were removed and replaced with four 5-inch guns and four triple 25 mm
mounts.[4] The Third Battleship Division departed Kure on 8 March 1944.
Arriving at Lingga on 14 March 1944, the division remained for training until
11 May 1944.[7] On 11 May 1944, Kong� and Admiral Ozawa's Mobile Fleet departed
Lingga for Tawitawi, where they were joined by Vice-Admiral Takeo Kurita's
"Force C". On 13 June, Ozawa's Mobile Fleet departed Tawitawi for the
Mariana Islands.[32] During the Battle of the Philippine Sea, Kong� escorted
Japanese fast carriers, and remained undamaged in counterattacks from US
carrier aircraft on 20 June.[5] When she returned to Japan, 13 triple and 40
single 25-mm mounts were added to her anti-aircraft armament, for a total of
over 100 mounts. In August, two more 6-inch guns were removed and another
eighteen single mounts installed.[4]
In October 1944, Kong� departed Lingga in preparation for
"Operation Sho-1", Japan's counterattack during the Battle of Leyte
Gulf, the largest naval engagement in history.[33] On 24 October, Kong� was
undamaged by several near misses from American carrier aircraft in the Battle
of the Sibuyan Sea. On 25 October, during the Battle off Samar, Kong��as part
of Admiral Kurita's Centre Force�engaged the US 7th Fleet's "Taffy
3", a battlegroup of escort carriers and destroyers. She succeeded in
scoring numerous hits on the escort carrier Gambier Bay as well as the destroyers
Hoel and Heermann. At 09:12, she sank the destroyer escort Samuel B. Roberts.
After a fierce defensive action by the American ships, which sank three
Japanese heavy cruisers, Admiral Kurita elected to withdraw, ending the
battle.[34] While retreating, Kong� suffered damage from five near misses from
attacking aircraft. The fleet arrived at Brunei on 28 October.[7]
On 16 November, following a US air raid on Brunei, Kong�
along with Yamato, Nagato and the rest of the First Fleet, departed Brunei for
Kure in preparation for a major reorganization of the fleet and battle repairs.
On 20 November, they entered the Formosa Strait. Shortly after midnight on 21
November, the submarine USS Sealion made radar contact with the fleet at 44,000
yards (40,000 m).[35] Maneuvering into position at 02:45, Sealion fired six bow
torpedoes at Kong� followed by three stern torpedoes at Nagato fifteen minutes
later. One minute after the first salvo was launched, two of the torpedoes were
seen to hit Kong� on the port side, while a third sank the destroyer Urakaze
with all hands.[7] The torpedoes flooded two of Kong�'s boiler rooms, but she
was still able to make 16 kn (30 km/h; 18 mph). By 05:00, she had slowed to 11
kn (20 km/h; 13 mph) and was given permission to break off from the fleet and
head to the port of Keelung in Formosa along with the destroyers Hamakaze and
Isokaze as escort.
Within fifteen minutes of detaching from the main force,
Kong� was listing 45 degrees and flooding uncontrollably. At 5:18 the ship lost
all power and the order was given to abandon ship. At 5:24, while the
evacuation was under way, the forward 14-inch magazine exploded and the broken
ship sank quickly with the loss of over 1,200 of her crew including the
commander of the Third Battleship Division and her captain.[5] The escort
destroyers Hamakaze and Isokaze rescued 237 survivors.
Kong� is believed to have sunk in 350 feet (110 m) of
water approximately 55 nautical miles (102 km; 63 mi) northwest of Keelung. She
was one of only three British-built battleships sunk by submarine attack during
World War II. The other two were the British Revenge-class battleship HMS Royal
Oak and the Queen Elizabeth-class battleship HMS Barham.