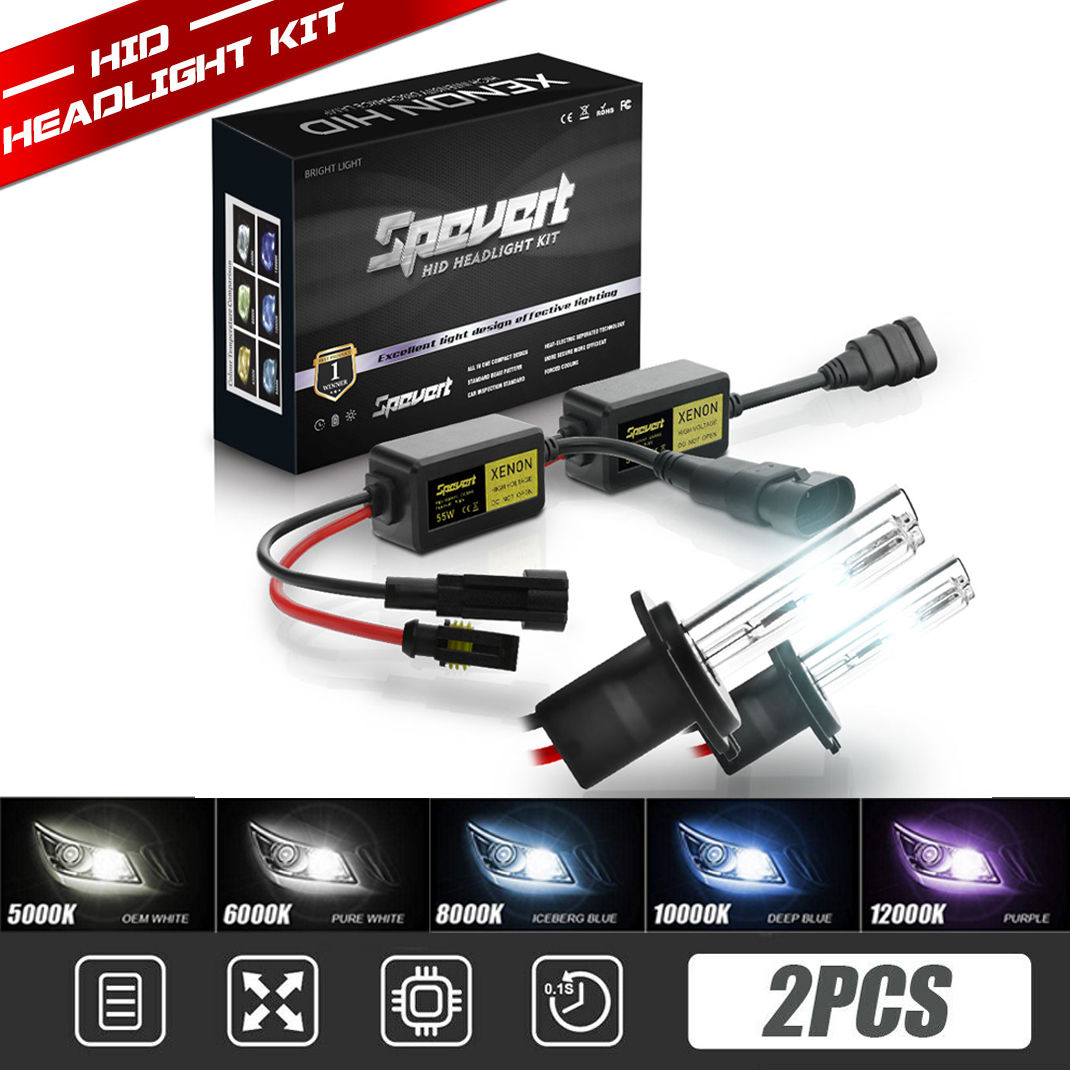
Why choose our Digital HID Conversion kits? * 100% Plug and Play design.Ballasts had the EMC built in it,and the mini size ballasts are save the space get more easier to install and more stable. * Our
product comes with a 3 year warranty and easy installation. We stand
behind our hid kits with support and service like other company. * We
offer a wide range of options including 6 bulb sizes, 7 different
colors and 2 types of ballasts. Not only do we sell the conversion kits,
but all the accessories needed for proper installation on most
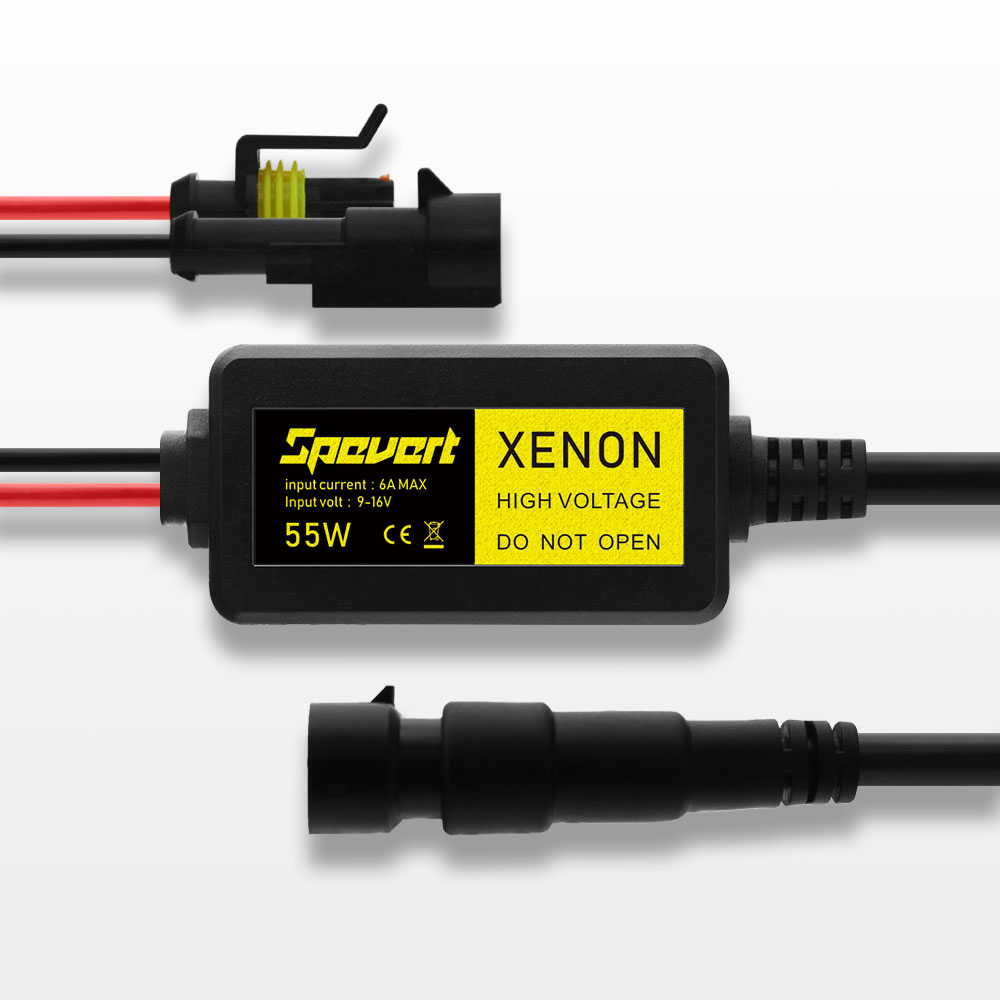
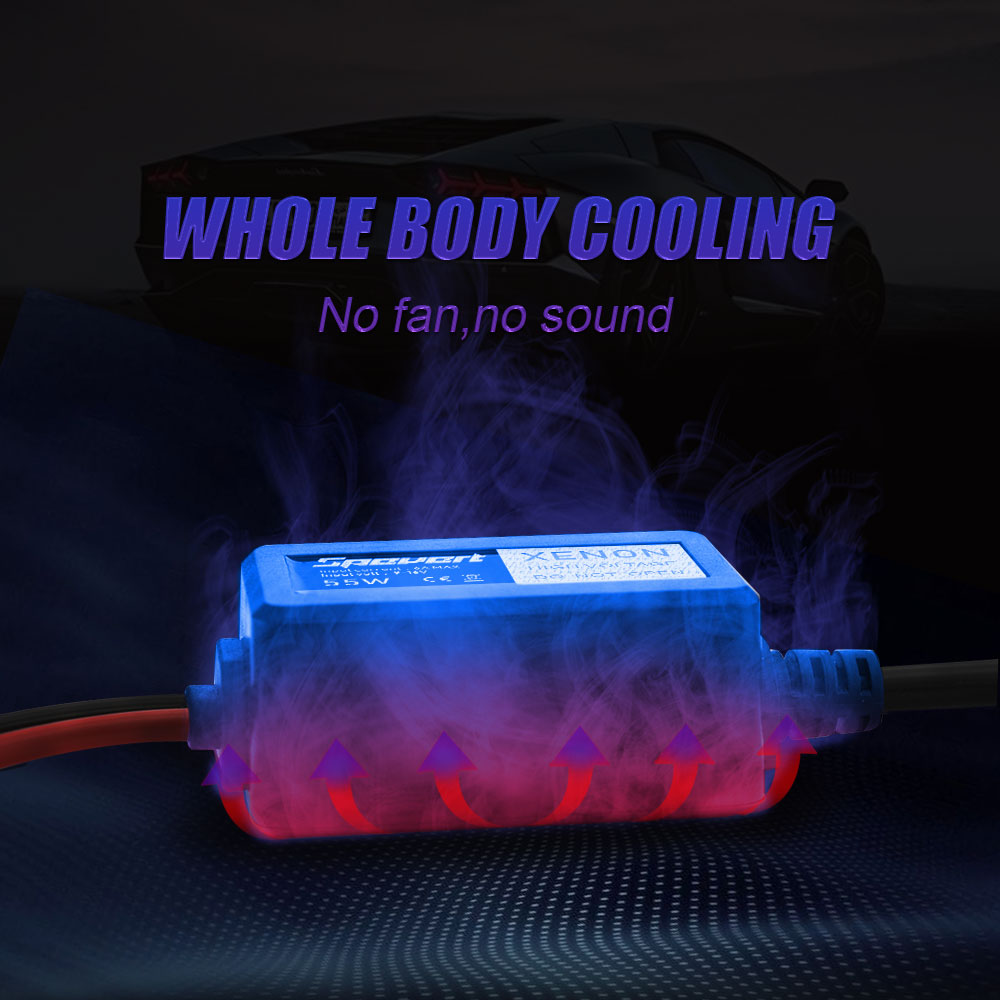
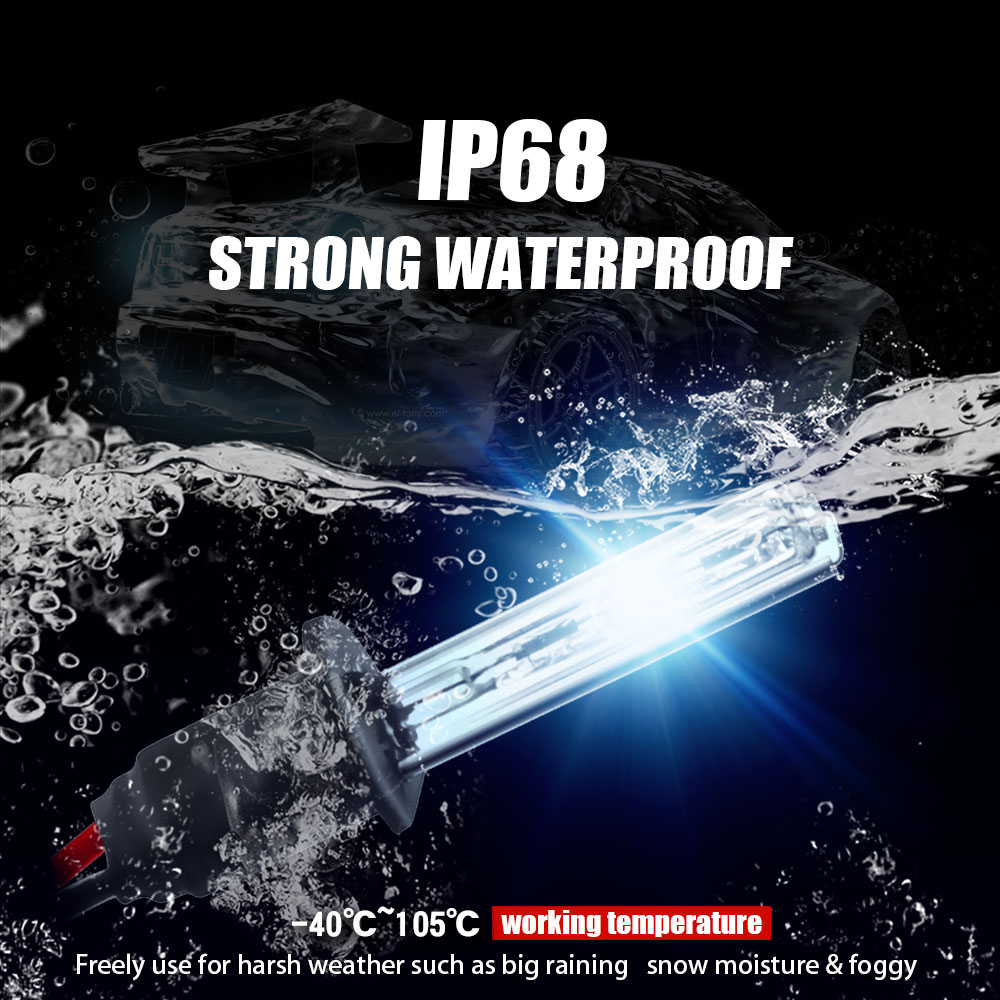
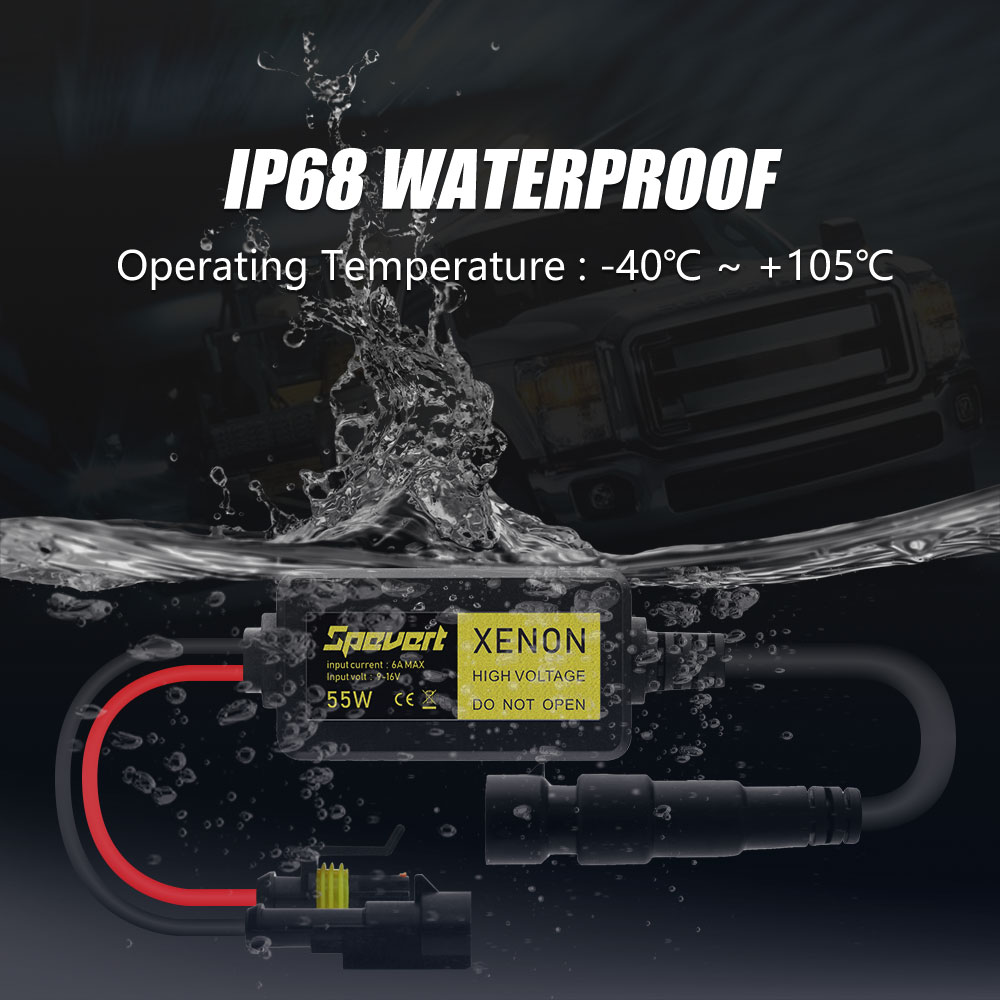
vehicles. Voltage Input 9-16V Voltage Norm. 13.2V Current Norm. 3.6A Current in Max 6A Power Output 55W Working Temperature -40 ~ +105 Centidrgee. HID Efficiency 98.68%, 3, 200 LM. Life-Span 3, 000 hours
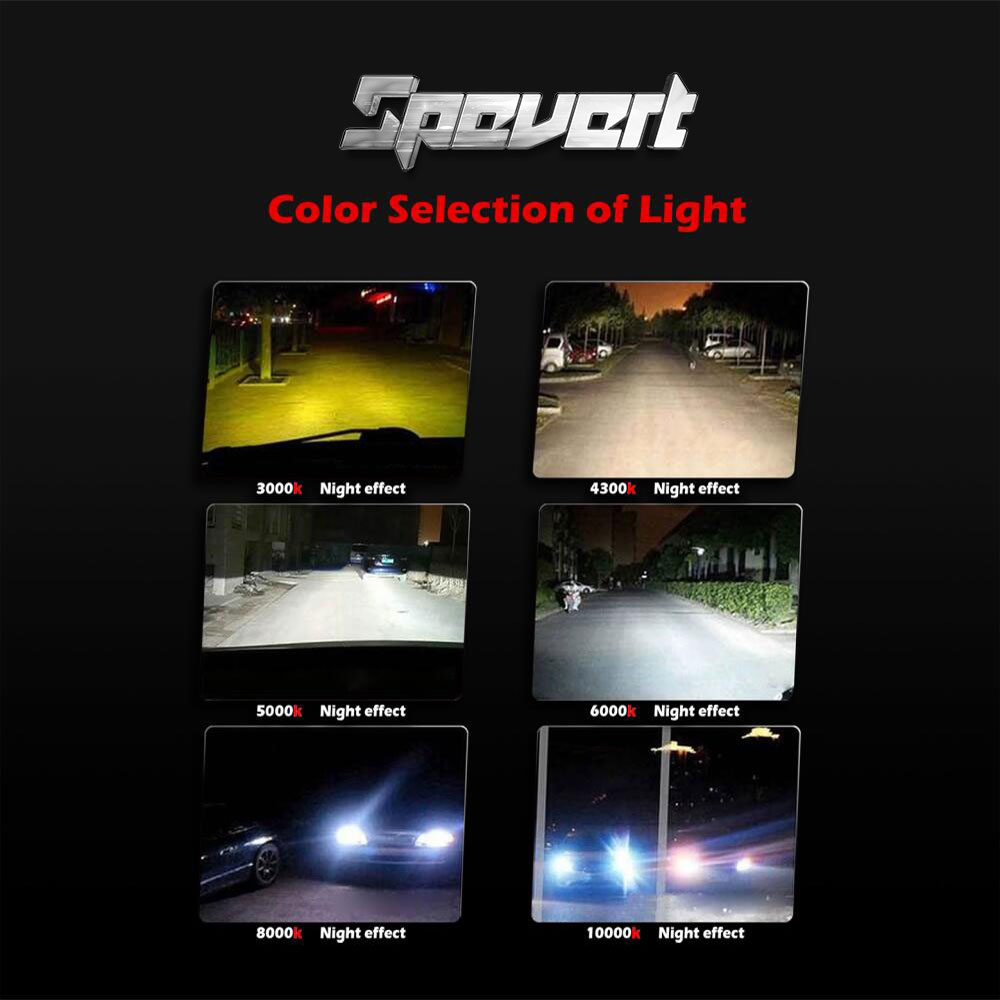
E4 & ISO-9001:2000 Approved * 6 hours continuous working aging test. * Connection circuit protection test. * Short circuit protection test. * Lack of voltage protection test. * Over voltage protection test. * Flash light concussion test. * Quakeproof capability test. * Cold, warm boot test. * Polarity protection test. * EMC anti-jamming test What is HI/LO Bi-Xenon? HID Color
Temperature: * The
color of light is measured and expressed in degrees Kelvin (K). The
color spectrum ranges from a red to purple. HID headlamps do not have
this wide of a range though there are different bulbs that skew toward
either extreme. Most are more focused on the center of that range. Our Benefits of
Slim Ballast: Slim Ballasts usesmaller
internal components and still offer the same input and output power as
its standard sized version. With the Igniter unit in an epoxy filled
chamber, we are able to reduce the size of the core unit by roughly
half, also reducing the weight significantly. Slim Ballasts are easier
to mount, weigh less, and allow users to install their HID systems
faster with less time spent under the hood, and more time enjoying their
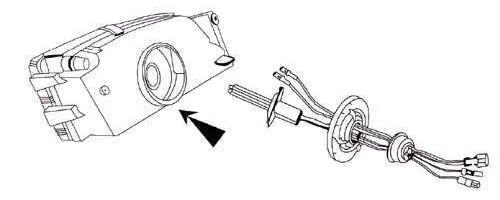
HID lights! Installation Guide: Step 1: Open
hood and locate the factory light bulb you are
trying to convert. If fog lights, you may need to
pull out your factory fog light housing to access
the back. On some vehicles you can access factory
bulbs from the engine bay or from the wheel wells
with your wheels fully turned on direction. Please
consult your owners manual or dealer on how to
access your factory light bulbs. In 90% your bulbs
are easily removed without too much trouble. Once
your factory light bulb is removed, you can prepare
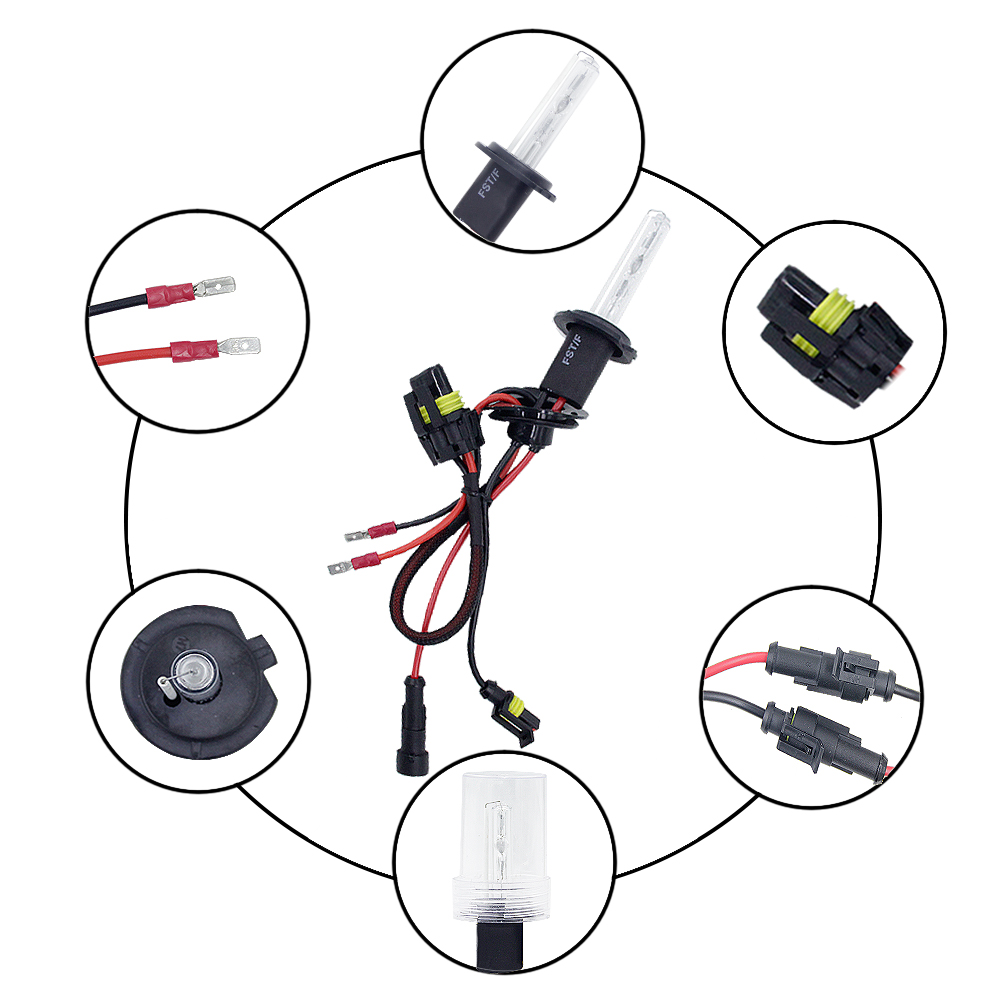
for the HID bulb insertion. Step 2: Remove
the plastic capsule preinstalled on the HID bulb and
insert into your headlight socket. HID bulbs should
fit similar to your factory light bulb, but the
tolerances may be slightly different on certain
vehicle models. Bulb installation will vary from
twisting to clamping from the back depending on the
bulb type. Be very gentle with the HID glass
portion. Do not touch the glass with your fingers.
If it does end up getting dirty, simply wipe with
clean cloth gently. Notice: Some
vehicle models may require adapters for the bulb to
fit into the socket. These include H7 bulbs. Some
parts off of your original headlight may be be
required depending on car model. Example, 9007 light
bulbs will require the reinstallation of the plastic
bulb holder adapter. Some BMW / VW / Mercedes / Saab
will require a metal adapter or plastic adapter to
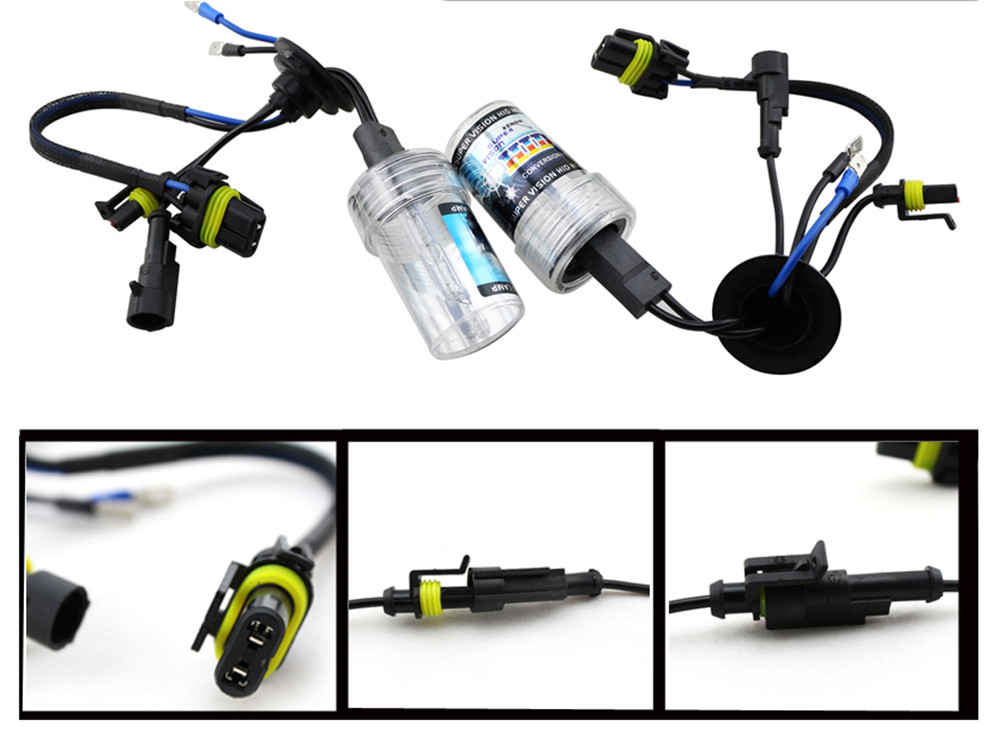
hold the bulb in place. Step 3a: Once
the HID bulb is fixed into place locate the factory
connector where the original halogen bulb was
connected to. You will now connect the supplied wire
(may be a plug or 2 metal tips) that you must insert
into your factory connector as shown below. When we
say factory connector, this is the connector your
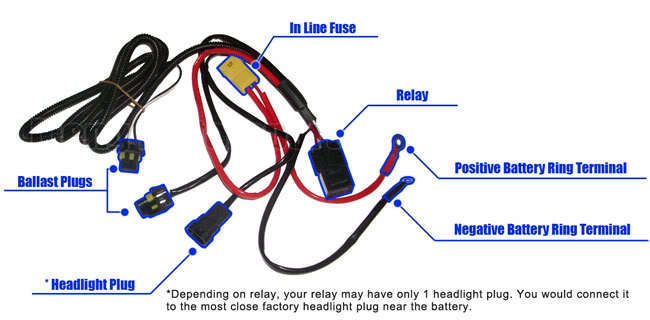
original bulb was feed power with. Step 3b: If
your kit included a relay you will not use the
provided extra wires shown in Step 3a. that connect
ballast to factory headlight plug. Instead the
ballast get connected to the relay as shown below.
The relay then will connect to your factory
headlight plug. Some relays will have two plugs one
for each side, while others only one headlight plug.
Remember a relay simply gets a signal from your
headlight plug, then allows power to flow directly
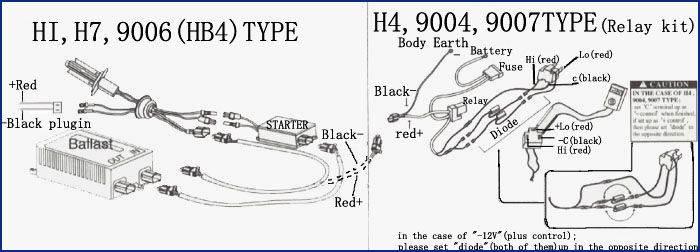
from your battery. Step 3c: If
your kit purchased is a bi-xenon kit also known as
hi/low (low beam + high beam HID with movement).
This only applies to kits with bulb types 9004 9007
H4 H13 9008. Notice on these kits there will be only
1 headlight plug connector. One of your headlight
connectors may not be used. Step 4: Before
mounting ballast permanently please test the system.
Low beam, high beam and fog light function if it
applies to your install. It is best to turn the
vehicle on to test the system as some vehicles do
not give full voltage when vehicle is running only
from battery.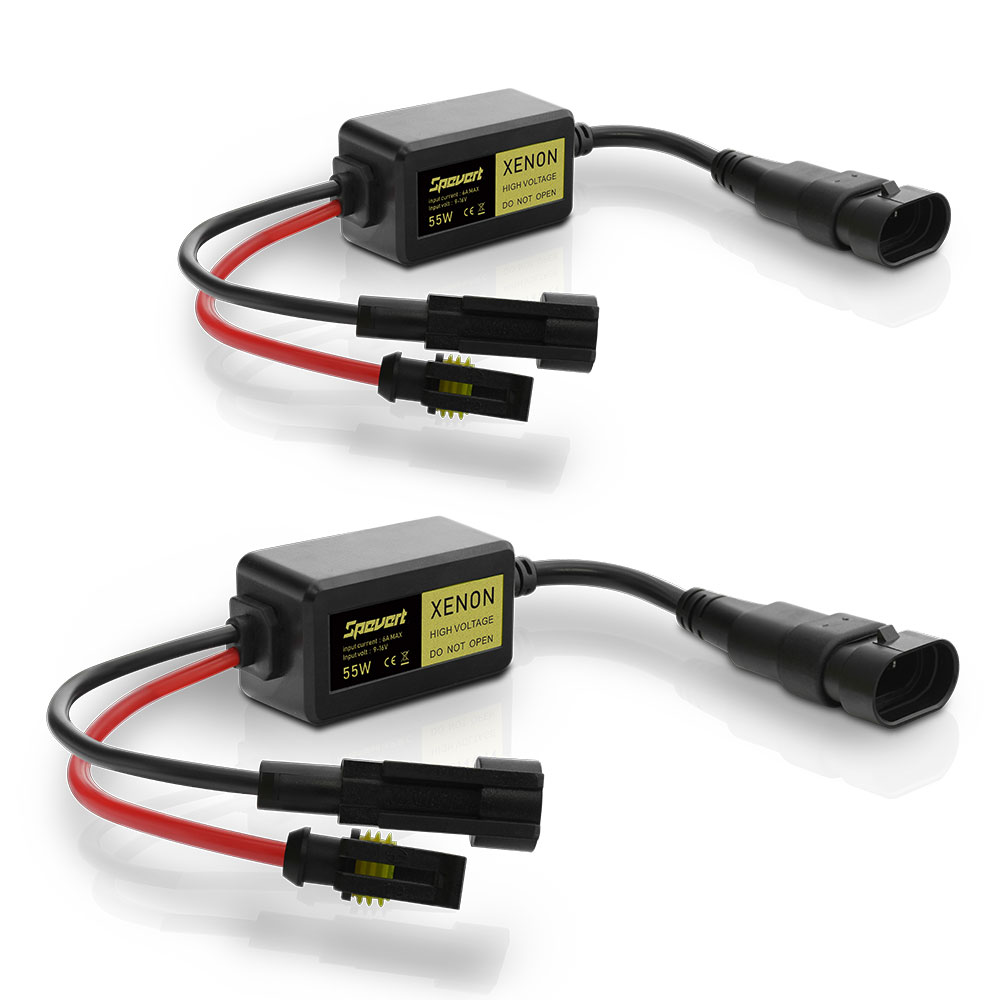
Specifications
* This
will depend on the type of vehicle you drive. For most vehicle, the
headlights have 2 bulbs each: one for low beams and one for high beams.
In this case, you will need one regular HID kit for the low beams. If
you also want your high-beams to be HID lights, you will need a second
regular HID kit.
* On
some other vehicles, the headlights have one bulb each. This bulb
performs the function of both the high beam and low beam. In this case,
if you want to keep the high beam and low beam functions, you will need
to install a special HI/LO kit. The HI/LO HID kits have special bulbs
that perform both high and low beam functions.
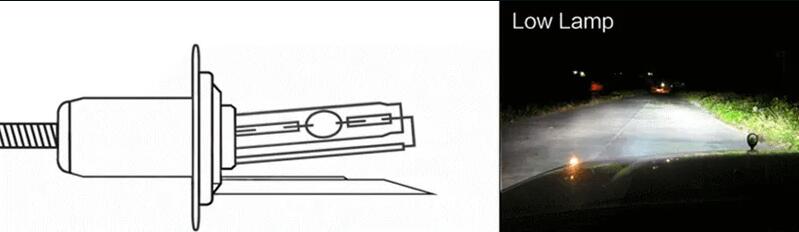
* A
Bi-Xenon bulb replaces a H4 halogen bulb that produces low beam as well
as high beam. A H4 halogen bulb has therefore two filaments, one for
low beam and one for high beam. The Bi-Xenon bulb however, only has one
'light cell'. (See The Pic. Below)
By means of an ingenious
electro-magnetic construction, this light cell can change position. One
position is low beam, the other is high beam.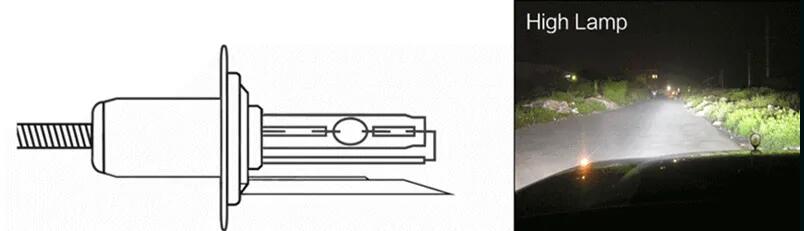
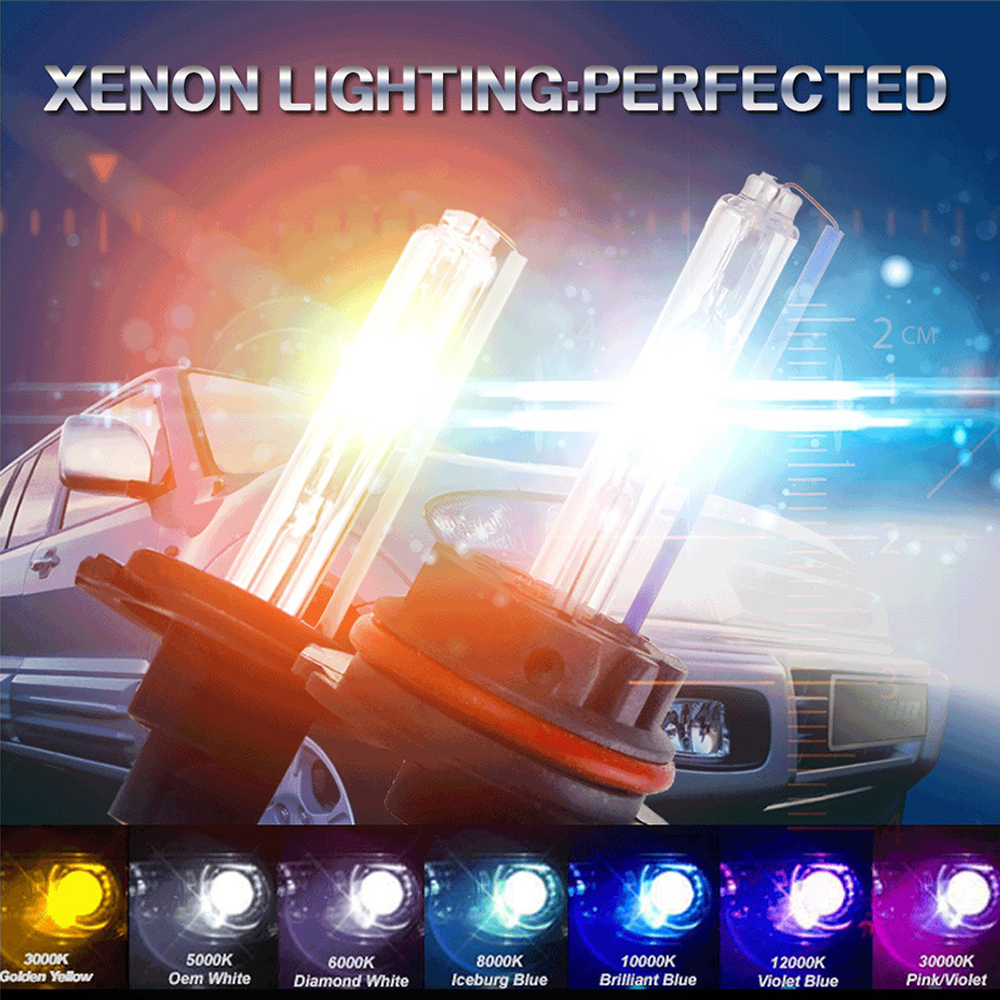
* 4,300K is the temperature that is closest to natural daylight. Factory HID headlamps are setup for this color temperature. 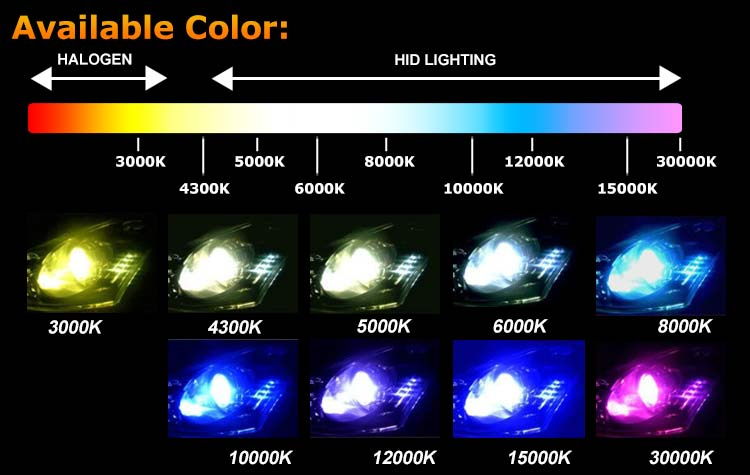


If you purchased a Bi-xenon kit, or a kit with
relay, your installation will be a little different
than above. See steps 3b or 3c.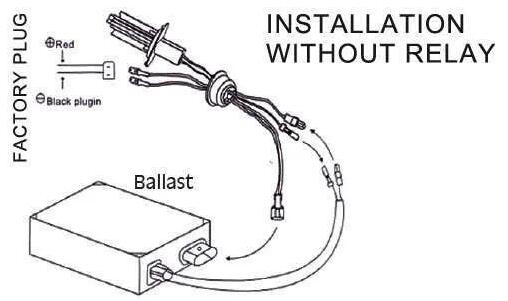
Step 5: Mount the ballasts on any existing
bolt or flat surface away from excessive heat. We do
not recommend mounting on top of the radiator or in
front or behind it. Ballasts are electronic devices
which excessive heat can ruin. Make certain the
wires with your kit cannot get tangled into the belt
line or are resting on very hot components of the
engine.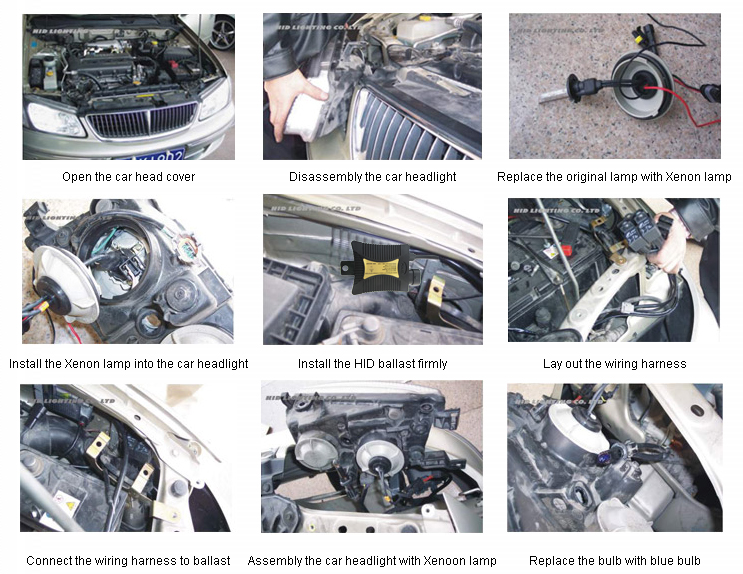


PayPal Only.
We ship to your Paypal registered address only.
Item will be shipped out within 24 hours once we have received your payment via PayPal with confirmed shipping address only
Warm Tips: Import duties, value added taxes and any other charges are not included, as an eligible importer, you are responsible for any reasonable tax or importation fees.
Items will be shipped within 24 hours on payment received.
All items are shipped from China or Hongkong using Post Airmail, Please allow 25-30 days for your order to arrive due to International shipping.
If you do not receive your item after 35
days. please contact us immediately for further assistance. We will be
responsible for any damages or losses incurred in the shipping process.
PLEASE NOTE: If an item is defective or taking longer than usual to reach you, please do not leave a negative feedback. Send us a message through eBay and we will resolve the issue promptly.^-^A customer-centered shopping experience has always been our goal and we want you to be completely satisfied with every item that you purchase online from us.If you are not satisfied with an item that you have purchased from us, you may return the item within 30 days of the order date for a full refund of the purchase price, minus the shipping & handling fees. Any "Free Shipping" item returned will have the outbound freight charge deducted from the total return.Buyers will pay for return shipping charges.Shipping, handling and insurance fees are NOT refundable.Please read our terms and conditions above carefully.Bidder or Buyer must agree all terms and conditions before placing a bid or purchasing.
1. If you are satisfied with our products and service, please leave usPositive Feedback and 5 Star Ratings, and we will do the same for you.2. Please feel free to contact us if you have any question . We'll do reply you as soon as possible and try our best to solve your problems out. Believe us,every customer is taken as our important treasure. And please contact us by the following instructions, your cooperation would be much appreciated,and the warranty period can be extended automatically,please note.
Q1: What can I do if I haven't received my item in time?
A1: Please find the order record, select "Contact seller" in drop-down menu at right hand side, which lead to a new page and "Select a topic" as follows, then we will receive your email and respond within 24 hours.
Q2: How can we process if I'm not satisfied with your product?
A2: Please click " Return this item" bottom, find the following 3 options, and select one among them to continue should be okay. PS: The return reasons are not important, as no matter which one you select, we need to further confirm the details through message.


Welcome to our store! Your Satisfaction is our Highest Priority. Please feel free to contact us if you have any questions about our products or service. Thank you!Our Working time (Monday to Friday):
-09:00-12:00(GMT+8)
-14:00-18:00(GMT+8)Saturday:
-09:00-12:00(GMT+8)
-14:00-17:00(GMT+8)All emails would be replied very fast during our working time, emails would be replied within 24 hours usually during holiday.
Welcome to contact us if you have any problem.
PayPal Only.
We ship to your Paypal registered address only.
Item will be shipped out within 24 hours once we have received your payment via PayPal with confirmed shipping address only
Warm Tips: Import duties, value added taxes and any other charges are not included, as an eligible importer, you are responsible for any reasonable tax or importation fees.
Items will be shipped within 24 hours on payment received.
All items are shipped from China or Hongkong using Post Airmail, Please allow 25-30 days for your order to arrive due to International shipping.
If you do not receive your item after 35
days. please contact us immediately for further assistance. We will be
responsible for any damages or losses incurred in the shipping process.
PLEASE NOTE: If an item is defective or taking longer than usual to reach you, please do not leave a negative feedback. Send us a message through eBay and we will resolve the issue promptly.^-^A customer-centered shopping experience has always been our goal and we want you to be completely satisfied with every item that you purchase online from us.If you are not satisfied with an item that you have purchased from us, you may return the item within 30 days of the order date for a full refund of the purchase price, minus the shipping & handling fees. Any "Free Shipping" item returned will have the outbound freight charge deducted from the total return.Buyers will pay for return shipping charges.Shipping, handling and insurance fees are NOT refundable.Please read our terms and conditions above carefully.Bidder or Buyer must agree all terms and conditions before placing a bid or purchasing.
1. If you are satisfied with our products and service, please leave usPositive Feedback and 5 Star Ratings, and we will do the same for you.2. Please feel free to contact us if you have any question . We'll do reply you as soon as possible and try our best to solve your problems out. Believe us,every customer is taken as our important treasure. And please contact us by the following instructions, your cooperation would be much appreciated,and the warranty period can be extended automatically,please note.
Q1: What can I do if I haven't received my item in time?
A1: Please find the order record, select "Contact seller" in drop-down menu at right hand side, which lead to a new page and "Select a topic" as follows, then we will receive your email and respond within 24 hours.
Q2: How can we process if I'm not satisfied with your product?
A2: Please click " Return this item" bottom, find the following 3 options, and select one among them to continue should be okay. PS: The return reasons are not important, as no matter which one you select, we need to further confirm the details through message.
Welcome to our store! Your Satisfaction is our Highest Priority. Please feel free to contact us if you have any questions about our products or service. Thank you!Our Working time (Monday to Friday):
-09:00-12:00(GMT+8)
-14:00-18:00(GMT+8)Saturday:
-09:00-12:00(GMT+8)
-14:00-17:00(GMT+8)All emails would be replied very fast during our working time, emails would be replied within 24 hours usually during holiday.
Welcome to contact us if you have any problem.
You may also like


Le 27 avr. 2024 à 11:37:11 CEST, le vendeur a ajouté les informations suivantes :