Cfspeed-autoparts


|
|
|

|

|

|

|

|

|

|
?Compatibility Chart
1, You can distinguish specific model of an automobile by VIN(Vehicle Identification Number).
2, VIN(Vehicle Identification Number) consists of total 17 English letters and arabic digits.
3, VIN does not include the letters I (i), O (o), and Q (q) (to avoid confusion with numerals 1 and 0).
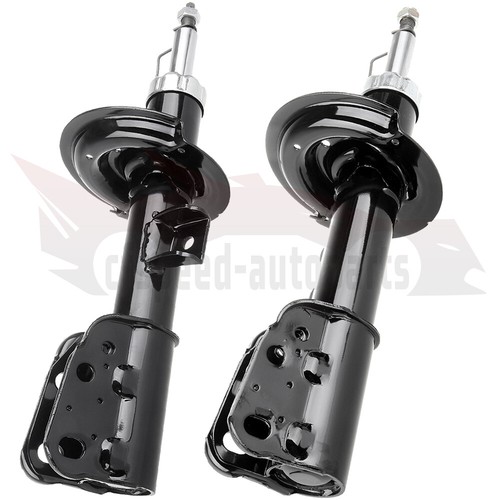
- 2014-2019 Ford Escape Front Driver Side & Passenger Side Suspension Strut Assembly
?When Should We Replace a New complete strut
Since the average annual distance of the car is 20,000 kilometers, and the shock absorber needs to be replaced in pairs, the replacement frequency is obtained every 4 years. In fact, the replacement frequency will vary depending on the car condition, road condition and shock absorber manufacturer.When driving a certain number of kilometers, we should take corresponding measures to ensure our driving safety.
- 20.000km: Please check your shock absorber
- 80.000km: Need to replace your shock absorber
- 100.000km: Please replace your shock absorber as soon as possibleWhen Should We Replace a New complete strut
?How to Inspect Your Suspension System
Identifying Signs of Suspension Issues

1.Pay attention if your ride begins to feel rougher.
- If you begin to feel more bumps and shakes as you drive, there may be an issue with your suspension.
- Sometimes a rougher ride will come coupled with audible squeaks as the suspension struggles to manage bumps in the road.

2.Take note if your vehicle pulls or squeaks during turns.
- Pay attention to how the vehicle reacts as you turn and compare it to your previous experiences in the vehicle to assess if there is an issue.
- Listen carefully to see if components of your suspension are squeaking under pressure.
- Every vehicle behaves a little differently while turning, so previous experiences with the vehicle can make assessing issues much easier.

3.Inspect the tread wear on your tires.
- A vehicle with negative camber will wear the inside of the tires more quickly.
- A vehicle with positive camber will wear the outsides of the tires more quickly.
- Camber is determined by your suspension components and wheel alignment.

4.Try braking abruptly to see if the nose dives as you stop.
- Your suspension should be able to support the weight of your vehicle and keep it fairly level during most situations.
- The front corner of your vehicle may also drop as you turn in the same direction. This is caused by the same failure.

5.Look to see if the vehicle sits level. With the vehicle parked, walk around it and visually assess how level it seems to be sitting. If one side of the car rests higher than the other, there are likely worn out or broken suspension components to blame.
- It is not uncommon for the front of the vehicle to ride slightly lower than the rear in many vehicles such as pickup trucks, but the vehicle should otherwise be level.

6.Pay attention to swaying and bouncing at low speeds.
· Your vehicle should be able to go over a bump and quickly regain composure at low speeds.
· If your vehicle sways back and forth after going over a bump, there is likely an issue with your suspension.
?Frequently Asked Questions
1.What shocks and struts do?
They keep the tires from bouncing which causes loss of road contact and they also keep the vehicle body weight from shifting and rolling which causes a loss of vehicle control and handling. You could say that their main job is to resist both tire and vehicle body motion. When shocks and struts are working well, the vehicle maintains traction on the road and has the optimum stability in every driving condition: stopping, turning, swerving, over bumps and potholes.
2.Can I Drive With a Broken Strut?
A strut is a suspension component that dampens an automobile's movements and prevents it from bouncing on its springs. Struts are often expensive to replace, but driving on a broken strut is not a good idea.
3.Can worn shocks or struts cause my new tires to wear unevenly?
Absolutely: shocks and struts provide damping force to control tire movement. When the tires move excessively, they develop a “cupping” wear pattern that damages the tire.
Other factors such as incorrect air pressure, worn suspension components or improperly aligned steering also causes uneven tire wear.
4.Shall we choose to replace the normal shock absorber or the direct shock absorber assembly?
From the perspective of the difficulty of replacement, it is difficult to replace an independent shock absorber, requires professional equipment and technicians, and has a high risk factor.
From the price point of view, the individual parts of the shock absorber kit are expensive to replace, while the shock absorber assembly contains all the parts of the shock absorber system, which is cheaper than replacing all the parts of the shock absorber.
5.What are the benefits after replacing the shock absorber?
Buffer conveys shock to drivers and passengers in order to improve ride comfort and reduce fatigue.
Extend body life, prevent spring damage and improve braking effect.
Suppressing the rapid vibration of the wheels while driving, preventing the tires from leaving the road surface and improving the driving stability.
Improving driving stability and adjustability, effectively conveying engine deflagration pressure to the ground, so as to save fuel costs.
6.What happens if I do not replace worn out shocks and struts?
Tires will wear out prematurely, the vehicle becomes more difficult to stop, steer and maintain tire contact with the road. The vehicle will be difficult to control and unpleasant to drive. The ability of the driver to make emergency maneuvers and stops is compromised.
7.Why should I buy a complete strut assembly instead of replacing the bare strut only?
The complete strut assembly includes a new spring, strut mount, dust bellows, and bump stop. It is about 50% faster and much safer to install a complete strut assembly compared to a bare strut. Generally, a new strut mount, dust bellows, and bumper are needed with the bare strut replacement. So, the complete strut assembly saves time, is cheaper than the bare strut plus purchasing the replacement strut mount kit and is much safer to install.
8.Why should I replace complete strut assembly in PAIR?
It is generally recommended to replace shocks and struts in pairs for the front or rear of the vehicle.This practice ensures that the repair schedule for the left and ride sides are harmonized.
?Notice
1. When installing a new shock absorber, you should pay attention to whether the model matches, please pay attention to the matching model list before purchasing, and confirm whether the left and right are correct.
2. Check the quality status of the new shock absorber, such as whether there is oil leakage in the appearance, etc., pay special attention to the surface of the piston not to be bumped.
3. Professional tools must be used during installation, and the shock absorber must not be forcibly installed.
4. Pay attention to whether the installation position between the shock absorber and the body and the car is correct.
5. During the assembly process, be sure to protect the surface of the piston rod, and avoid using tools to pull the piston rod or bump or scratch the piston rod, otherwise the shock absorber will leak oil.
6. All nuts should be new and tightened according to the specified parameters of the vehicle to ensure that the tightening torque of the connection part meets the specified parameters of the vehicle.
7. When tightening the nuts of the connecting part, it should be carried out in the natural state of the tire and meet the specified parameters of the vehicle.
?Installation Guideline

Step 1: Before you lift the vehicle, loosen lug nuts one full turn.
Step 2: Jack up vehicle and use jack stands for safety & remove the tire from the rotor.
Step 3: (Wheel alignment is necessary after strut replacement.) Marking the position of all the bolts will help keep the alignment close to original and save time aligning. Use a colored pencil to mark the old strut on the bolt.
Step 4: Use penetrating oil (such as WD40) to coat any rusted fasteners, let soak for approximately 1 hour.
Step 5: (Optional) While waiting for oil to soak, take this time to inspect all other components that may need replacement (brake pads, rotors, brake hoses, ball joints, CV boots, tie rod ends, bushings, sway bars, etc).
Step 6: Remove any brake line or wire attachments from the strut body. Do not disconnect brake lines (if possible)! Opening brake lines will require bleeding of the brake system.
Use extreme caution when removing brake lines from your struts, as any damage to your brake line can result in expensive and time consuming repairs.
Step 7: Remove sway bar attached to the strut assembly or control arm.
Step 8: Remove the tie rod (only if it attached to the body of the strut, if not leave it attached to the steering knuckle).
Step 9: Remove the strut to knuckle bolts at the bottom of the strut. On some vehicles, the brake caliper and rotor may need to be removed to gain access.
Step 10: Remove the upper mounting plate bolts located in the engine or trunk compartment. Do not remove the center retaining nut! It is not safe to unload the spring from the assembly in this position.
Step 11: Carefully remove the old strut assembly from the vehicle. Be very cautious not to let the strut "drop" down on your brake line, rotor or drum.
Step 12: Install the new Complete Strut Assembly in the reverse order as above (steps 11-6). Using an anti-seize compound on all fasteners is suggested.
Step 13: Carefully double check your work and make sure everything is tightened to manufacturers torque specifications.
Step 14: Replace the tire the rotor and tighten to manufacturers torque specifications.
Step 15: Slowly lower the vehicle down after removing the jack stands. Pay very close attention to any odd sounds when the vehicle is lowered onto the new Complete Strut Assemblies.
Step 16: It is very important that you immediately "road test" your vehicle right away to ensure that installation was done properly. Listen and feel for common signs of incorrect installation while driving slowly over speed bumps, rough road or potholes.
2011-2013 Toyota Corolla L4 1.8L; w/8 mm studs,Japan Built
| Item Specifics | |
|---|---|
| Brand | cfspeed-autoparts |
| Fitment Type | Direct Replacement |
| Manufacturer Part Number | C11935901APS |
| Adjustable | No |
| Greasable or Sealed | Sealed |
| Placement on Vehicle | Front |
| Quantity | 2 pieces |
| Part Type | Complete Strut Assembly |
| Platform | Universal |
| Interchange Part Number | 172751,172750,Full strut assembly,Driver Side Passenger side |
| Superseded Part Number | 2 Piece Set Complete Strut Assembly New Ready to Install |
| Included Hardware | None |
| OE Spec or Performance | OE Spec |
| Surface Finish | Powder Coat |
| Custom Bundle | Yes |
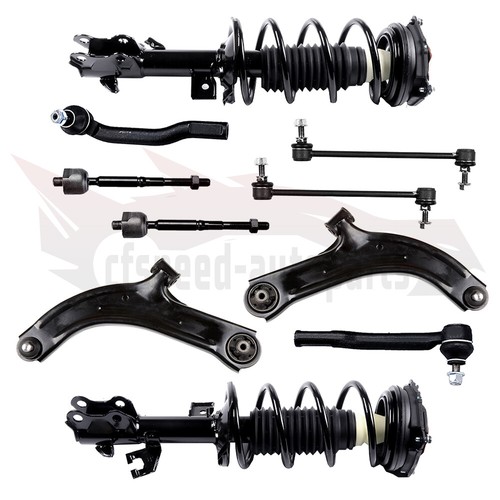
| Kit Parts Included | Shock Aborber,Boot,Bumper Kit,Spring Seat,Coil Spring,Isolator |
| Gas Charged Shock | Yes |
| Product Type | Complete Struts Assembly with Coil Spring |
| Modified Item | No |
| Size | Single Dimension(CM) 66.5(length)*39(width)*22(height) |
| Single Weight(KG) | 17.74 |
| Extended Length (in.) | 19.370 |
| Compressed Length (in.) | 12.360 |
- PayPal preferred.
- Payments are expected within 7 days after the last winning auction is closed; Otherwise Unpaid Item Dispute will be filed with eBay.
- Product will be shipped within 2 business days after full payment is received and verified. Delivery Time is about 3-7 business days to most of countries.
- All domestic orders will be shipped via USPS, UPS or FedEx from our US warehouse and usually arrives to your door in about 3-5 business days.
- We ship the package to your shipping address in eBay instead of the one in PayPal. Please tell us your shipping address if it is different from the one in eBay.
- The tracking number will be given for the customer to check the shipping status online (registered or faster service only).
- We are not responsible for any wrong or undeliverable addresses. Please verify and update your shipping address on eBay during checkout.
- We stand behind every product we sell.
- All of our brand new items come with a 60-Days money-back guarantee.
- We define the item as defective only if it doesn't function as described.
- It is the buyer's responsibility to understand the item description before bidding.
- We will replace the defective items, provided that they are in stock within the warranty period posted with the listing and the buyer return the original item and pay for the S&H cost for the replacement.
- We will refund the purchase price if the replacement is not available or buyer prefers a refund and send the original item back at his/her own cost.
- Shipping & handling cost are not refundable.
- Man-made damage by abuse or wrong operation is not covered by this warranty.
- No product liability insurance is assumed.
We are dedicated to provide high quality products and satisfied customer service to our sincerely customers, so if there's any questions or problems with our products or service, feel free to contact us please.
Cfspeed-autoparts
Shop Category Hot Item
Picture
New List Item
Help & Info Payment Policy Shipping Policy Return Policy FAQ About Us |
Pair Front LH&RH Complete Strut & Coil Spring Assembly For 2014-2019 Ford Escape
?Compatibility Chart 1, You can distinguish specific model of an automobile by VIN(Vehicle Identification Number). 2, VIN(Vehicle Identification Number) consists of total 17 English letters and arabic digits. 3, VIN does not include the letters I (i), O (o), and Q (q) (to avoid confusion with numerals 1 and 0).
?When Should We Replace a New complete strut Since the average annual distance of the car is 20,000 kilometers, and the shock absorber needs to be replaced in pairs, the replacement frequency is obtained every 4 years. In fact, the replacement frequency will vary depending on the car condition, road condition and shock absorber manufacturer.When driving a certain number of kilometers, we should take corresponding measures to ensure our driving safety.
?How to Inspect Your Suspension System Identifying Signs of Suspension Issues
1.Pay attention if your ride begins to feel rougher.
2.Take note if your vehicle pulls or squeaks during turns.
3.Inspect the tread wear on your tires.
4.Try braking abruptly to see if the nose dives as you stop.
5.Look to see if the vehicle sits level. With the vehicle parked, walk around it and visually assess how level it seems to be sitting. If one side of the car rests higher than the other, there are likely worn out or broken suspension components to blame.
6.Pay attention to swaying and bouncing at low speeds. · Your vehicle should be able to go over a bump and quickly regain composure at low speeds. · If your vehicle sways back and forth after going over a bump, there is likely an issue with your suspension.
?Frequently Asked Questions 1.What shocks and struts do? They keep the tires from bouncing which causes loss of road contact and they also keep the vehicle body weight from shifting and rolling which causes a loss of vehicle control and handling. You could say that their main job is to resist both tire and vehicle body motion. When shocks and struts are working well, the vehicle maintains traction on the road and has the optimum stability in every driving condition: stopping, turning, swerving, over bumps and potholes.
2.Can I Drive With a Broken Strut? A strut is a suspension component that dampens an automobile's movements and prevents it from bouncing on its springs. Struts are often expensive to replace, but driving on a broken strut is not a good idea.
3.Can worn shocks or struts cause my new tires to wear unevenly? Absolutely: shocks and struts provide damping force to control tire movement. When the tires move excessively, they develop a “cupping” wear pattern that damages the tire.
4.Shall we choose to replace the normal shock absorber or the direct shock absorber assembly? From the perspective of the difficulty of replacement, it is difficult to replace an independent shock absorber, requires professional equipment and technicians, and has a high risk factor.
5.What are the benefits after replacing the shock absorber? Buffer conveys shock to drivers and passengers in order to improve ride comfort and reduce fatigue.
6.What happens if I do not replace worn out shocks and struts? Tires will wear out prematurely, the vehicle becomes more difficult to stop, steer and maintain tire contact with the road. The vehicle will be difficult to control and unpleasant to drive. The ability of the driver to make emergency maneuvers and stops is compromised.
7.Why should I buy a complete strut assembly instead of replacing the bare strut only? The complete strut assembly includes a new spring, strut mount, dust bellows, and bump stop. It is about 50% faster and much safer to install a complete strut assembly compared to a bare strut. Generally, a new strut mount, dust bellows, and bumper are needed with the bare strut replacement. So, the complete strut assembly saves time, is cheaper than the bare strut plus purchasing the replacement strut mount kit and is much safer to install.
8.Why should I replace complete strut assembly in PAIR? It is generally recommended to replace shocks and struts in pairs for the front or rear of the vehicle.This practice ensures that the repair schedule for the left and ride sides are harmonized.
?Notice 1. When installing a new shock absorber, you should pay attention to whether the model matches, please pay attention to the matching model list before purchasing, and confirm whether the left and right are correct.
2. Check the quality status of the new shock absorber, such as whether there is oil leakage in the appearance, etc., pay special attention to the surface of the piston not to be bumped. 3. Professional tools must be used during installation, and the shock absorber must not be forcibly installed. 4. Pay attention to whether the installation position between the shock absorber and the body and the car is correct. 5. During the assembly process, be sure to protect the surface of the piston rod, and avoid using tools to pull the piston rod or bump or scratch the piston rod, otherwise the shock absorber will leak oil. 6. All nuts should be new and tightened according to the specified parameters of the vehicle to ensure that the tightening torque of the connection part meets the specified parameters of the vehicle. 7. When tightening the nuts of the connecting part, it should be carried out in the natural state of the tire and meet the specified parameters of the vehicle.
?Installation Guideline
Step 1: Before you lift the vehicle, loosen lug nuts one full turn. 2011-2013 Toyota Corolla L4 1.8L; w/8 mm studs,Japan Built
Payment
Shipping
Returns
WARNING: Cancer and Reproductive Harm - www.P65Warnings.ca.gov.
Contact Us
We are dedicated to provide high quality products and satisfied customer service to our sincerely customers, so if there's any questions or problems with our products or service, feel free to contact us please. All rights reserved. |
|||||||||||||||||||||||||||||||||||||||||||||||||||||||||||||||||||||||||||||||||||||||||||||||||||